
Adding users to Google Chat spaces on demand with Apps Script

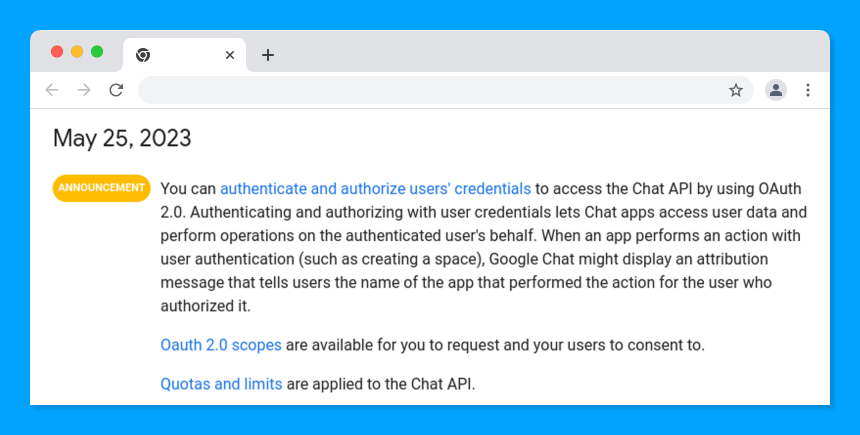
Just a few weeks ago, Google blessed the already existing, although somewhat limited, Google Chat API with the possibility to authenticate and authorize user’s credentials. Consequently, a bunch of new methods are now available to manage Chat spaces and user’s memberships 🎉.
This new methods have already been there for some months in the Developer Preview program, which unfortunately I could not apply to because educational institutions, using Google Workspace for Education, were excluded at the time.
Fortunately, the wait is over and all these features are now in GA (general availability), so it is just about time to start building with them.
Google Chat is in the spotlight. It is growing increasingly popular as an alternative to bulkier platforms like Slack or Microsoft Teams. In my school, for example, it has become, over the past two years, the preferred app for internal communication, so I am excited to finally build some automations on top of it to make my life as a stressed, full-time Head of Studies and ICT manager a tad easier.
In this first, introductory post, we’ll tackle a very straightforward albeit rather common use case that in my opinion makes a lot of sense in the context of the onboarding process of teachers in schools, or team members in any other business areas, of course.
In the second post we’ll delve deeper into some of the new API methods and will discuss a few yet to be addressed shortcomings and small quirks, that hopefully will be ironed out in the coming months.
I hope that both will help you understand the important role that user authentication plays in the Google Chat API, and also provide some insight into how it can actually be used to build useful automations.
But let’s get straight to the point. What are we building today?
In the coming sections, we’ll build a workflow for process managers to review and authorize membership requests sent by users willing to join a predefined set of chat spaces.
Stay with me for the following minutes to get to know all the moving parts involved in this automation and learn how to deploy it in your own Google Workspace domain. I’ll provide you with all the required instructions, fully functional codebase and even a sample Google Sheets template (let’s call it Google Chat Majordomo™ 😉).
TABLE OF CONTENTS
Meet the moving parts of Google Chat Majordomo
⚙️ Moving part #1:
We, teachers love Google Forms. Really.
They are easy to build and deploy and more than often just get the job done, avoiding the need for full-fledged Web Apps summoned with Apps Script spells. We’ll use one of those handy-dandy Google Forms to collect user’s requests, and call it a day as far as the user-facing front end is concerned.
⚙️ Moving part # 2:
You guessed it! Al those Google Form responses will be piped into a management Google spreadsheet (confirmed, edu people do also love them!). Managers will use this spreadsheet to comfortably assess the membership applications sent by users and simply grant access (or not) accordingly.
We’ll do our best to spice it up a little bit adding a friendly user interface, together with a settings dashboard to perform the mapping of user’s choices coming from the form to the actual chat spaces.
⚙️ Moving part #3:
And finally, we have the star of the show today, the Google Chat API, hit by (who else) our trusty and loyal Google Apps Script.
Fancy having a peek at how all these moving parts will work when put together? Your wish is granted!

Let's dive now into the actual implementation.
The Google Form
This has to be the shortest section in an Apps Script tutorial, ever.
The form is pretty simple, we’ll need:
- A multiple choice question for users to choose a chat space.
- A paragraph question, to motivate the application.
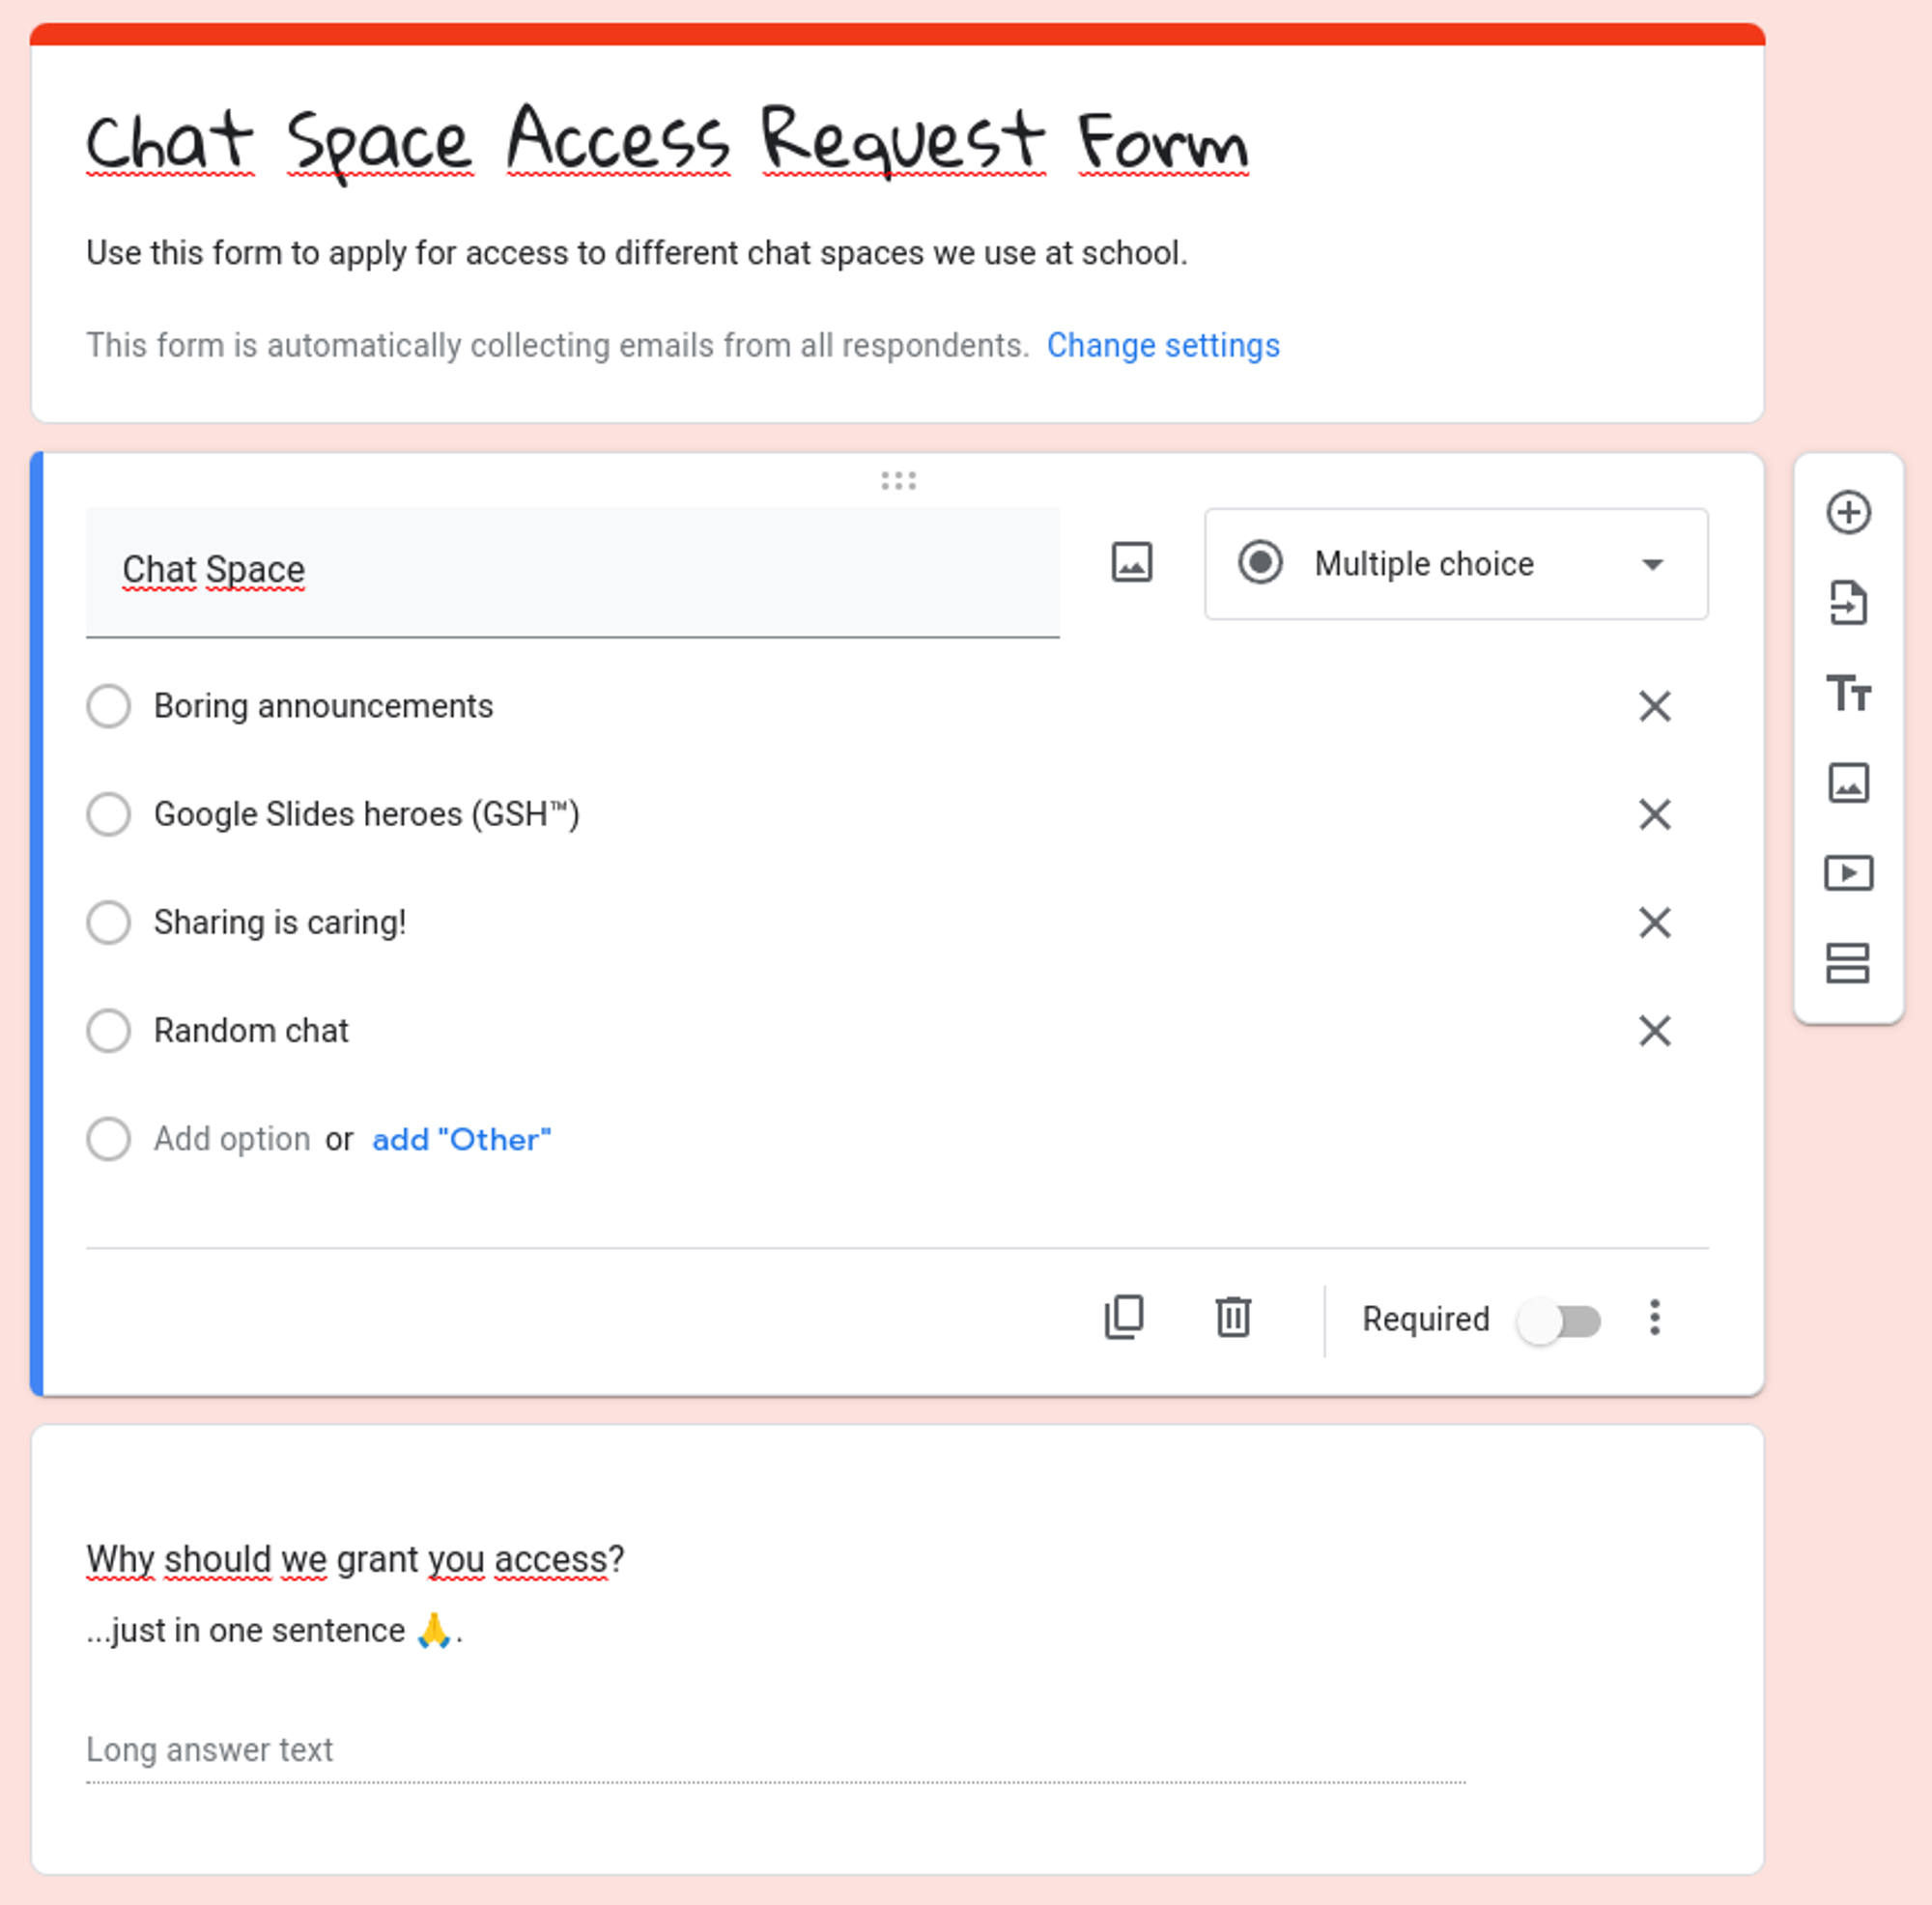
Respondents will be asked to sign in to Google and their emails will be automatically collected by the form.

And that’s a wrap! Please, find here the sample Google form used along this post:

The Google Spreadsheet
Let’s take some more time to unravel the three different worksheets that populate our management spreadsheet:
- Form responses
- Workflow settings
- Application review
Form responses
This is the no-frills worksheet where the responses coming from our form will be routed by Google’s helpful, little elves.
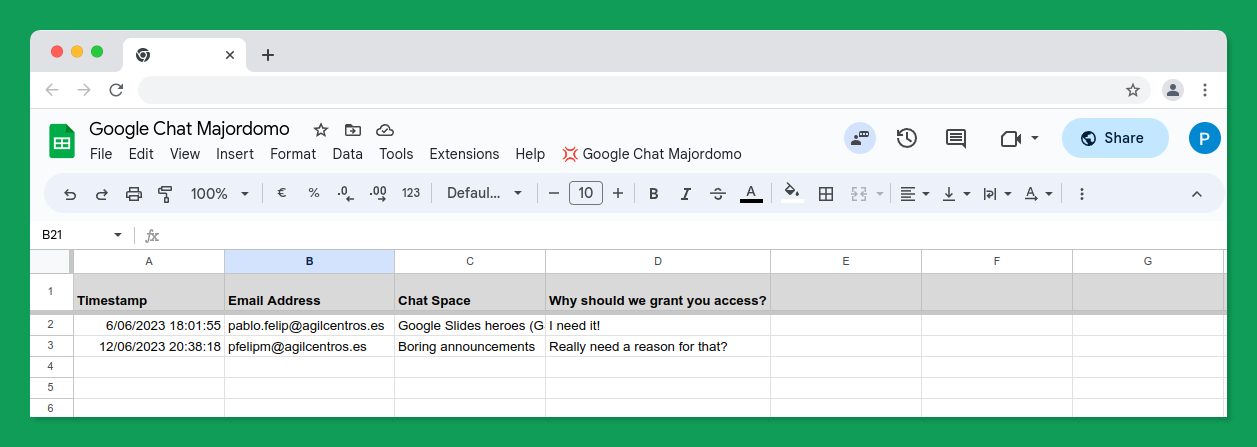
We need to provide the people responsible for reviewing access requests with some way to approve them (I heard checkbox coming from the public? 😏).
But, in my opinion, performing the collection and manipulation of data in a single worksheet is not such a great idea most of the time. Therefore, we’ll be using another worksheet for that, which will pull the required information from this one.
More of this in a couple of minutes.
(Workflow) Settings
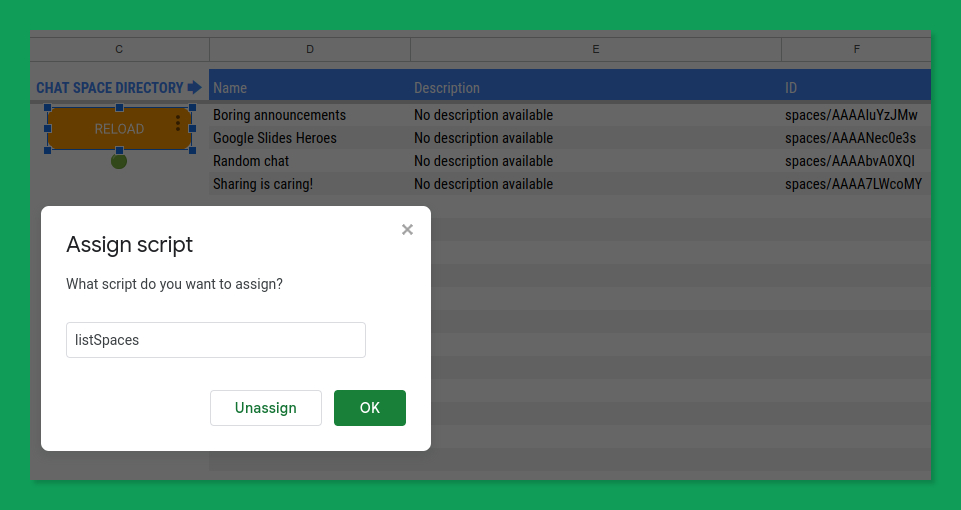
This worksheet lets the spreadsheet managers bind the different choices available in the chat space selection question of the previous form to their actual display names (displayName field), and their corresponding internal names (name field) exposed by the Chat API.
☝ For the sake of clarity, I am using a slightly different wording for these fields (properties, in fact) in the worksheet: Name for displayName and ID for name).
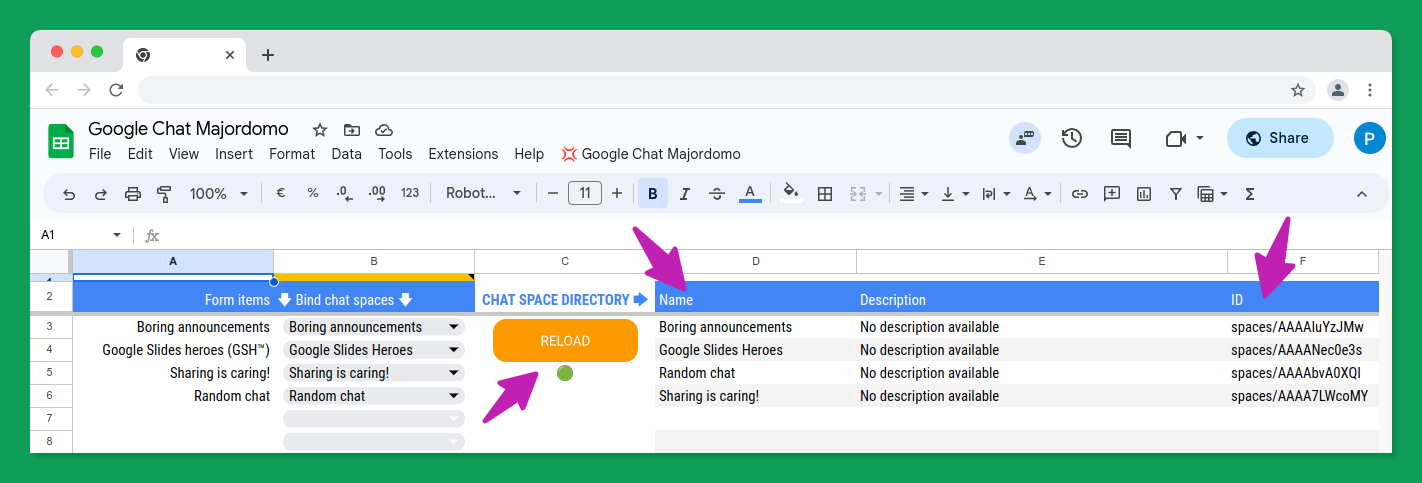
That rather flashy RELOAD button, when pressed, will kindly ask the Google Chat API for the list of chat spaces accessible to the active user and dump their display names, internal names and description fields in the D2:F range. The chat space descriptions are coming from the spaceDetails.description field of the aforementioned API resource.
The green 🟢 circle just below will turn gray ⚪ when the button is clicked and for as long as the API is busy fetching the requested information. Further clicking by anxious users will be ignored until the process is finished (not much of a problem in this use case, but good practice anyway).
☝️ The Google Chat API does not currently support listing all the chat spaces available in a Google Workspace domain, not even when it is a domain administrator, or super administrator who asks. To be honest, I find this a little bit underwhelming, considering that since May 3rd domain administrators can already manage all spaces in Google Chat through the Admin console. Hey, Google 👋, we would like to have an Admin API for Chat (thanks) 🙏.
The table in A2:B is used by request reviewers to map form items to specific chat spaces. In this way, we can use longer, more meaningful chat space names in the form, for example, Google Slides heroes (GSH™) instead of just Google Slides Heroes. For that purpose, data validation has been applied to B3:3, which will display the list of unique chat space names pulled from D3:D.
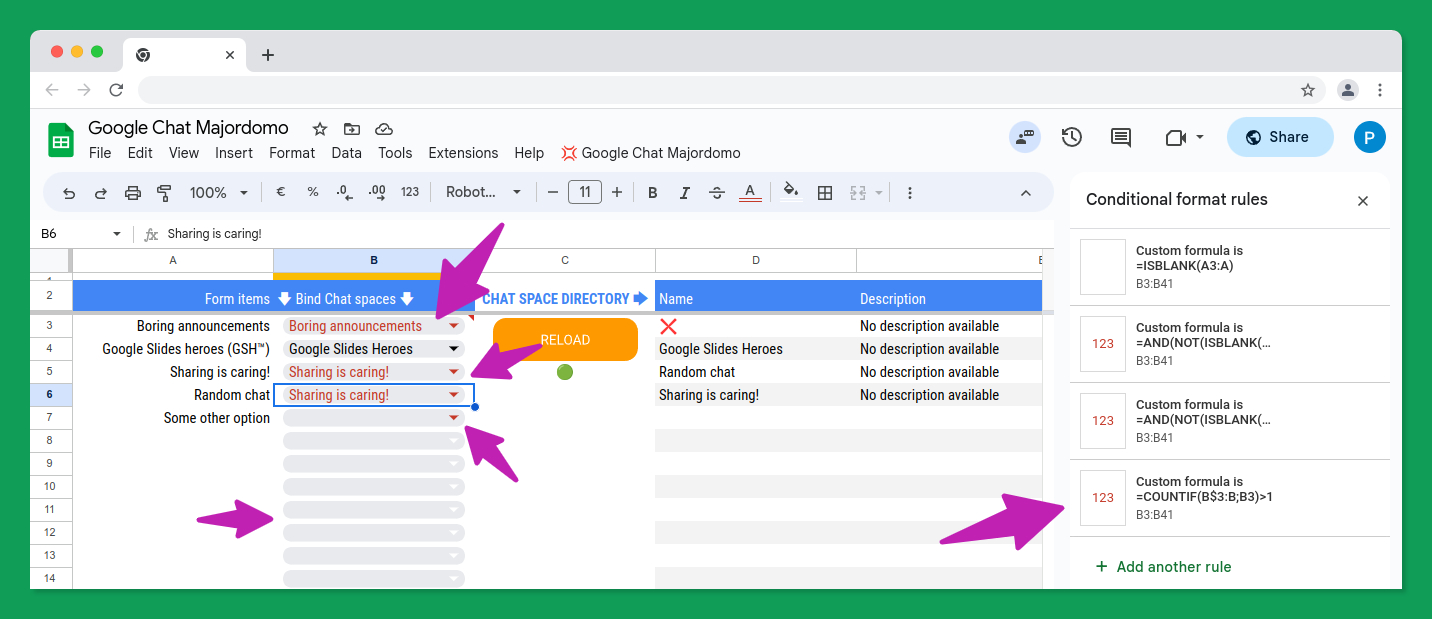
Furthermore, 🎨 conditional formatting has been applied to good measure in B3:B to provide visual feedback when any of these conditions arise:
- Corresponding cell in column A is blank (empty row) → apply text color: white.
- Cell is blank and the corresponding cell in column A is not (no mapping) → apply text color: red.
- Cell is not blank and there is no match in D2:F or there is one but its ID field is blank → apply text color: red.
- A single chat space name has been assigned to more that one form item → apply text color: red.
Application review
In this worksheet is where managers will actually review applications and grant access to chat spaces to approved users.
First, a formula in A2 pulls requests from the Form responses worksheet and displays them in reverse-chronological order to avoid unnecessary scrolling.
=QUERY('Form responses'!A:D;"ORDER BY A DESC")We can find here those anticipated checkboxes that will be used to approve requests (column E), next to a log column (F), as well as a button —and its familiar status indicator— to process the approved requests through the Chat API.
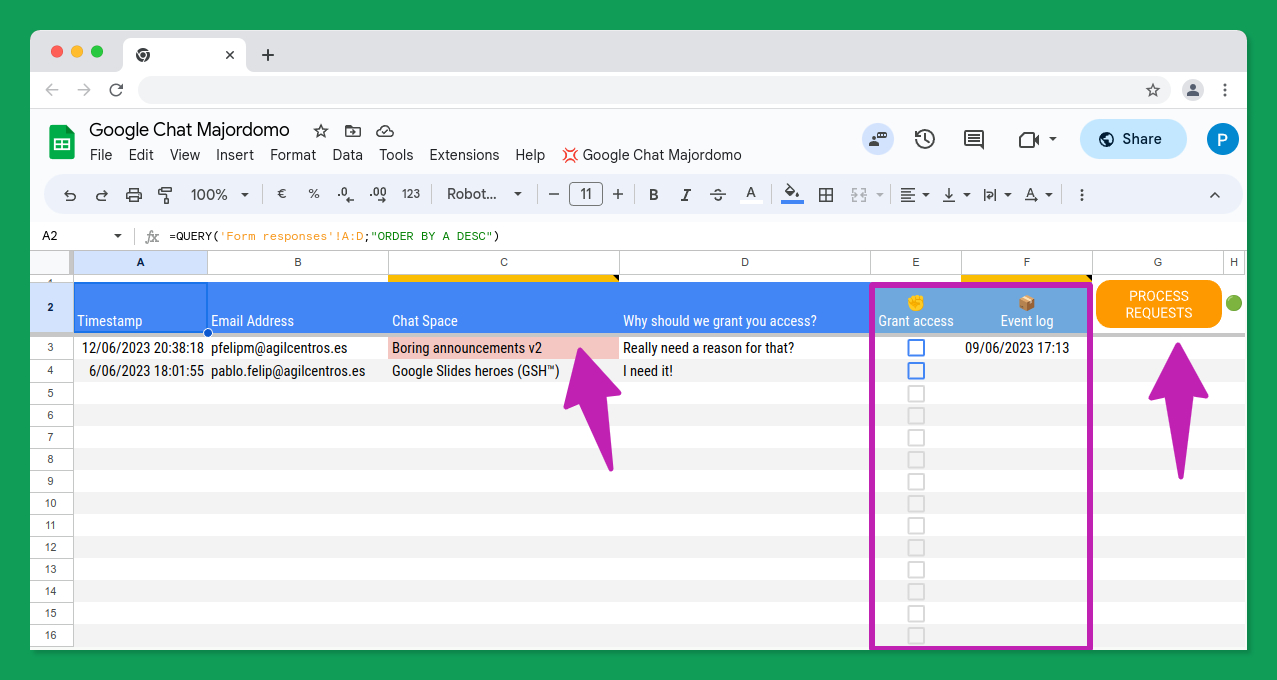
Again, conditional formatting has been used:
- | C3:C | The requested chat space can’t be found in settings → apply fill color: red.
- | E3:E | No time stamp in column A (empty row) → apply checkbox color: light gray.
- | F3:F | An error has been encountered when adding a user to a space → apply fill color: red.
☝ Right, you are using Apps Script to grant superpowers to your spreadsheets! So what? That does not imply to neglect all those great features of Google Sheets, such as data validation or conditional formatting (and many more!) to make the tools you build more user-friendly and less error-prone, especially when spreadsheets are being used as a cheap user interface.
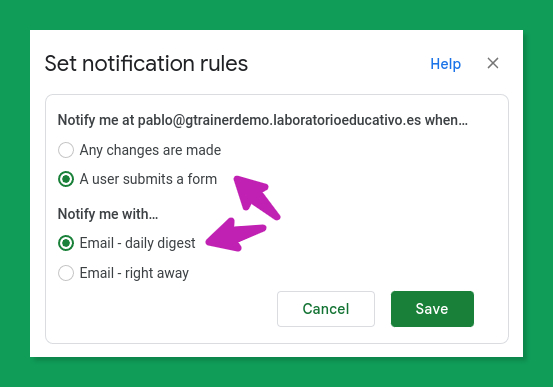
The people in charge of deciding which applications to approve could easily use the Tools → Notification settings → Edit notifications feature of Google Sheets to enjoy a crude but perfectly functional alert system.
Please, check all these details in this sample spreadsheet:

The Apps Script code
The codebase of Google Chat Majordomo comprises five files:
| File | Contents |
| appsscript.json | The standard Apps Script manifest file. We'll set authorization scopes in an explicit manner inside because... just keep reading 🙂. |
| Base.gs | Global constants and custom menu function handlers. |
| List Spaces.gs | Contains the function that gets the list of spaces the current user has access to and writes their names, descriptions and IDs in the spreadsheet. |
| Process requests.gs | Contains the function that adds users to chat spaces, if access has been granted. |
| About.html | Some bits of templated HTML to build a custom, informative dialog to explain what this automation does. We'll simply skip it, as it is rather irrelevant to the purpose of this tutorial. |
Some words about the Google Chat apps before we start looking into the code.
There are different types of Google Chat applications you can build, and also different types of authorization requirements, depending on the tasks you aim to perform. You may want to learn about them in this foundational article in the Google Chat documentation center for developers before getting on with this post.
It is important to highlight that we are not building a chat agent that interacts with users in a chat space, but a tool that performs management actions on behalf of users that run the script and pings some Google Chat API endpoints asynchronously to achieve so.
As the Google Chat REST API currently has no wrapper in the form of a convenient Apps Script advanced service (and it seems it is not getting one anytime soon), we'll have to consume it using the well-known Apps Script UrlFetchApp class.
More specifically, the kind of tasks we are interested in, such as listing spaces or managing their members, require something called user authentication.
All in all, our Apps Script code will need to obtain a properly scoped authorization token from the API before calling any of its methods. The recommended way of doing it is resorting to the wildly popular OAuth2 library, but we'll take some shortcuts to accomplish it in a somewhat simpler way.
Okay, now we already know the fine print, we are ready to move on.
Choosing the right scopes (appsscript.json)
We'll be interacting with the Google Chat API using Apps Script, hence we can skip the OAuth2 library altogether. In this way, we avoid all the usual hassle of obtaining an OAuth client ID and secret from the GCP console, setting the redirect URI, etc.
Instead of that, we'll just declare the required authorization scopes inside the oauthScopes section of the manifest file of our Apps Script project (lines 14 - 21).
{
  "timeZone": "Europe/Madrid",
  "dependencies": {
    "enabledAdvancedServices": [
      {
        "userSymbol": "AdminDirectory",
        "version": "directory_v1",
        "serviceId": "admin"
      }
    ]
  },
  "exceptionLogging": "STACKDRIVER",
  "runtimeVersion": "V8",
  "oauthScopes": [
    "https://www.googleapis.com/auth/chat.spaces",
    "https://www.googleapis.com/auth/chat.memberships",
    "https://www.googleapis.com/auth/script.external_request",
    "https://www.googleapis.com/auth/spreadsheets.currentonly",
    "https://www.googleapis.com/auth/admin.directory.user.readonly",
    "https://www.googleapis.com/auth/script.container.ui"
  ]
}
☝ There is caveat, though: We will have to be careful enough to do it not only for the scopes related to the Google Chat API but also for the rest of the scopes used by our script, even those required by the more common built-in or advanced Google services provided by the Apps Script platform. Yes, the helpful automatic scoping provided by the Apps Script IDE was nice, but a price had to be paid to bypass the manual OAuth authorization workflow.
| Scope | Used to... |
| /chat.spaces | Get the list of chat spaces. |
| /chat.memberships | Add members to a space. |
| /script.external_request | Perform calls to the Google Chat API. |
| /spreadsheets.currentonly | Access the current spreadsheet data. |
| /admin.directory.user.readonly | List users in the Workspace domain. |
| /script.container.ui | Show the "about" dialogue. |
Helper code (Base.gs)
This file contains little to write home about:
- Some global constants to parameterize the script (lines 14 - 38).
- The
onOpen()function that builds the custom menu (lines 40 - 50). - The
m_about()function that is invoked with the 💡 About command in the custom menu (lines 52 - 62). We won't need more items inside the custom menu because the functions that take care of listing chat spaces and adding new members will be triggered by a couple of native Google Sheets buttons.
/**
* Google Chat Majordomo is a simple Apps Script automation based on spreadsheets,
* created for educational purposes to demonstrate how Google Chat API user authentication
* methods can be leveraged. This tool implements a workflow that allows administrators
* to review and approve requests for membership in different Google Chat spaces, collected
* with Google Forms.
*
* Copyright (C) Pablo Felip (@pfelipm) v1.0 JUN 2023.
* Distributed under a GNU GPL v3 licence.
*
* @OnlyCurrentDoc
*/
const PARAMS = {
version: 'Version: 1.0 (june 2023)',
appName: 'Google Chat Majordomo',
icon: '💢',
toastTitle: '💢 Chat Majordomo says:',
endpoints: {
listSpaces: 'https://chat.googleapis.com/v1/spaces',
spacesMembersCreate: 'https://chat.googleapis.com/v1'
},
sheets: {
review: {
name: 'Application review', dataRow: 3, colTimeStamp: 1, colEmail: 2, colSpace: 3, colCheck: 5, colLog: 6
},
settings: {
name: 'Settings',
formSpaceTable: 'A3:B', colFormItem: 1, colFormSpaceName: 2,
spaceTable: 'D3:F', colSpaceName: 1, colSpaceId: 3,
},
},
buttons: {
leds: { process: 'H2', reload: 'C5' },
status: { on: '🟢', off: '⚪' }
},
chatSpaceDescriptionMaxLength: 60,
};
/**
* Builds custom menu. */
function onOpen() {
const ui = SpreadsheetApp.getUi();
ui.createMenu(`${PARAMS.icon} ${PARAMS.appName}`)
.addItem(`💡 About ${PARAMS.appName}`, 'm_about')
.addToUi();
}
/**
* Shows the about this app dialog.
*/
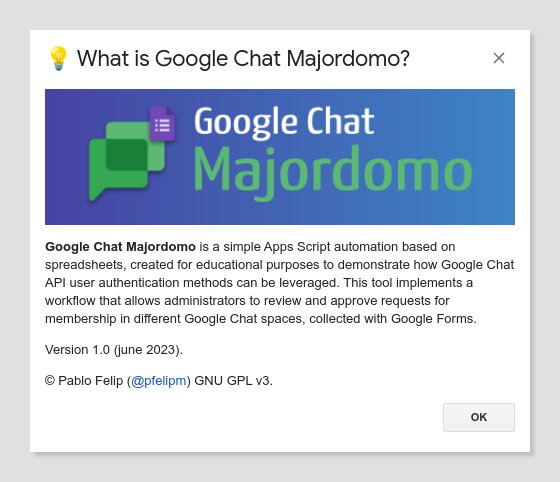
function m_about() {
const panel = HtmlService.createTemplateFromFile('About');
panel.version = PARAMS.version;
panel.appName = PARAMS.appName;
SpreadsheetApp.getUi().showModalDialog(panel.evaluate().setWidth(470).setHeight(320), `💡 What is ${PARAMS.appName}?`);
}
Listing chat spaces (List Spaces.gs)
The single listSpaces() function fetches the display names, internal (API) names and descriptions of all chat spaces that the current user can access using the spaces.list method of the Google Chat API and writes them in the Settings worksheet.
This function is triggered by the RELOAD button we already know.
/**
* Gets the list of spaces the current user has access to and writes
* names, descriptions and IDs in the spreadsheet.
*/
function listSpaces() {
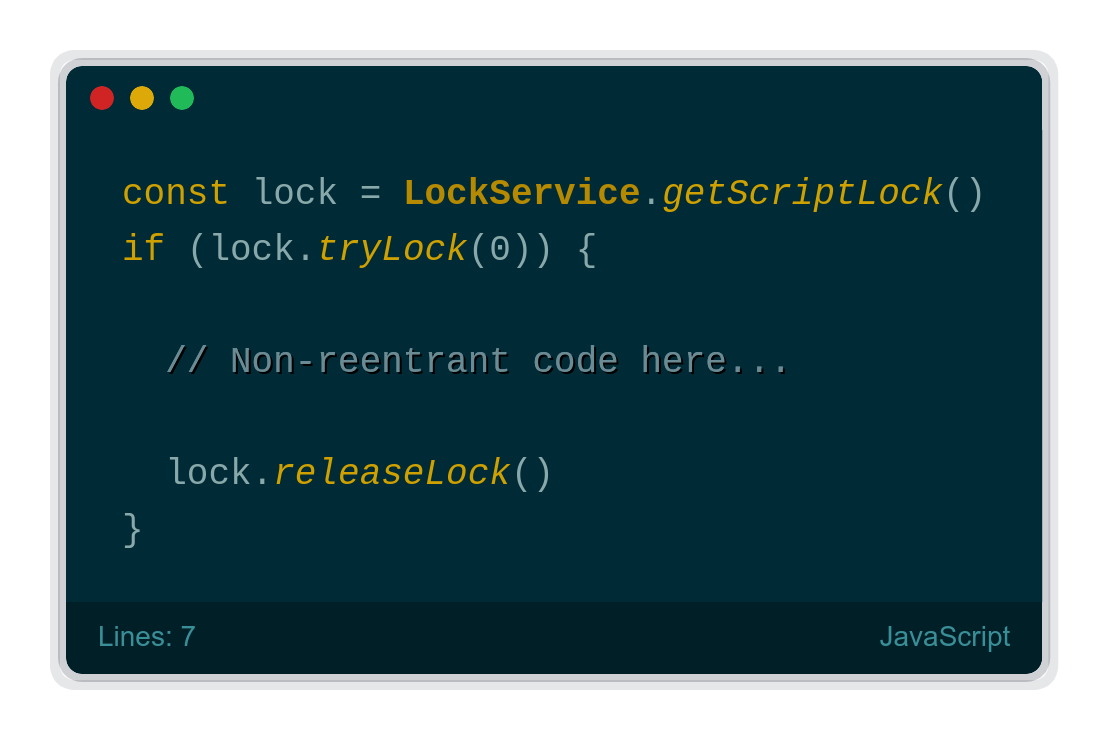
// Prevents concurrent runs
const lock = LockService.getScriptLock();
if (lock.tryLock(0)) {
const ss = SpreadsheetApp.getActive();
const s = ss.getSheetByName(PARAMS.sheets.settings.name);
let result = [];
let pageToken;
// Signals start of process
s.getRange(PARAMS.buttons.leds.reload).setValue(PARAMS.buttons.status.off);
SpreadsheetApp.flush();
ss.toast('Updating list of Chat spaces...', PARAMS.toastTitle, -1);
Consecutive button clicks are ignored thanks to the Lock Service. Even though concurrent runs would not pose a problem in this situation as the API endpoint is idempotent, I find this constitutes a good practice that takes a meager two or three lines of code to implement.
Lines 17 - 18 take care of changing the green indicator circle beneath the button into a gray one to visually mark that the button is disabled. If you'd rather change the appearance of the button itself, you might want to have a look at this rather old code snippet of mine.
☝ This script is not running inside a Google Workspace or Editor add-on, otherwise a document lock would have been a wiser choice.
Next, lines 21 - 37 take care of pinging the API to get enumerate the available chat spaces in the result array. As you can see, the spaces.list API method returns a paginated response, so we'll keep asking for more spaces until the nextPageToken field of the response is empty.
    // Pings the Chat API to get spaces using API
    do {
      const response = UrlFetchApp.fetch(
    	// Double quotes (") are not valid in the URI, either replace with %22 or use encodeURI()
        encodeURI(`${PARAMS.endpoints.listSpaces}?filter=spaceType="SPACE"${pageToken ? `&pageToken=${pageToken}` : ''}`),
        {
          method: 'GET',
          muteHttpExceptions: true,
          headers: { Authorization: 'Bearer ' + ScriptApp.getOAuthToken() }
        }
      );
      if (response.getResponseCode() == 200) {
        const payload = JSON.parse(response.getContentText());
        result = result.concat(payload.spaces);
        pageToken = payload.nextPageToken;
      } else return response.getResponseCode();
    } while (pageToken);
There are two important things to note in this section of the code:
1️⃣ Notice how the authorization token is obtained from the Script Service (line 29). You may not need to wrangle with the OAuth2 library to use a Google API from Apps Script. Just put the proper authorization scopes in their due place inside the appsscript.json file and call its getOAuthToken() method.
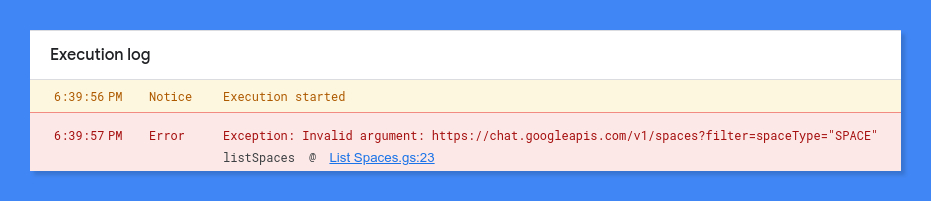
headers: { Authorization: 'Bearer ' + ScriptApp.getOAuthToken() }2️⃣ Take a look at the encodeURI() JavaScript function in line 25. It is used to properly encode the endpoint URI string, which contains double quotes in the filter query parameter to get only spaces that are of the SPACE type (i.e., neither group chats nor direct messages).
?filter=spaceType="SPACE"
Finally, lines 39 - 49 build a sorted 2D array to store the information we want to extract from each chat space: name, displayName, and spaceDetails.description fields (isn't object destructuring beautiful?)...
    // Gets only the desired fields from the result array using nested destructuring and sorts spaces by name
    const spacesData = result.map(space => {
      const { name, displayName, spaceDetails: { description = 'No description available' } = '' } = space;
      return [
        displayName,
        description.length > PARAMS.chatSpaceDescriptionMaxLength - 3 ? `${description.slice(0, 60)}...` : description,
        // Space ID, actually
        name
      ];
    // Sorts by displayName
    }).sort((space1, space2) => space1[0].localeCompare(space2[0]));

    // Writes data, if any, in table (directory) of spaces
    if (spacesData.length > 0) {
      s.getRange(PARAMS.sheets.settings.spaceTable)
        .clearContent()
        .offset(0, 0, spacesData.length, spacesData[0].length).setValues(spacesData);

      // Signals successful end of process
      ss.toast('Done!', PARAMS.toastTitle);
    }

    // Restores the green indicator circle
    s.getRange(PARAMS.buttons.leds.reload).setValue(PARAMS.buttons.status.on);
    // Unnecessary, but recommended
    SpreadsheetApp.flush();
    lock.releaseLock();

  }

}
...whereas lines 51 - 69 dump the contents of that information array, if not empty, into the D3:F range, signal the end of the process, and —although unnecessary— release the lock.
☝ The data extraction loop in lines 39 - 49 (save for the sorting part) could have been easily built into the previous do...while loop that pages through the API responses, but I preferred to keep both separate to emphasize that they serve different purposes.
Adding members to chat spaces (Process requests.gs)
This code section is responsible for adding new members to the requested chat spaces, if access has been granted by marking the appropriate checkbox.
The processRequests() function is also triggered by clicking a button, so we'll take the same precautions regarding multiple concurrent executions (lines 8 - 9).
The code in this section takes the requests in the Application review worksheet and proceeds if any of them has a check mark in the Grant access column.
/**
 * Adds users to chat spaces, if granted access.
 */
function processRequests() {

  // Prevents concurrent runs
  const lock = LockService.getScriptLock()
  if (lock.tryLock(0)) {
8 -
    const ss = SpreadsheetApp.getActive();
    const s = ss.getSheetByName(PARAMS.sheets.review.name);
    let usersAdded = 0;

    const requests = s.getDataRange().getValues().slice(PARAMS.sheets.review.dataRow - 1);
    const numRequests = requests.filter(row => row[PARAMS.sheets.review.colTimeStamp - 1] && row[PARAMS.sheets.review.colCheck - 1]).length;
    if (numRequests == 0) ss.toast('No pending approved requests!', PARAMS.toastTitle);
Then, both the directory of spaces and the table that maps form items to chat spaces are read from the Settings worksheet.
    else {

      // Let's add users to spaces

      // Signals start of process
      s.getRange(PARAMS.buttons.leds.process).setValue(PARAMS.buttons.status.off);
      SpreadsheetApp.flush();
      ss.toast('Adding approved users to Chat spaces ...', PARAMS.toastTitle, -1);

      // Reads form item to Chat space name table
      const settingsSheet = SpreadsheetApp.getActive().getSheetByName(PARAMS.sheets.settings.name);
      const formSpaceTableValues = settingsSheet.getRange(PARAMS.sheets.settings.formSpaceTable).getValues();

      // Reads Chat space name to Chat space ID table
      const spaceTableValues = settingsSheet.getRange(PARAMS.sheets.settings.spaceTable).getValues();
The main loop (lines 33 - 85) iterates through all the requests that need to be fulfilled and, for each of them:
      // Loops over the requests and filter out those that should not be processed
      requests.forEach((request, index, array) => {

        const email = request[PARAMS.sheets.review.colEmail - 1];
        const chatSpaceItem = request[PARAMS.sheets.review.colSpace - 1];
        const check = request[PARAMS.sheets.review.colCheck - 1];
        if (check) {

          const chatSpaceName = formSpaceTableValues
            .find(item => item[PARAMS.sheets.settings.colFormItem - 1] == chatSpaceItem)?.[PARAMS.sheets.settings.colFormSpaceName - 1];
          const chatSpaceId = spaceTableValues
            .find(chatSpace => chatSpace[PARAMS.sheets.settings.colSpaceName - 1] == chatSpaceName)?.[PARAMS.sheets.settings.colSpaceId - 1];
- Fetches the chat space name that is mapped to the chosen form item (lines 41 - 42).
- Finds out the API name (ID) of the space (lines 43 - 44).
If the ID can be determined the process continues; if not, the error will be registered for later reporting in the Event log column of the Application review worksheet.
Now we a are getting to the gist of this.
To add a new user to a chat space we'll use the spaces.members.create API method. For this we need to pass it a Membership resource, and inside of it a member or groupMember field (the latter still in Developer Preview as of June 17th). The rest of the resource fields are assigned by the server after serving the request.
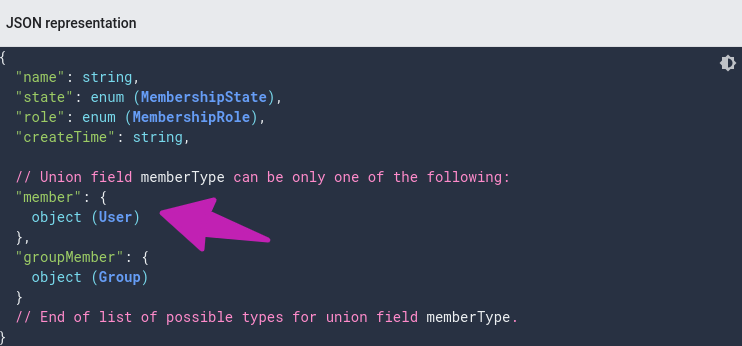
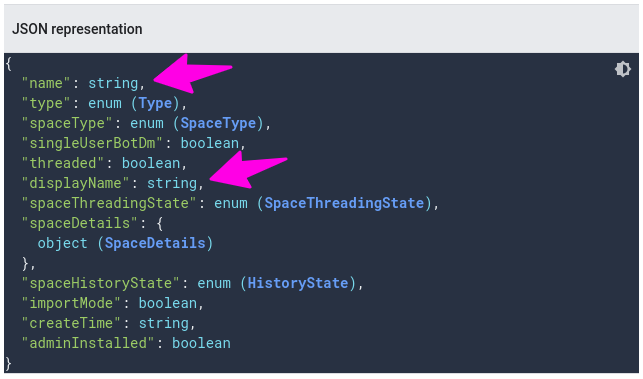
Let's keep on digging into the Google Chat API resources. A User object looks like this:
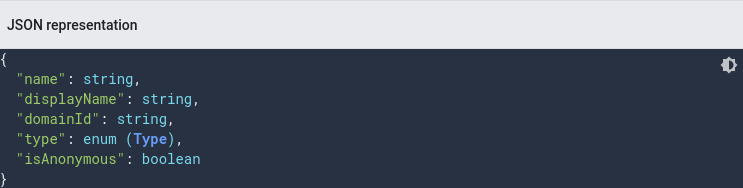
But wait a minute: The only information we know about the user requesting to join a space is the email address!
According to the documentation for the User object, the name field holds the same user identifier as the id field of a User resource in the Admin SDK Directory API, with a user/ prefix. Therefore, we will resort to this API (through its handy Apps Script advanced service this time) to get the userId (line 53):
const userId = AdminDirectory.Users.get(
  email, { projection: 'BASIC', viewType: 'domain_public' }
).id;
Once the the user ID has been obtained, a call to the spaces.members.create API method is performed in lines 55 - 65.
☝ The People API probably could be used to get a valid user, too, but the path down that route does not seem so obvious at first glance.
If the API call fails, an error is registered (line 68), otherwise, if the new membership is created successfully, the checkbox is cleared and a timestamp is registered in the Event log column for later reporting (lines 69 - 74).
          // Do we have a match?
          if (!chatSpaceId) array[index][PARAMS.sheets.review.colLog - 1] = `Can't find space!`;
		  else {

            try {

              // Gets user's id using the Directory API
              const userId = AdminDirectory.Users.get(email, { projection: 'BASIC', viewType: 'domain_public' }).id;

              // Adds user to space (no previous membership check needed)
              const response = UrlFetchApp.fetch(
                `${PARAMS.endpoints.spacesMembersCreate}/${chatSpaceId}/members`,
                {
                  method: 'POST',
                  muteHttpExceptions: true,
                  headers: { Authorization: 'Bearer ' + ScriptApp.getOAuthToken() },
                  contentType: 'application/json',
                  payload: JSON.stringify({ member: { name: `users/${userId}`, type: 'HUMAN' } })
 			    }
              );

              // Won't throw an error if user was already a member (unlike AdminDirectory.Members.insert!)
              if (response.getResponseCode() != 200) array[index][PARAMS.sheets.review.colLog - 1] = `Can't add user to space!`;
              else {
                // Unchecks request and write timestamp in log
                usersAdded++;
                array[index][PARAMS.sheets.review.colCheck -1] = false;
                array[index][PARAMS.sheets.review.colLog - 1] =  Utilities.formatDate(new Date(), Session.getScriptTimeZone(), 'dd/MM/yyyy HH:mm');
              }

            } catch (e) {
              // This will happen if requesting user is external to the domain
              array[index][PARAMS.sheets.review.colLog - 1] = `Can't find user!`;
            }

          }

        }

      });
We are assuming all the time that users requesting access to a chat space are internal domain users, which I think is a fair enough assumption, but just in case, we'll try-catch the whole section and log errors accordingly (lines 76 - 79).
Finally, the checkbox and log columns are written back to the spreadsheet in lines 87 - 107, the user is notified that the process is complete and the execution lock is released.
      // Writes back the value of all checkboxes
      s.getRange(PARAMS.sheets.review.dataRow, PARAMS.sheets.review.colCheck, requests.length, 1)
        .setValues(requests.map(request => [request[PARAMS.sheets.review.colCheck - 1]]));

      // Writes log column to sheet, could be done in one step together with checkboxes, but columns could not be next to each other
      s.getRange(PARAMS.sheets.review.dataRow, PARAMS.sheets.review.colLog, requests.length, 1)
        .setValues(requests.map(request => [request[PARAMS.sheets.review.colLog - 1]]));

      // Signals end of process
      ss.toast(`Done! (added ${usersAdded} 👤)`, PARAMS.toastTitle);
      s.getRange(PARAMS.buttons.leds.process).setValue(PARAMS.buttons.status.on);

      // Unnecessary, but recommended
      SpreadsheetApp.flush();
      lock.releaseLock();

    }

  }

}
As we saw earlier, this process runs manually at the flick of a button, but it would be pretty easy to set up a time trigger to run it at a set interval, daily, for instance, to process new approved requests in batch mode (Apps Script IDE → ⏰ Triggers → +Add Trigger).

You can find all the codebase we have just reviewed inside the previous example Google spreadsheet or in this GitHub repo.
Deploying Google Chat Majordomo
Unfortunately, Chat apps can't be shared and reused as easily as more common editor-bound or standalone scripts unless they are properly published, which we won't bother to do for this simple proof-of-concept automation.
⚠️ Please, bear that the Google Chat API is only available to Google Workspace users. Even though you can enable its API in consumer accounts, you won't get much further than that.
Let's walk you through the step-by-step process of getting your own working copy of Google Chat Majordomo.
Cloning the sample spreadsheet
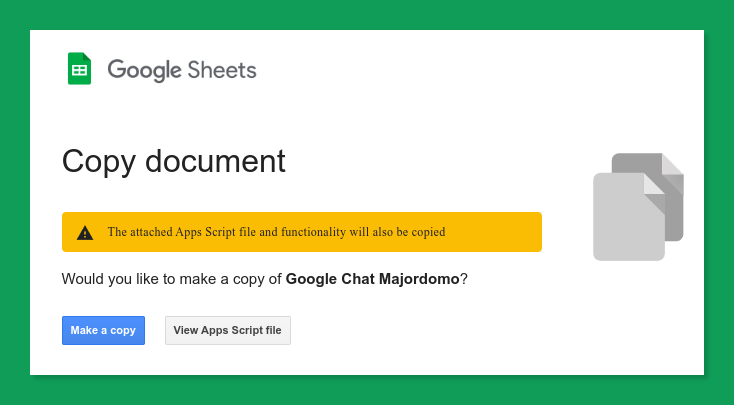
1️⃣ Make a copy of the sample spreadsheet. You'll also get a clone of the sample request form, already attached to the spreadsheet.
Creating a GCP project
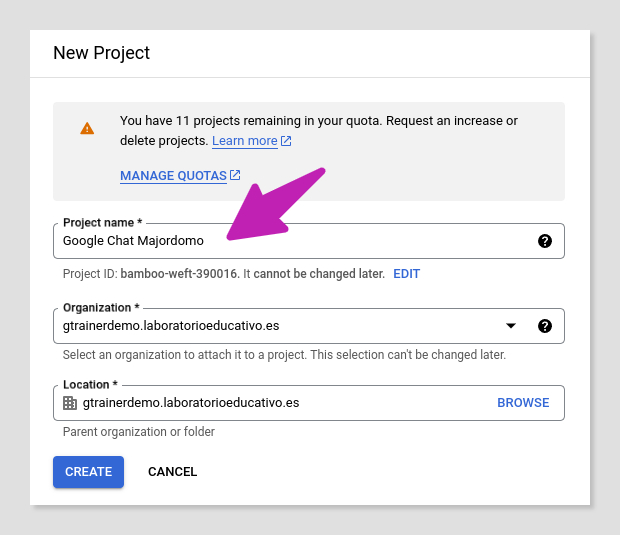
2️⃣ To use the Google Chat API we need to move our Apps Script project from the default Google Cloud Platform Project to a standard project. Use this link to open the Google Cloud Platform Console and create a new project. Input whatever project name you fancy an hit the CREATE button.
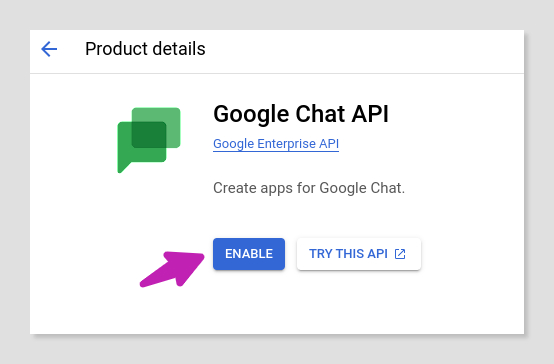
Enabling the Google Chat API
3️⃣ Now we need to enable the Google Chat API. Head to the section named APIs & Services → Library of the GCP console, use the search box to find the Google Chat API...
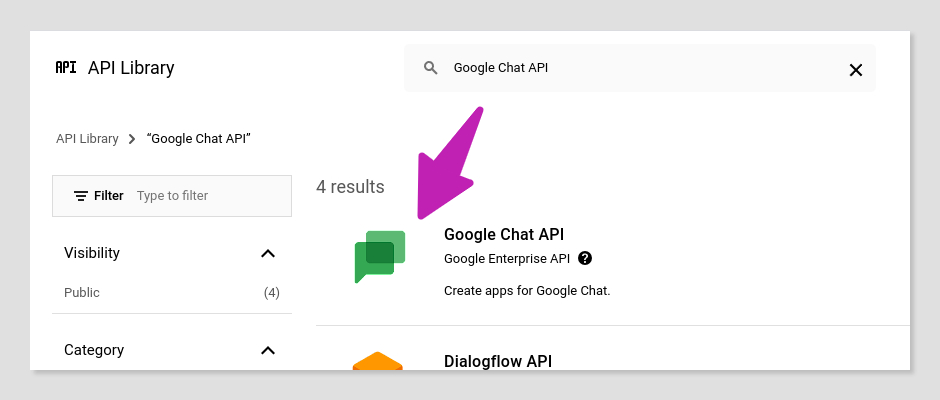
... and enable it.
Setting up the Google Chat API
4️⃣ The Chat API requires some additional configuration before we can send requests to it. Move to its CONFIGURATION tab and type the app name, avatar URL, and description (even though they will serve no purpose in our app). You may want to enter the following suggested value for the URL:
https://developers.google.com/chat/images/quickstart-app-avatar.png
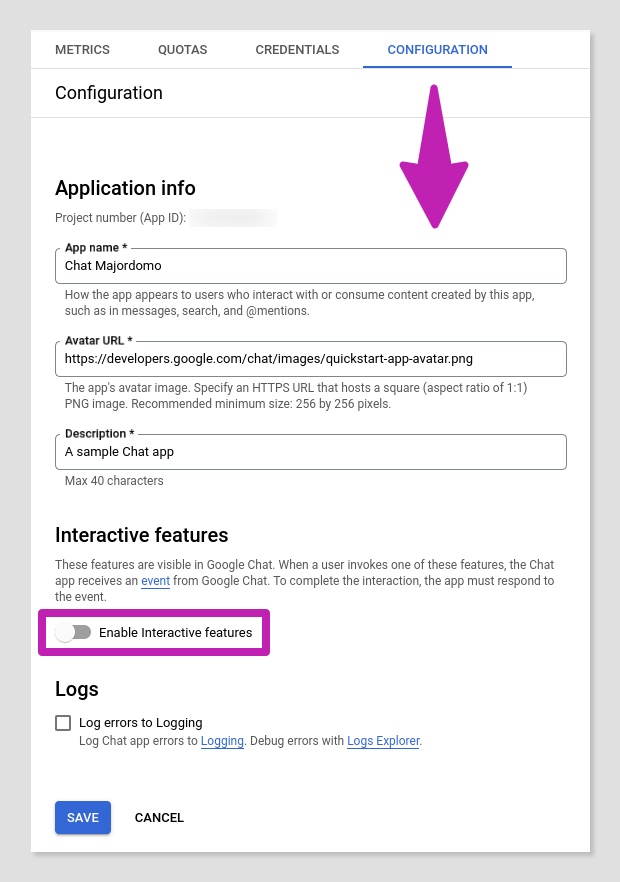
Make sure to keep the Interactive features disabled, as we won't need them for this kind of Chat app, and hit the SAVE button. Upon reloading the page, you should get visual confirmation that your Chat app is live!
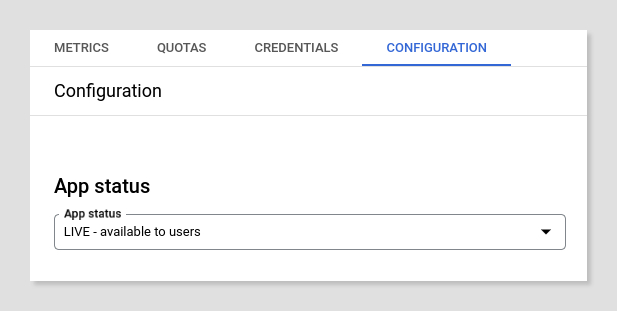
But the end is still a bit way off, my friend.
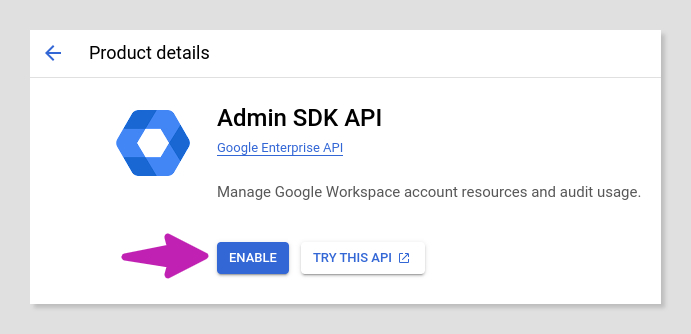
Enabling the Admin SDK API
5️⃣ If you are using a standard GCP project, you will also need to enable the appropriate APIs for the Apps Script advanced services that the script uses.
Our automation relies on the Admin SDK Directory API to determine the valid user IDs needed to create new memberships in Chat spaces, so follow the steps described in step 3 and enable the Admin SDK API accordingly.
Preparing a minimal OAuth consent screen
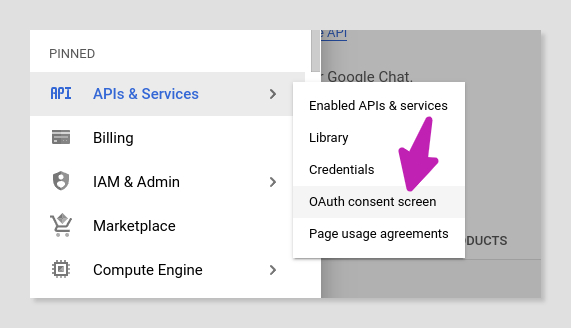
6️⃣ We are not set yet, we still have to perform a minimal setup of the OAuth consent screen of our project before we can use it. For that, proceed to APIs & Services → OAuth consent screen.
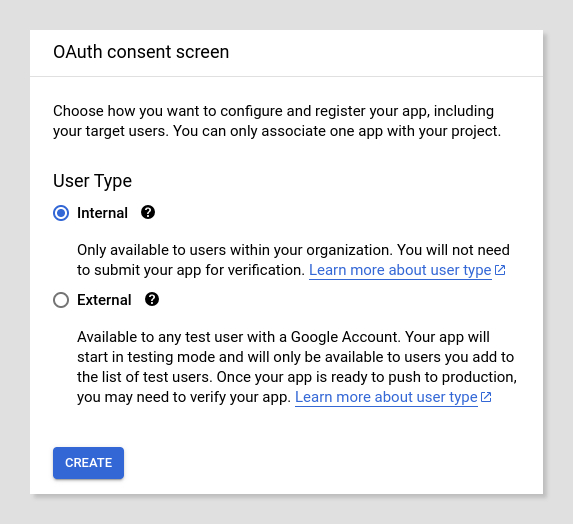
Choose Internal as the user type and click CREATE.
Then, complete the following mandatory fields:
- App name
- User support email
- Email addresses
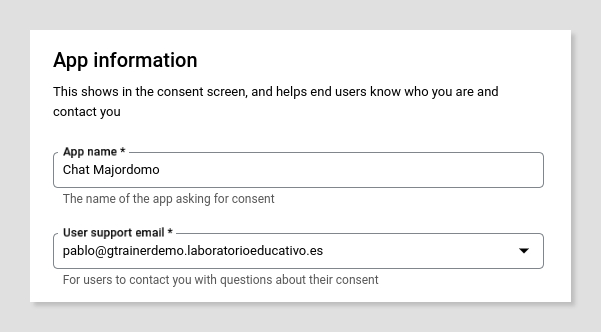
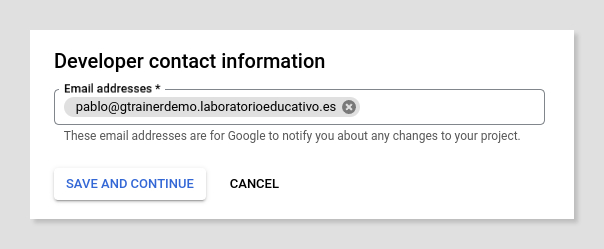
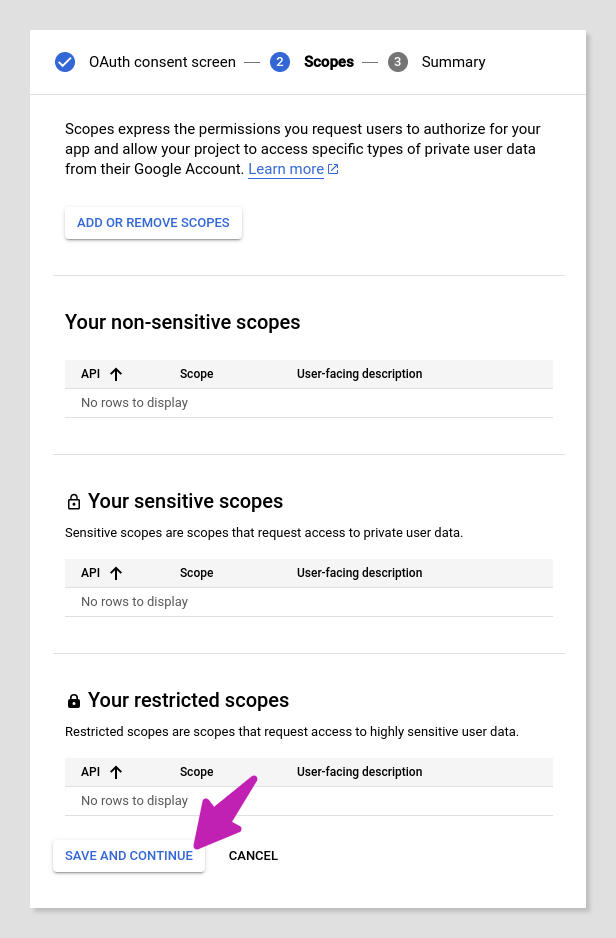
...and click the SAVE AND CONTINUE button.
☝ If the name you choose for your app starts with the word "Google", you'll get an inconclusive message saying "An error saving your app has occurred", and you won't be able to continue. The app name you enter here will be visible when the familiar Apps Script authorization dialog pops up, so it seems that Google rightfully wants to protect users from mischievous apps (🤫 don't tell anyone, but you can still use names like "xxx by Google" instead).
We are not sending our OAuth consent screen for review, so we don't really need to add the authorization scopes used by our app. You can safely skip this part and click the SAVE AND CONTINUE button again to complete this item.
Moving the script to the GCP project
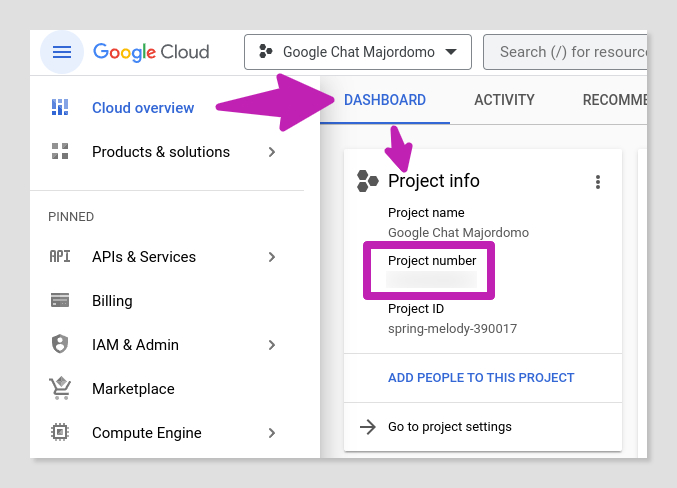
7️⃣ Finally —for the GCP console part of this deployment guide—, use the drop-down menu to choose your project, make sure you are in the Cloud overview → Dashboard section of the GCP console and copy your project number from the Project info section.
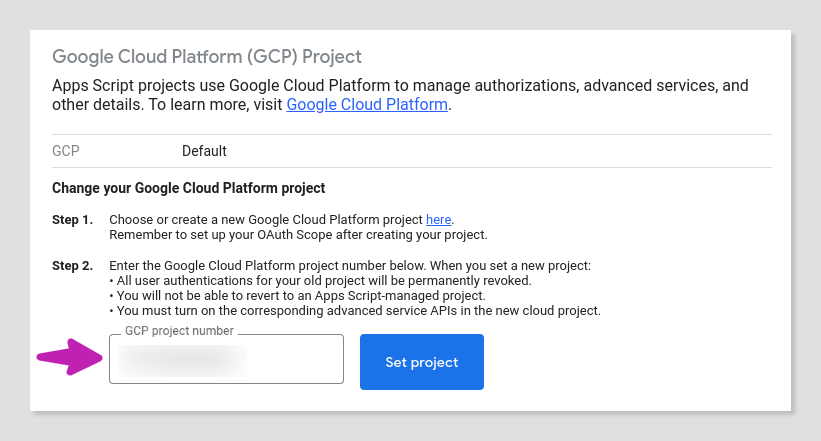
Next, open the Apps Script IDE in your copy of the spreadsheet (Extensions → Apps Script), click on the sidebar ⚙ Project Settings icon and hit the Change project button.

Type the project number you got from the GCP console and click Set project.
Congratulations, your own Google Chat Majordomo is ready to serve!
Final comments and next steps
In this post, we have developed a simple Apps Script automation that takes advantage of the new user-authenticated methods of the Google Chat API to carry through a common management task of the Google Workspace Chat service: adding members to a Chat space.
The tool I've shown you is just a proof of concept that could be improved in some ways, for example:
- Adding a custom menu to enable o disable the batch processing of approved membership requests at certain time intervals using an installable trigger.
- Sending email notifications to the people in charge of the enrollment process in Chat spaces when new requests arrive, with no need to manually set up the built-in notification feature of Google Sheets.
- Sending email notifications to the applicants informing them of the outcome of their requests.
- And last but not least, accepting membership requests from users external to the Workspace domain.
Even though this automation is quite basic, I can already see some situations in my school and in the context of our activities in the Google Educator Group Spain where it could be quite useful.
Stay tuned for the next post in this Google Chat API exploratory series, where we'll discuss some annoying limitations when it comes to automating other management tasks.
Comentarios