Coda webhooks 💙 Google Apps Script!

TL;DR
In this post, we'll explore different code patterns in both Coda's formula language and Google Apps Script to send data contained in a Google Spreadsheet to a Coda table, and also perform other related tasks, using the new (May 2022) webhook-powered Coda automations.
TABLE OF CONTENTS
This is Coda calling
As I already explained in a recent post on this blog, my interest in no-code platforms has been on the rise in the last couple of years. I've been using Notion quite extensively since mid-2020, both for my knowledge management and also as a collaboration tool with my team at the school where I work, with extremely satisfying results.
I was first exposed to Coda, a seeming competitor to Notion, thanks to Eric Koleda's appearance in a Totally Unscripted episode earlier this school year (by the way, kudos to Martin Hawksey, Charles Maxson, and Steve Webster for such a great show) and became immediately interested, even though I couldn't find the time to delve deeper into it until some months later. You may have a peek at my initial fumbling with Coda 🐦 here and there.
To say that Coda is just another doc editor of the smart canvas breed would be an understatement, in my opinion. And even though I still can't help thinking that there is room for improvement in its knowledge management features, the way Coda's formulas and automations work does show plenty of thoughtful design decisions and a deep understanding of the requirements of typical real-world problems that nocoders face.
Yes, Coda is a beautiful platform to use... but also to develop for:
1️⃣ It can be expanded using "Packs", a sort of JavaScript-based plugins that provide new formulas and buttons, and connect to third-party services through common RESTful APIs. Anyone can create and publish custom packs using a nice browser-based IDE and a thoughtfully —again— designed SDK that takes good care of such dreadful things as OAuth2 😛. By the way, I'd really love to write a post about how Coda's Packs are built in a not-too-distant future... but I need to teach myself first.

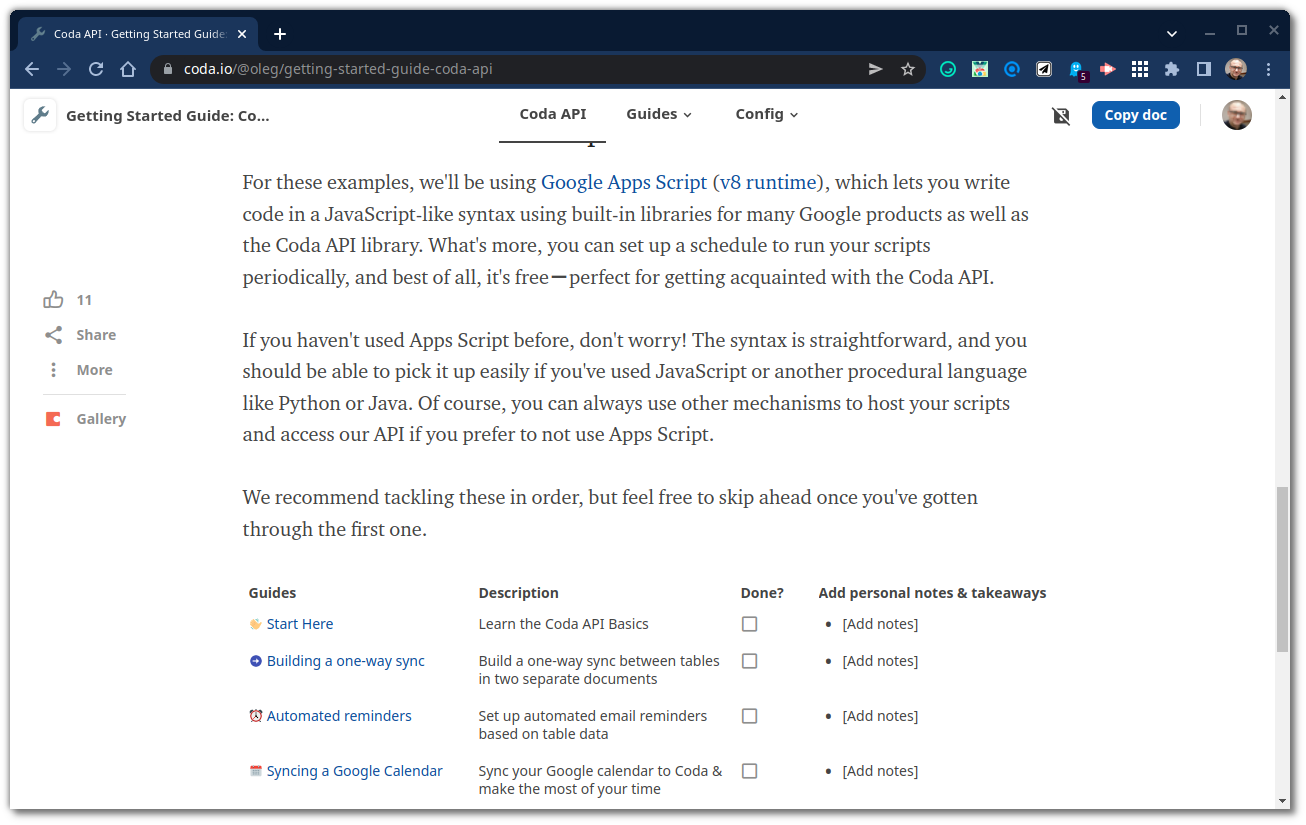
2️⃣ Coda also has an API! And there is a nice getting started guide (Coda) doc, too. You'll probably feel more than at home with it, as it resorts to Google Apps Script (GAS) as the stack of choice to implement some meaningful examples.
But let's move into automations right away.
Coda (webhook) automations are cool!
Automations are rules that trigger reactive behaviors inside your Coda docs. They can be used to perform actions when certain conditions are met, and as such, automations represent one of the main reasons behind Coda's no-code prowess. You may want to read more about them here.
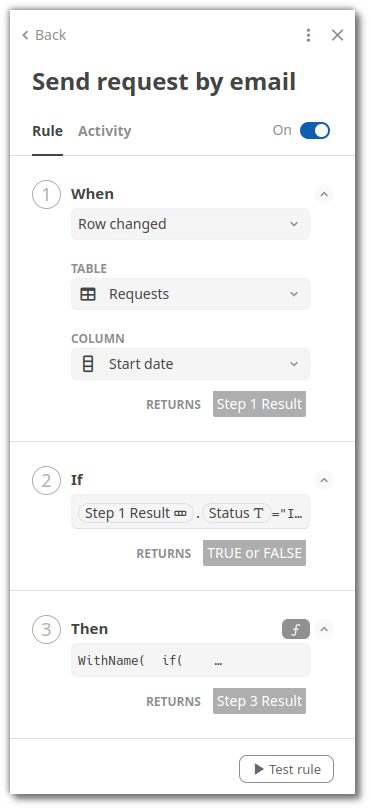
In a nutshell, a rule consists of three parts:
- WHEN: An event that triggers the rule, until now could be either a data change in any row of a Coda table or a timed event.
- IF: An optional condition that can be used to decide, using contextual information available every time the rule is triggered, whether it should go ahead and run or just be skipped.
- THEN: An action, or group of actions, to be performed.
For example, this simple rule will send an email to certain users, using the Gmail Pack, whenever the Start date column in the Requests table changes. Please, notice the three sections mentioned above.
☝ Now, besides time-driven and change-driven rules, we can also use webhook-based automations. This new mechanism allows us to build documents in Coda that react to external events and can receive data from other services and platforms.
We can ping a Coda rule with an authenticated POST request to make it run. These request can be sent from very well-known automation platforms such as Zapier or Make, but in this post we'll resort to our dear Google Apps Script.
You can find comprehensive instructions to set up a webhook-triggered automation in this document available in the Coda's help center. Just to summarize:
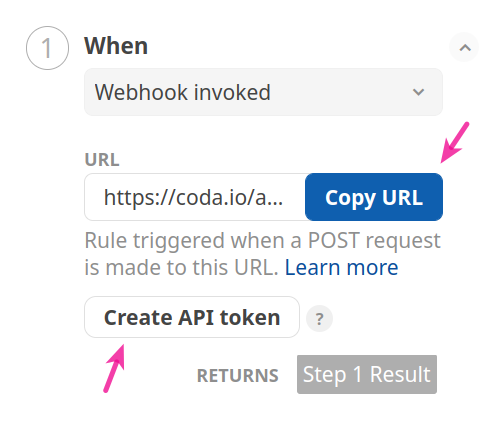
- The endpoint URL is obtained by pressing the Copy URL button in the WHEN part of the rule builder. This URL is specific to every single rule, as expected.
- The API token can be generated in the same place. Tokens created in this way are scoped to the whole document and therefore can be used to authenticate requests to all its webhook-based rules. Tokens require Bearer authentication.
These API tokens can be managed in Coda's Account settings → API settings. You can revoke previously created tokens, review their permissions and when they have been last used, and also generate new ones, setting their authorization scopes more thoroughly when doing so.

So we already know all the relevant information to start leveraging Coda webhook-based automations using Google Apps Script.
Playing with Coda & Apps Script
👇 Please, keep these test resources at hand while reading this article 👇
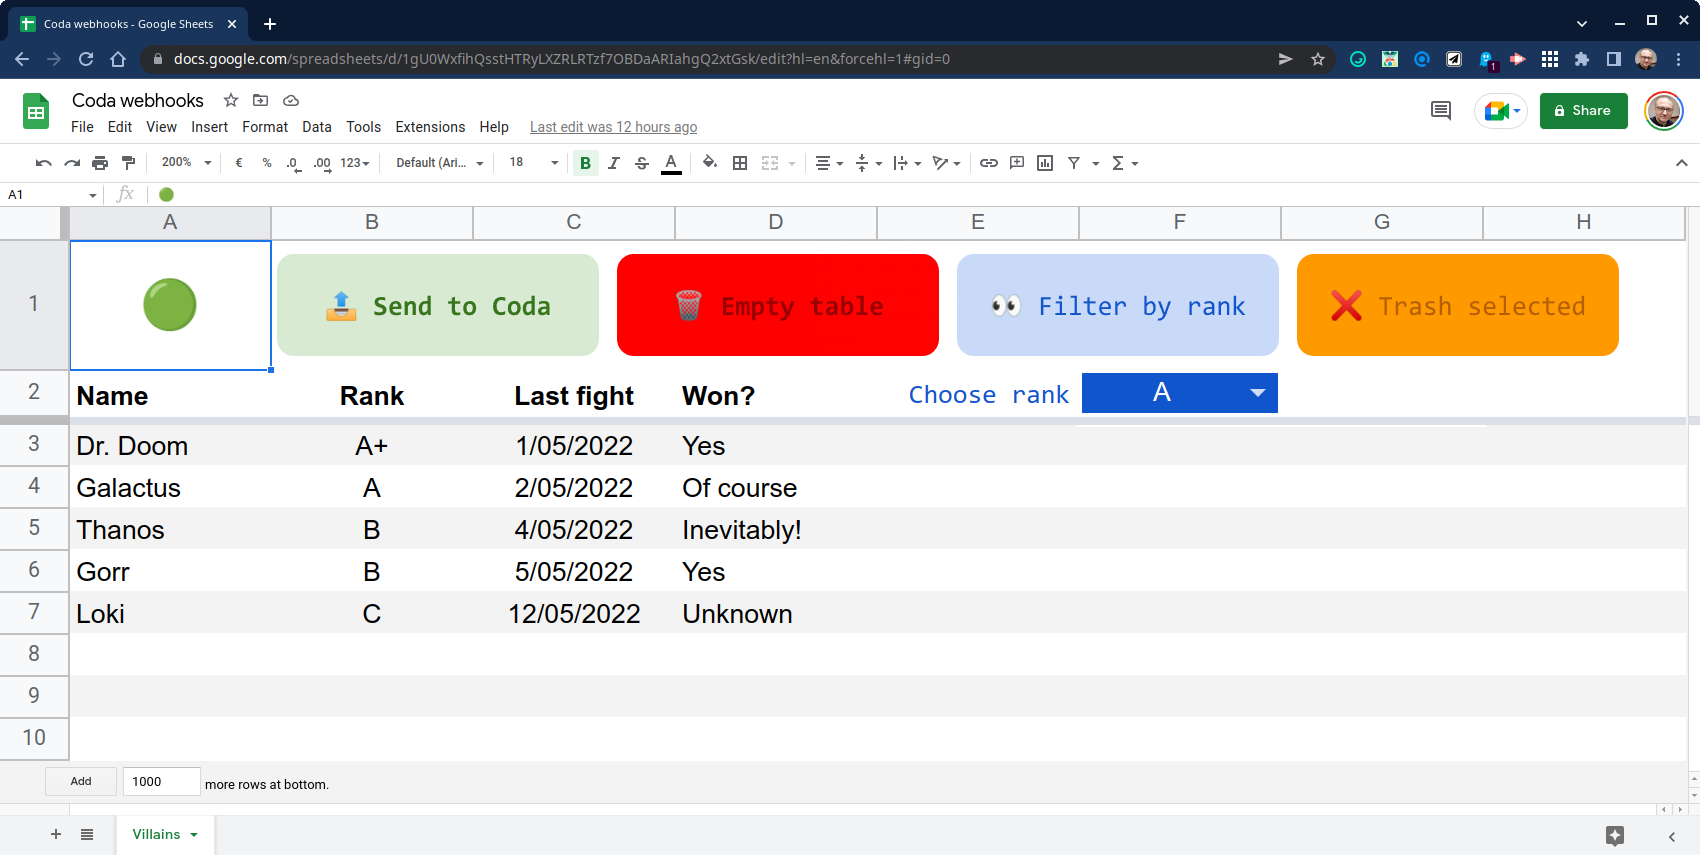
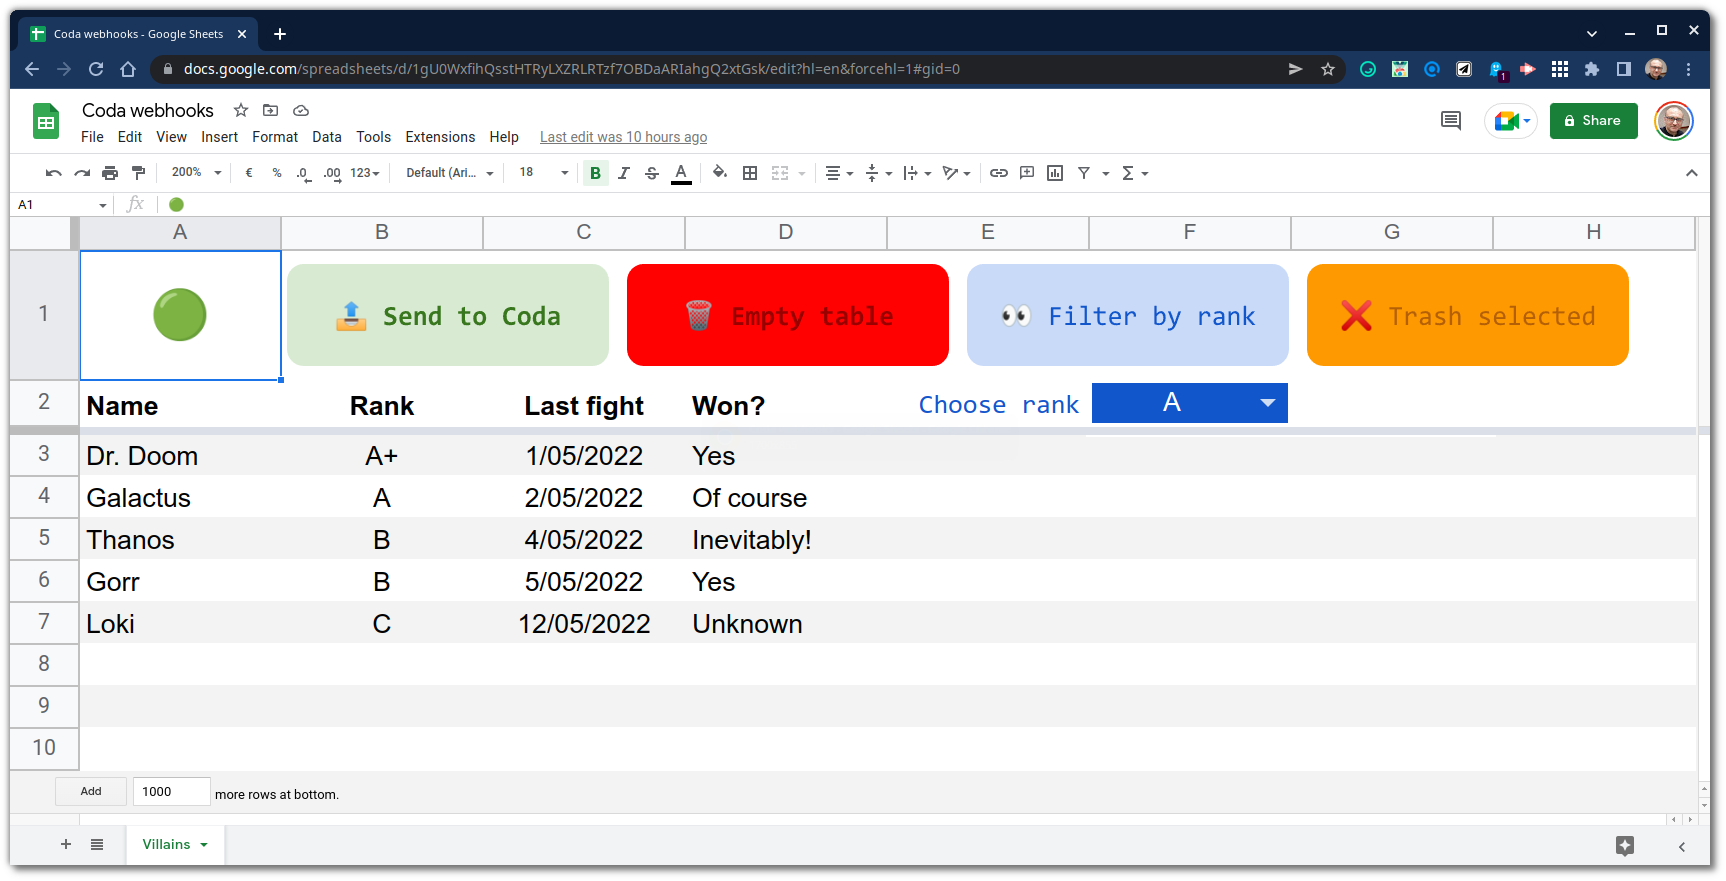
🅰️ I've populated this simple Google Sheet with some data as a testbed. Those big, colored buttons above the table surely will give you a clue as to what we intend to achieve. This spreadsheet hosts the Apps Script code snippets I am about to show you in a moment. You can also browse the GAS code base in this GitHub repository.
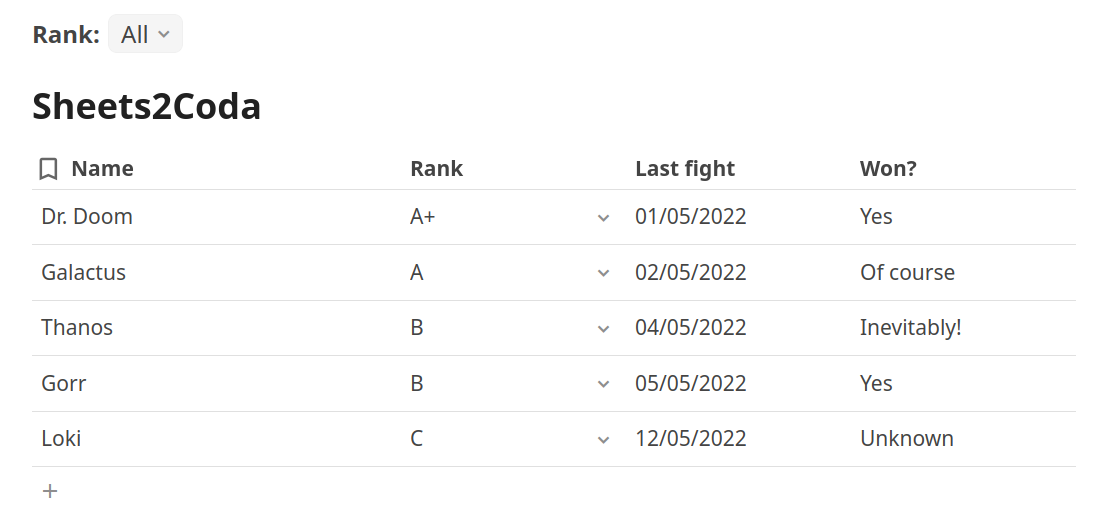
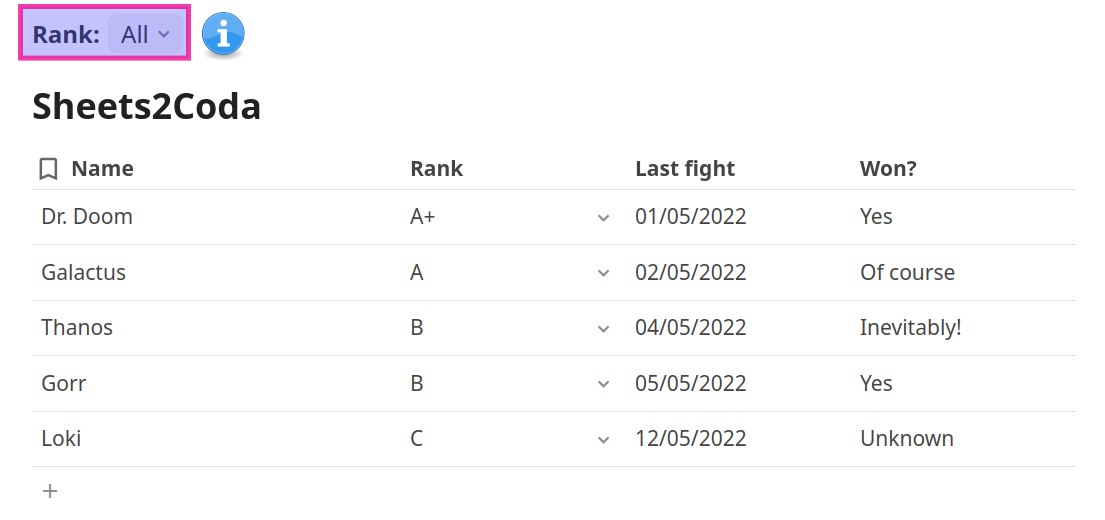
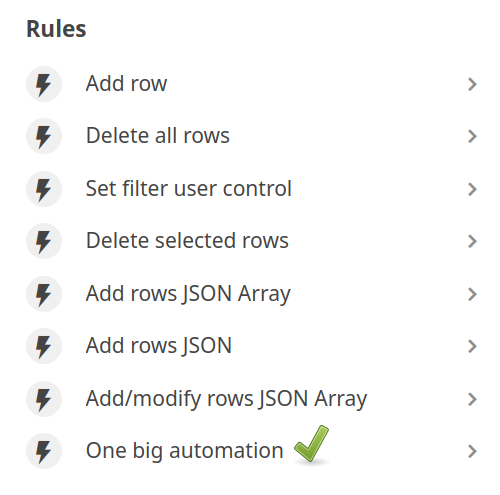
🅱️ I've also prepared this Coda document. It contains a table and all the sample automation rules we are going to use.
Adding rows to a Coda table from a Google spreadsheet
We'll start pushing data to our Coda table. Let's set up some global constant declarations we'll need later.
// ----------------
// COMMON CONSTANTS
// ----------------

const HEADING_ROW = 2;
const DATA_COLUMNS = 4;
const STATUS = 'A1';
const AUTH = {
  token: 'YOUR_API_KEY', // provide your own!
  endpoint: {
    codaAddRow: 'ENDPOINT_URL_ADD_ROW' // provide your own!
  }
};
Remember, you can get your API key and the POST URL of the automation in the rule builder, as we have already shown. We'll be adding some more code to this section later, as needed.
To push data we'll resort to the Apps Script UrlFetchApp.fetchAll() method.
/**
 * Sends all villains to a Coda automation endpoint that
 * adds them to a table, uses multiple asynchronous fetch requests,
 * order is not guaranteed.
 */
function codaSendData() {

  ss = SpreadsheetApp.getActiveSheet();
  ss.getRange(STATUS).clearContent();
  const data = ss.getRange(HEADING_ROW + 1, 1, ss.getLastRow() - HEADING_ROW, DATA_COLUMNS).getValues();
  const requests = [];
  data.forEach(row => {
    requests.push(
      {
        url: AUTH.endpoint.codaAddRow,
        method: 'post',
        headers: { Authorization: `Bearer ${AUTH.token}` },
        contentType: 'application/json',
        payload: JSON.stringify({
          name: row[0],
          rank: row[1],
          lastFight: row[2],
          won: row[3]
        }),
        muteHttpExceptions: true
      });
  });
  const resultCodes = UrlFetchApp.fetchAll(requests).map(result => result.getResponseCode());
  ss.getRange(STATUS).setValue(
    resultCodes.some(code => code != 202) ?
      '🟠' :
      '🟢'
  );

}
We are sending here as many fetch requests as rows exist in the source sheet asynchronously (instead of doing it sequentially) to improve speed. As a result of this, the order in which rows are added to the Coda table is not guaranteed (just apply sorting as needed). Some super-villains seem to teleport faster than others (sometimes) 😜.
As you may appreciate, this is a purely uni-directional mechanism. There is no Coda calling back. All we get from the automation is a result code. A 202 means that our request has been delivered to the endpoint and is queued for processing.
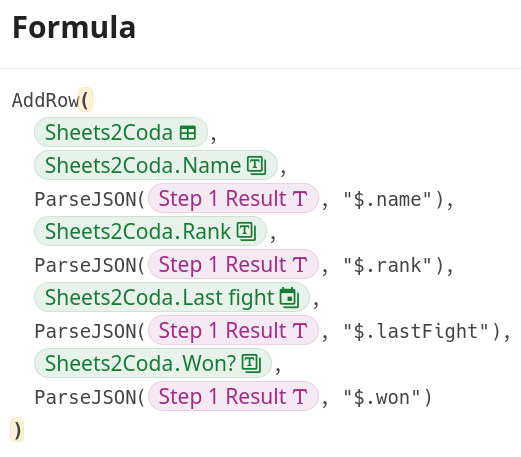
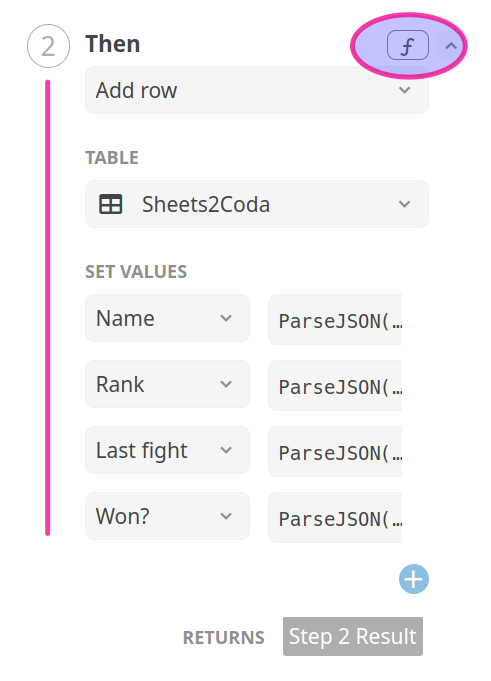
This is the formula you need to enter in the THEN part of the rule builder...
...to catch data inside the POST payload and put it in the right columns of the table.
AddRow(
  Sheets2Coda,
  Sheets2Coda.Name,
  ParseJSON([Step 1 Result], "$.name"),
  Sheets2Coda.Rank,
  ParseJSON([Step 1 Result], "$.rank"),
  Sheets2Coda.[Last fight],
  ParseJSON([Step 1 Result], "$.lastFight"),
  Sheets2Coda.[Won?],
  ParseJSON([Step 1 Result], "$.won")
)
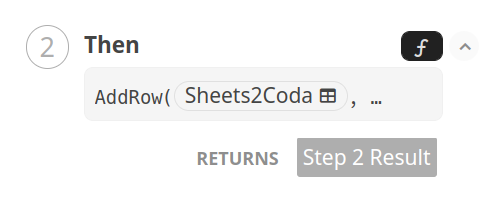
☝ Please, notice that the THEN section in the rule builder will appear labeled as 2️⃣ when the IF part is absent. Moreover, the formula editor encloses elements that contain spaces or other special characters between brackets [...] when you paste them somewhere else (for example, in this post). Brackets will disappear once pasted back inside the editor.
⚙ Technical highlights:
- Coda action functions are very cool (another key feature in Coda). Here we use AddRow() to append (surprise) a row of data to our table.
- The
[Step 1 Result]object, provided by the Coda rule, contains the JSON payload of the request. - We use the ParseJSON() function to extract all elements carried inside the JSON payload. The second parameter (e.g.,
$.name) is a JSONPath expression that targets the appropriate stringified property names of the JSON object inside the payload and extracts the required values. - The formula above can also be created in a more assisted way. Just switch the rule editor into the non-formula mode.
Simple and clean, isn't it?
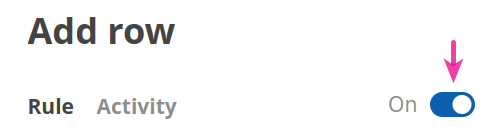
☝ Don't forget to turn your automation on!
Let's see this in action:
Removing all rows of a Coda table
What about wiping all data in a Coda Table?
Let's add the endpoint URL of a new automation rule to our global constants: codaEmptyTable.
// ----------------
// COMMON CONSTANTS
// ----------------

const HEADING_ROW = 2;
const DATA_COLUMNS = 4;
const STATUS = 'A1';
const AUTH = {
  token: 'YOUR_API_KEY', // provide your own!
  endpoint: {
    codaAddRow: 'ENDPOINT_URL_ADD_ROW', // provide your own!
    codaEmptyTable: 'ENDPOINT_URL_EMPTY_TABLE' // provide your own!
  }
};
This is easier to pull because there is no payload involved. In fact, we just have to ping the endpoint and... boom 🗑!
/**
 * Pings a Coda automation endpoint that deletes all data in a table,
 * no payload inside the POST request is needed.
 */
function codaEmptyTable() {

  const ss = SpreadsheetApp.getActiveSheet();
  ss.getRange(STATUS).clearContent();
  const resultCode = UrlFetchApp.fetch(
    AUTH.endpoint.codaEmptyTable,
    {
      method: 'post',
      headers: { Authorization: `Bearer ${AUTH.token}` },
      contentType: 'application/json',
      muteHttpExceptions: true
    }
  ).getResponseCode();

  ss.getRange(STATUS).setValue(
    resultCode != 202 ?
      '🟠' :
      '🟢'
  );

}
You don't even need to perform a single keystroke to build the rule this time, but if you are inclined to do so, make sure to use the DeleteRows() function with no parameters to wipe out the whole table.
Another micro animation to demonstrate this new pattern:
Setting the value of a Coda filter control
Coda provides controls users can interact with to trigger different actions and establish how other elements in a document behave (more coolness from Coda). You can find out more about Coda's controls here before proceeding further, although that is not required at all to follow this post.
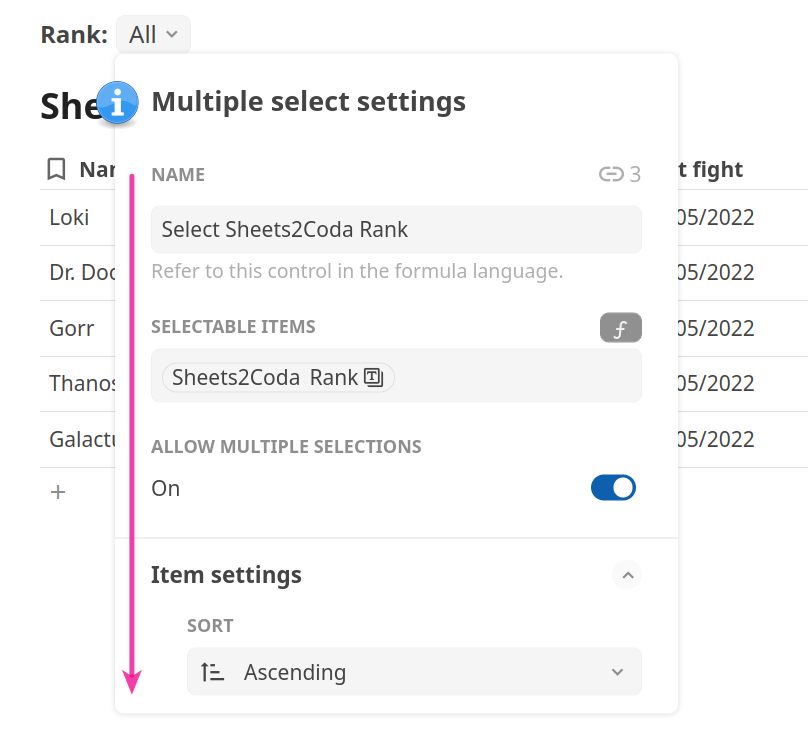
You might have already noticed one of those controls lying around in our test Coda doc, a drop-down select list that lets viewers slice our crew of super-villains by rank.
Controls have a wealth of handy settings. The list of selectable values can even be calculated by a formula (very nice indeed).
☝ Controls, together with the filter feature available in Coda tables (Options → ▼ Filter), provide a lot of flexibility when it comes to building interactive docs. Learn how to filter tables based on controls in the Coda's help center.
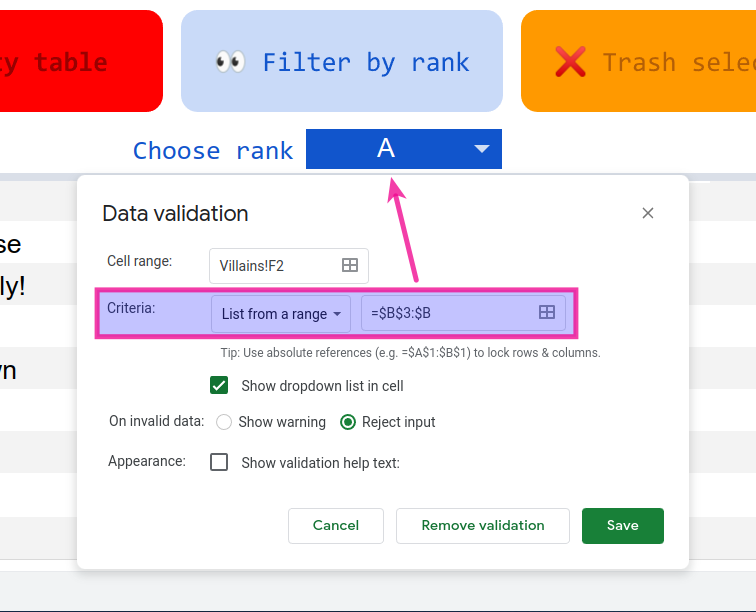
First, we need to insert a drop-down control in our spreadsheet for users to choose a single rank on the spreadsheet's side. Use the Google Sheet's data validation feature for that.
Then, a couple more global constants (FILTER and codaFilterTable) are required in our Apps Script code.
// ----------------
// COMMON CONSTANTS
// ----------------

const HEADING_ROW = 2;
const DATA_COLUMNS = 4;
const STATUS = 'A1';
const FILTER = 'F2';
const AUTH = {
  token: 'YOUR_API_KEY', // provide your own!
  endpoint: {
    codaAddRow: 'ENDPOINT_URL_ADD_ROW', // provide your own!
    codaEmptyTable: 'ENDPOINT_URL_EMPTY_TABLE', // provide your own!
    codaFilterTable: 'ENDPOINT_URL_FILTER TABLE' // provide your own!
  }
};
We'll be using the POST payload to pass on the chosen value in cell F2 (or a comma-separated list of all of them, if none has been selected) to the Coda rule...
/**
 * Pings a Coda automation endpoint that sets a user control
 * to filter a table in a specific way.
 */
function codaFilterTable() {

  ss = SpreadsheetApp.getActiveSheet();
  ss.getRange(STATUS).clearContent();
  const rank = ss.getRange(FILTER).getValue();
  const resultCode = UrlFetchApp.fetch(
    AUTH.endpoint.codaFilterTable,
    {
      method: 'post',
      headers: { Authorization: `Bearer ${AUTH.token}` },
      contentType: 'application/json',
      payload: JSON.stringify({ rank: !rank ? 'A+,A,B,C,D,E' : rank }),
      muteHttpExceptions: true
    }
  ).getResponseCode();

  SpreadsheetApp.getActiveSheet().getRange(STATUS).setValue(
    resultCode != 202 ?
      '🟠' :
      '🟢'
  );

}
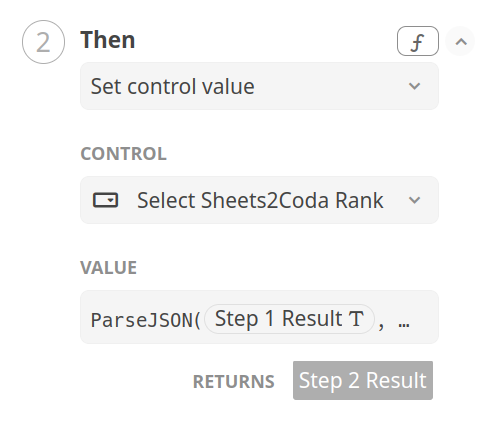
...which will, in turn, apply the passed value to the user control with a formula that is based on the SetControlValue() function:
SetControlValue(
  [Select Sheets2Coda Rank],
  ParseJSON([Step 1 Result], "$.rank")
)
Another short demo:
By now, I think you might already be familiar with the mechanism we are using to connect Apps Script to Coda, so let's pump it up a bit.
Sending multiple rows of data in one request
Unfortunately, Coda's automations have a monthly cap... unless you are on the Team or Enterprise plan.
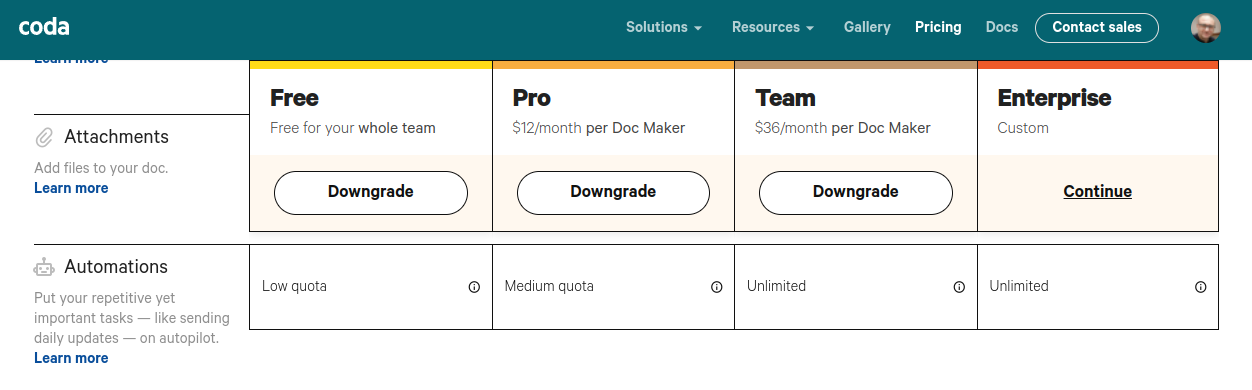
This table summarizes the number of allowed automation runs per month and doc (as of June 11th, 2022).
| Type of rule / Tier | Free | Pro |
| Time-based | 35 | 100 |
| Event-based | 100 | 500 |
| Webhook-based | ❔ | ❔ |
The information provided by Coda about their pricing plans is not specific yet about the monthly cap for the new webhook-based automations, but I guess that it must be in the same ballpark as for the time-based ones. And yes, I bumped into it while preparing this post 😁.
Consequently, we seem to have fair reasons to reduce the number of POST requests as much as possible. Let's add a new rule/endpoint: codaAddRowsJsonArray.
// ----------------
// COMMON CONSTANTS
// ----------------

const HEADING_ROW = 2;
const DATA_COLUMNS = 4;
const STATUS = 'A1';
const FILTER = 'F2';
const AUTH = {
  token: 'YOUR_API_KEY', // provide your own!
  endpoint: {
    codaAddRow: 'ENDPOINT_URL_ADD_ROW', // provide your own!
    codaEmptyTable: 'ENDPOINT_URL_EMPTY_TABLE', // provide your own!
    codaFilterTable: 'ENDPOINT_URL_FILTER TABLE', // provide your own!
    codaAddRowsJsonArray: 'ENDPOINT_URL_ADD_ROWS' // provide your own!
  }
};
Now, in spite of making as many requests as rows to be sent to Coda, we'll pack all of them inside a JSON object array in the payload. We'll use this helper function:
/**
 * Transforms a data interval, with headings, into a JSON-like object
 * with a global numElements (rows in the data interval) property.
 * @param   {Array[]} data 2D array with heading labels
 * @return  {Object}
 *
 * Sample input:
 * |"A" | "B" | "C"]
 * | 1  |  2  |  3 |
 * | 4  |  5  |  6 |
 *
 * Sample output:
 * {
 *    numElements: 2,
 *    rows: [
 *      { "A": 1, "B": 2, "C": 3},
 *      { "A": 4, "B": 5, "C": 6}
 *    ]
 * }
 */
function table2ArrayObject(data) {

  const [heading, ...rows] = data;
  const arrayJson = rows.map(row => {
    return row.reduce((obj, field, colIndex) => {
      obj[heading[colIndex]] = field;
      return obj;
    }, {});
  }, {});

  return { numElements: arrayJson.length, rows: arrayJson };

}
As you can see, this object also contains a numElements property to tell the automation rule how many rows have to be added to the Coda table.
The Apps Script part is quite similar to the previous ones:
/**
 * Sends all villains to a Coda automation endpoint that
 * adds them to a table, uses a single asynchronous fetch request,
 * order is guaranteed.
 */
function codaSendDataMultiple() {

  const ss = SpreadsheetApp.getActiveSheet();
  ss.getRange(STATUS).clearContent();
  const data = ss.getRange(HEADING_ROW, 1, ss.getLastRow() - HEADING_ROW + 1, DATA_COLUMNS).getValues();
  const resultCode = UrlFetchApp.fetch(
    AUTH.endpoint.codaAddRowsJsonArray,
    {
      method: 'post',
      headers: { Authorization: `Bearer ${AUTH.token}` },
      contentType: 'application/json',
      payload: JSON.stringify(table2ArrayObject(data)),
      muteHttpExceptions: true
    }
  ).getResponseCode();

  ss.getRange(STATUS).setValue(
    resultCode != 202 ?
      '🟠' :
      '🟢'
  );

}
The formula to process the payload is a little bit more complex now, though.
Sequence(
  0, [Step 1 Result].ParseJSON("$.numElements").ToNumber() - 1
)
  .FormulaMap(
    Sheets2Coda
      .AddRow(
        Sheets2Coda.Name,
        [Step 1 Result]
          .ParseJSON(
            Concatenate("$.rows[", CurrentValue, "].", "Name")
          ),
        Sheets2Coda.Rank,
        [Step 1 Result]
          .ParseJSON(
            Concatenate("$.rows[", CurrentValue, "].", "Rank")
          ),
        Sheets2Coda.[Last fight] ,
        [Step 1 Result]
          .ParseJSON(
            Concatenate("$.rows[", CurrentValue, "].", "Last fight")
          ),
        Sheets2Coda.[Won?] ,
        [Step 1 Result]
          .ParseJSON(
            Concatenate("$.rows[", CurrentValue, "].", "Won?")
          )
      )
  )
⚙ Technical highlights:
- The Sequence() function generates a list of numbers between 0 and the number of rows received, minus 1 (similar to the Google Sheets' SEQUENCE function). Please, bear that indexes of JSONPath arrays, unlike Xpath collections, start from 0.
- The FormulaMap() function allows us to iterate over the previously generated list of indexes. We use the
CurrentValueto build JSONPath expressions that will retrieve, thanks to the subscript operator[...], every data field of each row inside the JSON array sequentially. The Concatenate() function comes in handy for that. - The AddRow() and ParseJSON() functions are used much in the same way as in the preceding automations.
- Row order is guaranteed now, as we are issuing a single POST request to the rule endpoint in the Apps Script code.
- For that same reason, this automation is much faster than our first naive attempt at sending rows.

We have saved a lot of fetch requests! But, as you might have figured out, repeated executions of the codaSendDataMultiple() Apps Script function would result in duplicate rows in the Coda table.
What about updating rows?
We can easily tweak our last script/automation rule allow for the updating of already existing data on the Coda's side and thus avoid duplicates.
Let's add another endpoint: codaAddModifyRowsJsonArray.
// ----------------
// COMMON CONSTANTS
// ----------------

const HEADING_ROW = 2;
const DATA_COLUMNS = 4;
const STATUS = 'A1';
const FILTER = 'F2';
const AUTH = {
  token: 'YOUR_API_KEY', // provide your own!
  endpoint: {
    codaAddRow: 'ENDPOINT_URL_ADD_ROW', // provide your own!
    codaEmptyTable: 'ENDPOINT_URL_EMPTY_TABLE', // provide your own!
    codaFilterTable: 'ENDPOINT_URL_FILTER TABLE', // provide your own!
    codaAddRowsJsonArray: 'ENDPOINT_URL_ADD_ROWS', // provide your own!
    codaAddModifyRowsJsonArray: 'ENDPOINT_URL_ADD_MODIFY_ROWS' // provide your own!
  }
};
The Apps Script part is pretty identical to our last attempt, save that we are just pinging a different rule endpoint: AUTH.endpoint.codaAddModifyRowsJsonArray.
/**
 * Pings a Coda automation endpoint that adds or modifies
 * (if name of villain already found in the Coda table) all
 * rows passed inside the JSON payload, order is guaranteed.
 */
function codaSendUpdateDataMultiple() {

  const ss = SpreadsheetApp.getActiveSheet();
  ss.getRange(STATUS).clearContent();
  const data = ss.getRange(HEADING_ROW, 1, ss.getLastRow() - HEADING_ROW + 1, DATA_COLUMNS).getValues();
  const resultCode = UrlFetchApp.fetch(
    AUTH.endpoint.codaAddModifyRowsJsonArray,
    {
      method: 'post',
      headers: { Authorization: `Bearer ${AUTH.token}` },
      contentType: 'application/json',
      payload: JSON.stringify(table2ArrayObject(data)),
      muteHttpExceptions: true
    }
  ).getResponseCode();

  ss.getRange(STATUS).setValue(
    resultCode != 202 ?
      '🟠' :
      '🟢'
  );

}
The formula used in the automation rule is slightly different, though:
Sequence(
  0, [Step 1 Result].ParseJSON("$.numElements").ToNumber() - 1
)
  .FormulaMap(
    Sheets2Coda
      .AddOrModifyRows(
        Name =
          [Step 1 Result]
            .ParseJSON(
              Concatenate("$.rows[", CurrentValue, "].", "Name")
            ),
        Sheets2Coda.Name,
        [Step 1 Result]
          .ParseJSON(
            Concatenate("$.rows[", CurrentValue, "].", "Name")
          ),
        Sheets2Coda.Rank,
        [Step 1 Result]
          .ParseJSON(
            Concatenate("$.rows[", CurrentValue, "].", "Rank")
          ),
        Sheets2Coda.[Last fight],
        [Step 1 Result]
          .ParseJSON(
            Concatenate("$.rows[", CurrentValue, "].", "Last fight")
          ),
        Sheets2Coda.[Won?],
        [Step 1 Result]
          .ParseJSON(
            Concatenate("$.rows[", CurrentValue, "].", "Won?")
          )
      )
  )
⚙ Technical highlights:
- We are now resorting to the AddOrModifyRows() function. This Coda function provides a first parameter that allows us to specify a condition to identify which rows should be updated. Those who fail the test will be added as normal.
- We use the Name field to check for already existing rows but could easily extend this check to include some other fields.
As you can see, our new codaSendUpdateDataMultiple() function supersedes the previous codaSendDataMultiple() one, so you can quietly ditch the latter.

Removing only selected rows
The last problem we are going to address is removing rows selectively.
We'll let the user select some rows in the spreadsheet and tell our script to ping a new Coda rule to delete them.
First (you guessed it), we need again a new automation rule and its associated endpoint: codaDeleteSelectedRows.
// ----------------
// COMMON CONSTANTS
// ----------------

const HEADING_ROW = 2;
const DATA_COLUMNS = 4;
const STATUS = 'A1';
const FILTER = 'F2';
const AUTH = {
  token: 'YOUR_API_KEY', // provide your own!
  endpoint: {
    codaAddRow: 'ENDPOINT_URL_ADD_ROW', // provide your own!
    codaEmptyTable: 'ENDPOINT_URL_EMPTY_TABLE', // provide your own!
    codaFilterTable: 'ENDPOINT_URL_FILTER TABLE', // provide your own!
    codaAddRowsJsonArray: 'ENDPOINT_URL_ADD_ROWS', // provide your own!
    codaAddModifyRowsJsonArray: 'ENDPOINT_URL_ADD_MODIFY_ROWS', // provide your own!
    codaDeleteSelectedRows: 'ENDPOINT_URL_DELETE_SELECTED_ROWS' // provide your own!
  }
};
We'll split the required Apps Script code into two different functional sections.
1️⃣ Identify the rows the user has selected in the spreadsheet.
/**
 * Pings a Coda automation endpoint that deletes all rows
 * passed inside the JSON payload, name of villain field
 * is used to target rows to be deleted.
 */
function codaDeleteSelected() {

  ss = SpreadsheetApp.getActiveSheet();
  const selectedRanges = ss.getActiveRangeList();

  if (selectedRanges) {

    const selectedRows = new Set();
    selectedRanges.getRanges().forEach(range => {
      const rangeFirstRow = range.getRowIndex();
      const rangeLastRow = rangeFirstRow + range.getNumRows() - 1;
      let row = rangeFirstRow;
      while (row <= rangeLastRow && row <= ss.getLastRow()) {
        if (row > HEADING_ROW) selectedRows.add(row - HEADING_ROW - 1);
        row++;
      }
    });
The code snippet above uses the getActiveRangeList() method of the Spreadsheet class to get all intervals (ranges) of selected cells. Then, it stores the unique indexes of all rows below the HEADING_ROW that overlap with any selected interval inside a JavaScript Set. Agreed, this part is probably irrelevant, but I thought it was worth devoting some time to it anyway.
2️⃣ Build a proper JSON payload that contains all selected rows and pass it on to the Coda automation back-end.
    if (selectedRows.size > 0) {

      ss.getRange(STATUS).clearContent();
      const [heading, ...rows] = ss.getRange(HEADING_ROW, 1, ss.getLastRow() + HEADING_ROW - 1, DATA_COLUMNS).getValues();
      // Include only selected rows, partial selections are supported
      const data = [heading, ...rows.filter((_, rowIndex) => selectedRows.has(rowIndex))];

      const resultCode = UrlFetchApp.fetch(
        AUTH.endpoint.codaDeleteSelectedRows,
        {
          method: 'post',
          headers: { Authorization: `Bearer ${AUTH.token}` },
          contentType: 'application/json',
          // We are passing all fields, even though in this use-case only
          // the name field is used to match villains on the Coda's side.
          payload: JSON.stringify(table2ArrayObject(data)),
          muteHttpExceptions: true
        }
      ).getResponseCode();

      ss.getRange(STATUS).setValue(
        resultCode != 202 ?
          '🟠' :
          '🟢'
      );

    }
  }
}
And this is the automation rule responsible for the actual deletion of rows in our Coda Table:
Sequence(
  0,
  [Step 1 Result].ParseJSON("$.numElements")
    .ToNumber() -
    1
)
  .FormulaMap(
    Sheets2Coda
      .Filter(
        Name =
          [Step 1 Result]
            .ParseJSON(
              Concatenate("$.rows[", CurrentValue, "].", "Name")
            )
      )
      .DeleteRows()
  )
⚙ Technical highlights:
- This new rule exploits the already familiar pattern that takes advantage of the Sequence() function to iterate over the JSON array of rows to delete.
- Next, the Filter() function finds all rows in the table with a matching Name field (there could be duplicates!). Again, we could have devised a different row-matching schema, so feel free to bring your own.
- Notice the alternative way in which the DeleteRows() function has been leveraged this time. If just like me you are a big fan of JavaScript map, filter, reduce, and the like, this probably has brought a faint smile to your face. Functional programming rocks 🕺!
- The actual Apps Script POST code is identical to the one found in our previous send/update functions. Some tweaks to the automation rule and you'll be adding or updating selected rows in no time.

Automations Assemble!
Could we streamline all these automation rules and build the one-and-only automation to rule them all?
Well, this modification may not probably serve any obvious purpose. We had better keep automations that perform different actions in separate rules, after all. But in complex scenarios, fewer endpoints to manage on the client side could mean simpler code. And, in any case, this is an exercise in Codan (was that right? 😝) Kung-fu, so please, indulge me.
First, we need to add once more the endpoint URL of our new rule: codaMultiPurpose.
// ----------------
// COMMON CONSTANTS
// ----------------

const HEADING_ROW = 2;
const DATA_COLUMNS = 4;
const STATUS = 'A1';
const FILTER = 'F2';
const AUTH = {
  token: 'YOUR_API_KEY', // provide your own!
  endpoint: {
    codaAddRow: 'ENDPOINT_URL_ADD_ROW', // provide your own!
    codaEmptyTable: 'ENDPOINT_URL_EMPTY_TABLE', // provide your own!
    codaFilterTable: 'ENDPOINT_URL_FILTER TABLE', // provide your own!
    codaAddRowsJsonArray: 'ENDPOINT_URL_ADD_ROWS', // provide your own!
    codaAddModifyRowsJsonArray: 'ENDPOINT_URL_ADD_MODIFY_ROWS', // provide your own!
    codaDeleteSelectedRows: 'ENDPOINT_URL_DELETE_SELECTED_ROWS', // provide your own!
    codaMultiPurpose: 'ENDPOINT_URL_MULTI_PURPOSE' // provide your own!
  }
};
The idea is very much straightforward:
1️⃣ We'll send an additional command inside the POST request payload to tell the automation rule which action has to be executed on its side.
2️⃣ The formula in the THEN part of the automation rule will use the Switch() function to check the command and fulfill its corresponding action.
Besides the changes needed to accommodate this new strategy, both the relevant Apps Script code and the specific action formulas are identical to the ones we developed in the former sections.
We need to keep track of all the commands that our script can issue to its Coda counterpart, so let there be some more constants. Moreover, we are using those colored buttons in the spreadsheet as a simplified user interface. This circumstance calls for some wrapper Apps Script functions to assign to them.
// -------------------------------------------------------------
// V2 FUNCTIONS, A SINGLE, BIG, MULTI-PURPOSE AUTOMATION IS USED
// -------------------------------------------------------------


// Commands
const COMMAND = {
  empyTable: 'DELETE_ALL_ROWS',
  filterTable: 'SET_FILTER_CONTROL',
  sendData: 'ADD_ROWS',
  sendUpdateData: 'ADD_UPDATE_ROWS',
  deleteSelected: 'DELETE_SELECTED_ROWS'
};

/**
 * Wrapper clients
 */
const clientCodaEmptyTable = () =>  codaWebHook(COMMAND.empyTable);
const clientCodaFilterTable = () => codaWebHook(COMMAND.filterTable);
const clientCodaSendData = () => codaWebHook(COMMAND.sendData);
const clientCodaSendUpdateData = () => codaWebHook(COMMAND.sendUpdateData);
const clientCodaDeleteSelected = () => codaWebHook(COMMAND.deleteSelected);
Now, the code to trigger all automations lives inside the single GAS codaWebHook() function. You'll find therein the private pingCodaEndpoint() helper function, which is the one that will actually perform every POST request.
/**
 * Proxy function for all things Coda, here!
 * @param {string} command
 */
function codaWebHook(command) {

  /**
   * UrlFetch() wrapper function, adds action parameter to JSON payload
   * and returns fetch result code.
   * @param {string} command    Requested action
   * @param {Object} [payload]  POST payload as a JS object
   * @return {number}
   */
  function pingCodaEndpoint(command, payload) {
    return UrlFetchApp.fetch(
      AUTH.endpoint.codaMultiPurpose,
      {
        method: 'post',
        headers: { Authorization: `Bearer ${AUTH.token}` },
        contentType: 'application/json',
        payload: JSON.stringify({ action: command, ...payload }),
        muteHttpExceptions: true
      }
    ).getResponseCode();
  }
Next, a switch statement checks the command parameter and executes the appropriate code, only partially shown in this snippet (nothing new under the sun).
  if(Object.values(COMMAND).includes(command)) {

    // Clears status cell
    const ss = SpreadsheetApp.getActiveSheet();
    ss.getRange(STATUS).clearContent();
    let responseCode, data;

    switch (command) {

      // 1️⃣ Deletes all rows in a Coda table
      case COMMAND.empyTable:
        responseCode = pingCodaEndpoint(command);
        break;

      // 2️⃣ Sets filter user control affecting a Coda table
      case COMMAND.filterTable:
        const rank = ss.getRange(FILTER).getValue();
        responseCode = pingCodaEndpoint(command, { rank: !rank ? 'A+,A,B,C,D,E' : rank });
        break;

      // 3️⃣ Adds rows to a Coda table, can cause duplicates on Coda's side
      case COMMAND.sendData:
        data = ss.getRange(HEADING_ROW, 1, ss.getLastRow() - HEADING_ROW + 1, DATA_COLUMNS).getValues();
        responseCode = pingCodaEndpoint(command, table2ArrayObject(data));
        break;

      // Code for commands 4️⃣ - 5️⃣ here...

    } // end of command processing [SWITCH]

    // Sets status cell
    ss.getRange(STATUS).setValue(
    responseCode != 202 ?
      '🟠' :
      '🟢'
    );

  } // end of valid command check [IF]

}
As you can see, the automation rule will perform different actions according to the value of the action property carried inside the JSON payload of the POST request. You might be less acquainted with Coda's formula language, so I'll rather show you the whole thing this time.
Switch(
  [Step 1 Result].ParseJSON('$.action'),
  "DELETE_ALL_ROWS",
  Sheets2Coda.DeleteRows(),
  "SET_FILTER_CONTROL",
  [Select Sheets2Coda Rank]
    .SetControlValue(
      [Step 1 Result].ParseJSON('$.rank')
    ),
  "ADD_ROWS",
  Sequence(
    0, [Step 1 Result].ParseJSON("$.numElements").ToNumber() - 1
  )
    .FormulaMap(
      Sheets2Coda
        .AddRow(
          Sheets2Coda.Name,
          [Step 1 Result]
            .ParseJSON(
              Concatenate("$.rows[", CurrentValue, "].", "Name")
            ),
          Sheets2Coda.Rank,
          [Step 1 Result]
            .ParseJSON(
              Concatenate("$.rows[", CurrentValue, "].", "Rank")
            ),
          Sheets2Coda.[Last fight],
          [Step 1 Result]
            .ParseJSON(
              Concatenate("$.rows[", CurrentValue, "].", "Last fight")
            ),
          Sheets2Coda.[Won?],
          [Step 1 Result]
            .ParseJSON(
              Concatenate("$.rows[", CurrentValue, "].", "Won?")
            )
        )
    ),
  "ADD_UPDATE_ROWS",
  Sequence(
    0,
    [Step 1 Result].ParseJSON("$.numElements")
      .ToNumber() -
      1
  )
    .FormulaMap(
      Sheets2Coda
        .AddOrModifyRows(
          Name =
            [Step 1 Result]
              .ParseJSON(
                Concatenate("$.rows[", CurrentValue, "].", "Name")
              ),
          Sheets2Coda.Name,
          [Step 1 Result]
            .ParseJSON(
              Concatenate("$.rows[", CurrentValue, "].", "Name")
            ),
          Sheets2Coda.Rank,
          [Step 1 Result]
            .ParseJSON(
              Concatenate("$.rows[", CurrentValue, "].", "Rank")
            ),
          Sheets2Coda.[Last fight],
          [Step 1 Result]
            .ParseJSON(
              Concatenate("$.rows[", CurrentValue, "].", "Last fight")
            ),
          Sheets2Coda.[Won?],
          [Step 1 Result]
            .ParseJSON(
              Concatenate("$.rows[", CurrentValue, "].", "Won?")
            )
        )
    ),
  "DELETE_SELECTED_ROWS",
  Sequence(
    0, [Step 1 Result].ParseJSON("$.numElements").ToNumber() - 1
  )
    .FormulaMap(
      Sheets2Coda
        .filter(
          Name =
            [Step 1 Result]
              .ParseJSON(
                Concatenate("$.rows[", CurrentValue, "].", "Name")
              )
        )
        .DeleteRows()
    )
)
And that's it! Sorry, no micro animation this time. It would have been indistinguishable from the previous ones, anyway (trust me).
☝ Remember that you can check all the Apps Script code in the companion spreadsheet (and GitHub repo) to this post. To review the formulas of all the automations we have devised, just make a copy of this Coda doc and head to ⚙ → Automations.
Final comments and next steps
In this post, we have used the new Coda webhook-based automations to connect Google Sheets to a Coda doc using Google Apps Script.
We have built scripts that add or update data in a Coda table, remove rows (all or only some of them), and even adjust how a Coda filter control operates. And all of this has been possible thanks to the flexible Coda's formula language, especially its action formulas.
The use pattern that makes for these interactions can be applied to other situations where sending data from Google services to Coda documents could be beneficial. Some possible use-cases that spring to my mind:
- Add new rows to a Coda table as new responses are received in a Google Form.
- Sync Google Calendar events with a Coda table (the Calendar Pack, in its free tier, is currently limited to manual data refreshes and 20 button actions).
- Use a Coda doc as a user-friendly logging backend, registering, for instance, conversations with a Google Chat chatbot or the Google Drive activity of a file or folder. With some additional update-based automation rules, older rows could be removed unattended, making for time-rotating logs.
- Keep an up-to-date browsable directory of members of your Google Groups or a list of domain-wide Classroom classes in a Coda table.
- Create copies of a relevant Coda template doc (or any of its pages) when new users are provisioned in a Workspace domain.
This pattern can be convenient, as we keep the logic of the interaction inside the automation formulas, which in turn can be easily updated by end-users , with no knowledge of Apps Script (or any other development stack of choice), as required.
But there are also some catches worth mentioning.
On the one hand, automations suffer from a monthly cap in the more basic subscription tiers. We already discussed this when talking about sending multiple rows of data in just one request.
On the other hand, there is a ceiling for the payload size that POST requests can carry. Apps script poses its own 50MB limit to the URL Fetch POST size. Coda's technical documentation mentions a maximum data size of 125MB for docs to be managed by the API, but it is unclear if this same limit also applies to the payload size that webhook-triggered automations can handle.
Therefore, using the API directly or building a Coda Pack, instead of resorting to the webhook mechanism introduced in this post, should be carefully pondered on a case-by-case basis.
I'd love to hear about how you use Coda and Apps Script together! Please, feel free to leave your reflections or questions in the comment box below.
Comentarios