
Discovering Google AppSheet in 48 hours | Part 2

👋 This article is the second installment in English (of a series of four) of the original Spanish post "Descubriendo Google AppSheet en 48 horas", which was previously published on this blog in August 2023.
Part I. Introduction and data
Part II. 🡆 Tables and the formula language 🡄
Part III. Views
Part IV. Actions, catch-all section and closing comments
🙌 Thanks to Christian Schalk for suggesting an English version in the first place and for his help and encouragement along the way.
TABLE OF CONTENTS
Messing around with tables and the AFL
I have to admit that what surprised me most about AppSheet was its rich and powerful formula language, so I will devote a large part of this article to talking about it and presenting some use cases that I found very significant.
Honestly, I didn't expect the AFL( AppSheet Formula Language) to be so fresh and well-designed. As you already know if you read the first part of this series, I had certain prejudices against AppSheet, but since I've expressed my deepest regrets several times, I'll stop whining about it right now.
Some of AppSheet's built-in features will remind you a lot of those available in Google Sheets. But make no mistake, there are things that significantly up the ante and, at the same time, change the rules of the game. And here's the first of them:
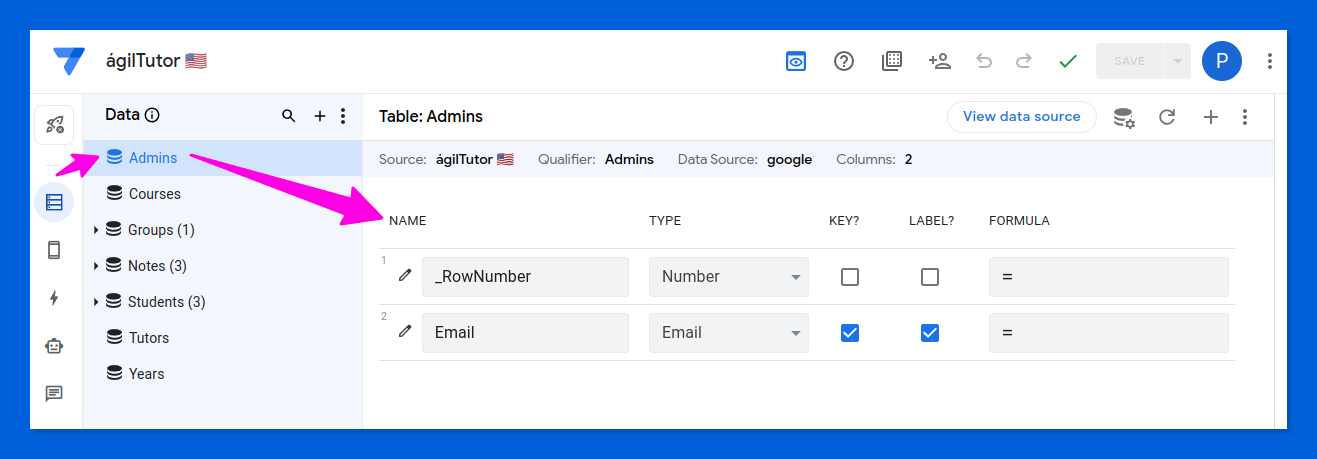
1️⃣ You can access data in any table column using this interesting bracket syntax.
Admins[Email]
The above expression returns all items in the Email column of the Admins table, which in this case only contains information in row 2 of the spreadsheet from which the data originated.
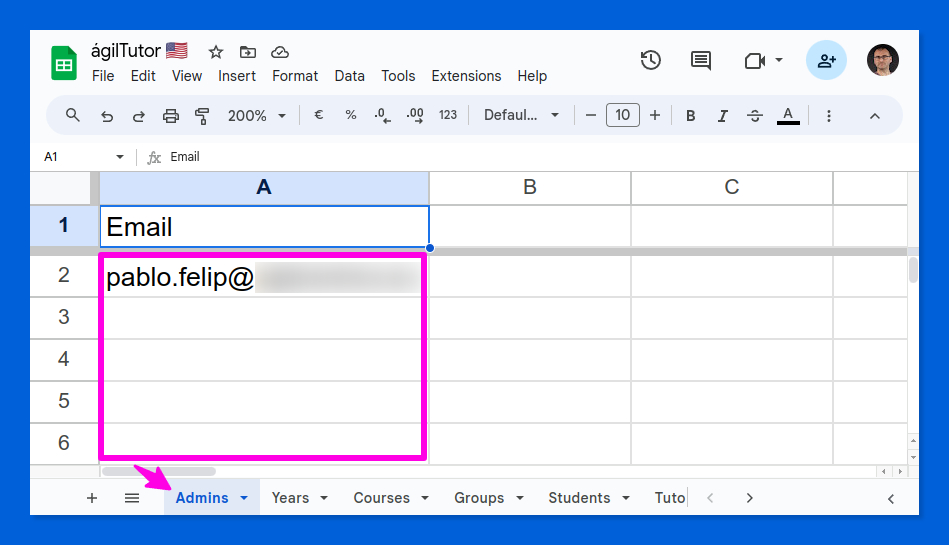
It's clear, right? If the data source is a Google spreadsheet, AppSheet will:
- Name the table after the worksheet name (Admins).
- Name the column after the text entered in the header cell (Email).
☝ If you add a comment to the header cell (A1 in the example above), AppSheet will use it to set the value of the DESCRIPTION property of the table in the AppSheet editor. These descriptions can be useful in some views of your application because they are more descriptive than the usually succint column names. In fact, AppSheet performs an intelligent analysis of the column headers to try to infer the structure of your data.
An talking about naming things...
⚠️ Be very careful about changing the names of the worksheets in the spreadsheet that makes up the data source of your application. Of course, this can be done (with some hitches), but in my brief experience I would try to stay away from it as much as possible, as it can have some really nasty side effects. Oh, and those cool people chips of Sheets seem to be confusing AppSheet for the time being, let's pray they won't do it for much longer.
☠ Changing the names of tables, columns, and other elements in AppSheet can break your app until the references to them in formulas and expressions are corrected. Getting it all working again can be a tedious and tricky job.
🤷♂️ Unfortunately, I feel that these renaming issues are some of AppSheet's most troubling weaknesses at the moment, something that should be fixed as soon as possible for a better and more relaxed app building experience.

If you are used to how Google Sheets formulas work, something equivalent could be this array formula:
{A2:A}AppSheet totally forgoes the familiar coordinate-based references typical in spreadsheets (e.g., A2) to access the data contained in your tables.
Instead, you can use expressions that use meaningful table and column names to retrieve every single item contained in a given column of any table.
table[column]
I'm confident that if you ever used the formula language of tools like Notion or Coda, you'll feel right at home! I certainly feel like that about AppSheet.
In AppSheet, as in Notion and Coda, the minimum unit of information in a table is not a cell, but an entire column, since it works more like a traditional database.
Does this mean that we will not be able to use our formulas to read or write the value stored in a particular column of a specific row ? Not at all. But one thing at a time.
You should know that under its discrete hood, the AppSheet formula engine supports lists of elements (they must be of the same type), just like Coda. So what we get back from an expression like the one above is just that: a list.
We can also create lists using curly braces...
{ "Group 1", "Group 2", "Group 3" }... or by resorting to the LIST() function to build them from other elements:
LIST("Group 1", "Group 2", "Group 3")We will even enjoy a certain "arithmetic" when dealing with lists, since we can easily add (combine) or subtract (remove items) lists:
{ "Group 1", "Group 2" } + { "Group 3" } → { "Group 1", "Group 2", "Group 3" }{ "Group 1", "Group 2", "Group 3" } - { "Group 2" } → { "Group 1", "Group 3" }As well as obtaining a new list from the intersection of two other given lists:
INTERSECT({ 1, 2, 3, 4, 5 }, { 3, 4, 5, 6 }) → { 3, 4, 5 } Uber cool, huh! 😏
In fact, AppSheet provides a rather thorough set of functions for managing lists —hello again, Coda— as well as some others that return lists.
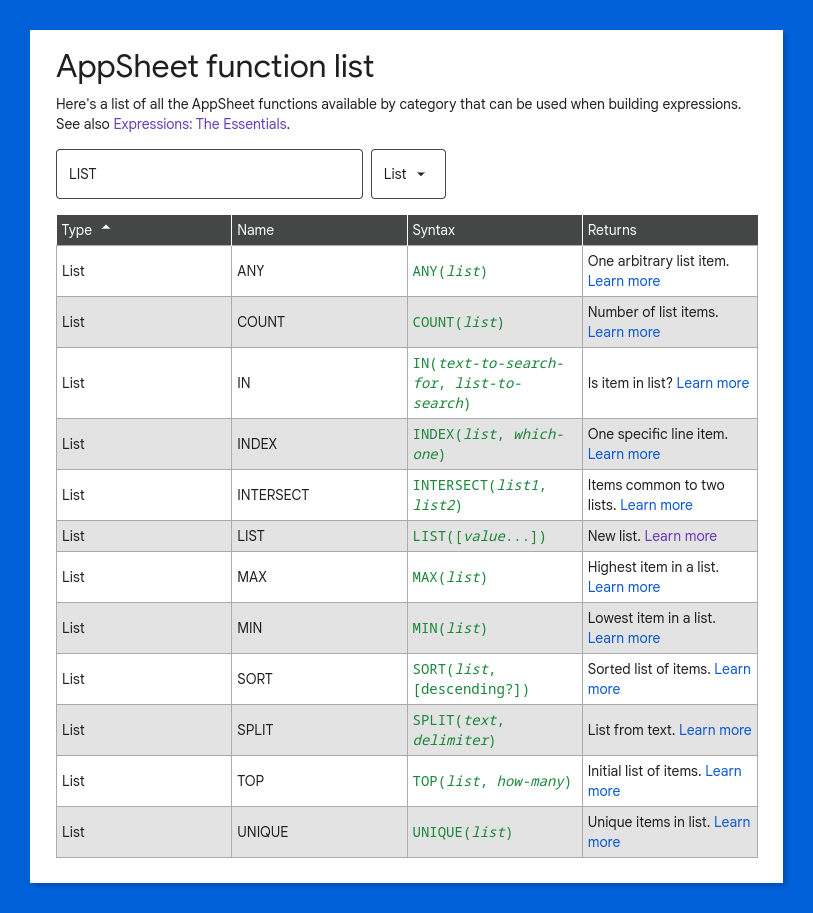
Unfortunately, I have not found an obvious way to iterate over the elements of a list within a formula to perform calculations or take actions on each of them, as is possible in Coda with the equivalent ForEach() and FormulaMap() functions, or the recent map() in Notion's Formulas 2.0. I would say this is a weakness that should be addressed.
Okay, but what are these lists good for? Calm down, I'm coming.
I need to tell you now about the second of those things that I think change the rules of the game.
2️⃣ You can use formulas in the most unexpected and obscure places within the AppSheet editor to make decisions that will shape the behavior of your application in a dynamic and extremely granular way.
For example:
- Establish users' access privileges for each data table, determining their ability to read, edit, insert, and delete items.
- Create calculated fields that AppSheet calls virtual columns. These virtual columns are visible in the AppSheet editor but do not exist in the underlying spreadsheet (or any other data source in use) and their values are never written back to it.
- Access data stored in different tables, no matter if they are related or not.
- Hide certain table rows from particular users of your application, providing a form of row or record-level security.
- Set default values for the fields (columns) of a table.
- Hide certain table columns from being displayed in specific views of your application.
- Show or hide the buttons of your app depending on various context circumstances.
- Apply validation rules to user-entered data to accept or reject it before it is actually stored.
- Apply conditional formatting rules.
- Change the visible labels of the fields displayed to the user of your app.
- Display messages and texts, in general, in different languages depending on the regional configuration of the user's device.
Yay, not bad at all! And I'm sure I'm leaving things out, because the list is long. Very long.
All these possibilities give us, as developers, an awesome control over the behavior of our application, which we can design to adapt to the identity of the user (indeed the first thing I thought of) or to many other context circumstances that could arise while in use.
Yes, same thing as in Coda (again), although I would say that AppSheet may provide an even greater versatility.
Let's look at a few real-world situations where all these AppSheet capabilites have been leveraged. I will use the small student tracking application I have developed as a timely excuse to demonstrate them to you.
Table access permissions by user
I'll use the Courses table for this, but we could do just the same thing with any other table in our demo application.
We'll swiftly head to the settings ⚙ panel of the chosen table.
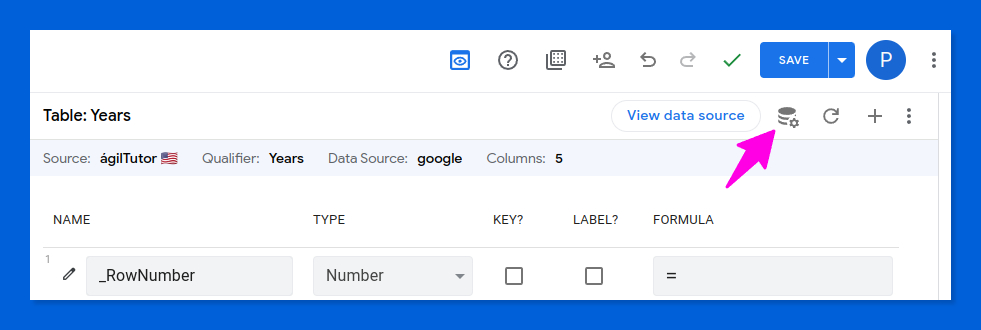
We are looking for the section called "Are updates allowed?" You can't miss it, it is just below the name of the table.
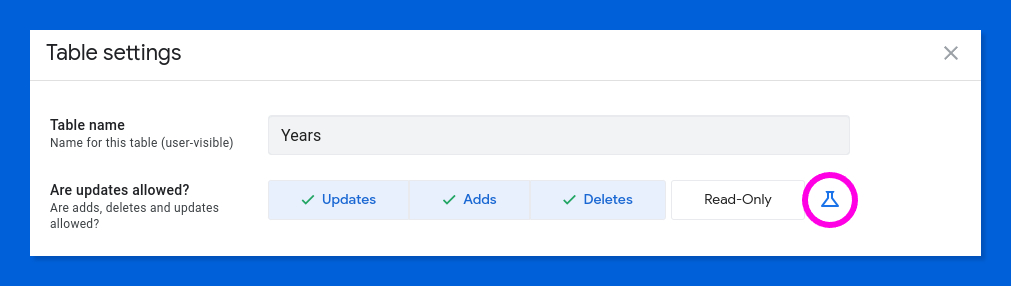
We can set unconditional permissions using those Updates / Adds / Deletes and Read-only buttons. However, this is not what we are after.
Note that ⚗ button shaped like some sort of laboratory flask. You'll get tired of seeing it everywhere in AppSheet. It hints that the setting next to it can be set by a formula.
Pressing it brings up the AppSheet formula wizard, which we will use this time to enter the one you can see below 👇.
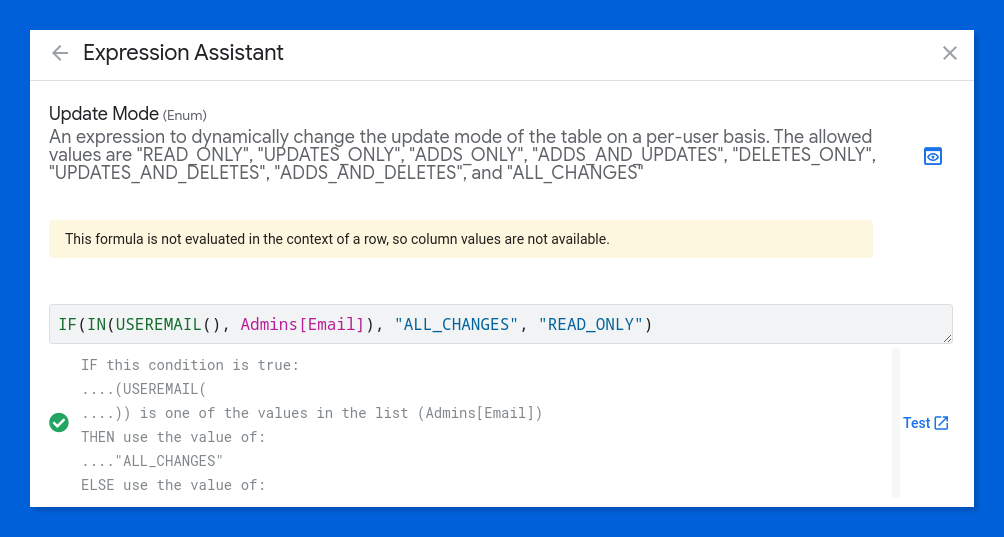
IF(IN(USEREMAIL(), Admins[Email]), "ALL_CHANGES", "READ_ONLY")
Two things are going on in this formula:
- First, we get the email address of the user running the application (the active user) thanks to the convenient USEREMAIL() function.
- Second, we leverage the amazing AFL's list support via the IN() function to make sure that only those users whose email addresses match any in the Admins table (which you are already acquainted with) can freely modify (ALL_CHANGES) the information contained in the Courses table. Other users will have read-only access (READ_ONLY).
By the way, check out how great the formula editor looks.

- It makes it easy to enter multi-line formulas, colors their syntax, and even highlights paired opening and closing parentheses.
- It has full context-sensitive help and provides useful usage hints.
- It displays a rich set of sample expressions to aid you in your quest of pulling the perfect formula.
- It includes a data explorer to browse your tables and their columns.
- It checks formulas for correctness in real time, and explains the inferred operations using plain words (I'd kill for this in Sheets, wouldn't you?).
Top notch, my most dear Google AppSheet development team & associated PMs 👏.
Calculated fields to summarize data
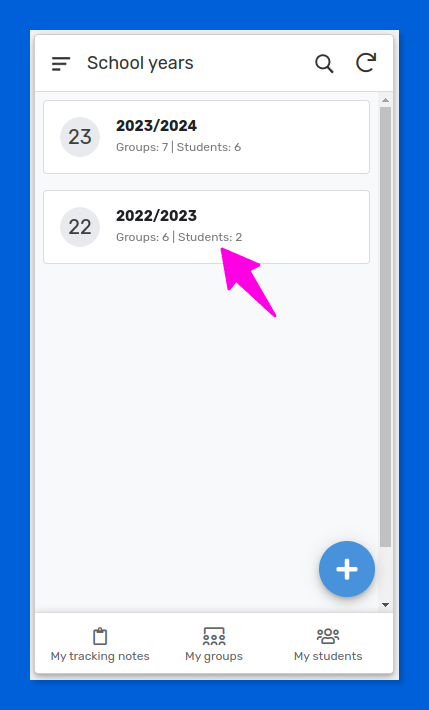
The point here is to show the number of groups and students per school year. Something like this:
Let's see how to deal with such challenges in AppSheet.
First and foremost: the school years (Years) and student groups (Groups) tables are related by the Year field.
It seems like a good time to talk about how AppSheet manages the relationships between tables.
☝ In the coming paragraphs, I will use the terms column and field, on the one hand, and row and record, on the other, interchangeably.
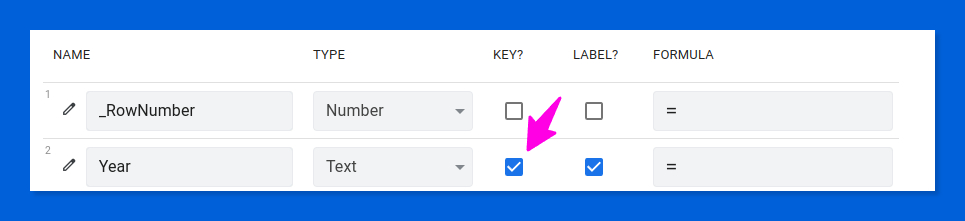
All tables must have a key field, which is a column containing non-repeating values that unambiguously identify each of the entities represented in the different rows of the table.
It is important to highlight that this key column (or primary key) is often constructed by combining several table columns using formulas.
The goal we pursue is always the same: to ensure that the values stored in the key column are unique, so that there is no ambiguity in identifying each record in the tables that our application manages.
In the case of the Years table of our example, we will simply use the name of the school year for that, which in in Spain is often something like this: "2023/2024".
In the Groups table, we find a composite primary key. This virtual column is obtained by concatenating the course internal code (Code column in the related Courses table) and the school year (Year column of the related Years table). For example: "DAM (2023/2024)". In this way, we'll be able to tell apart the different groups of each course that take place in different in different school years.
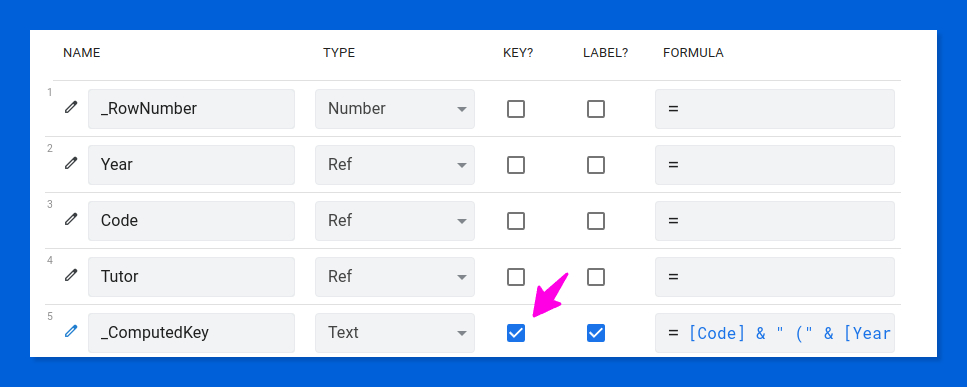
[Code] & " (" & [Year] & ")"We use the ampersand (&) operator to concatenate text strings, just as in Google Sheets. AppSheet provides a nice CONCATENATE() function, too.
AppSheet happens to be a very proactive little non-human and goes to the trouble of detecting which tables appear to be related based on the structure of the spreadsheet used as the data source of the application.
For example, this is the definition that is automatically applied to the Year column of the Groups table when imported from the spreadsheet.
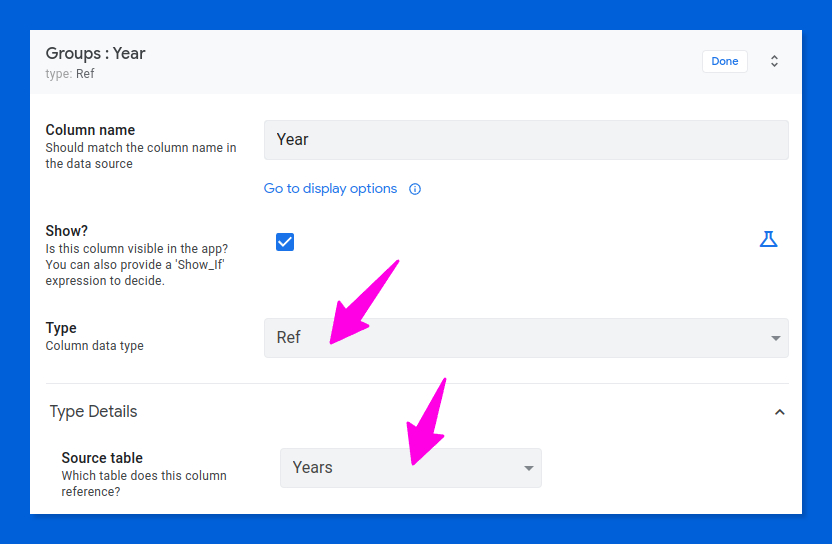
Of course, builders will always have the last word and will be able to modify or delete the automatically generated relationships or create new ones.
But let's focus now on the Years table.
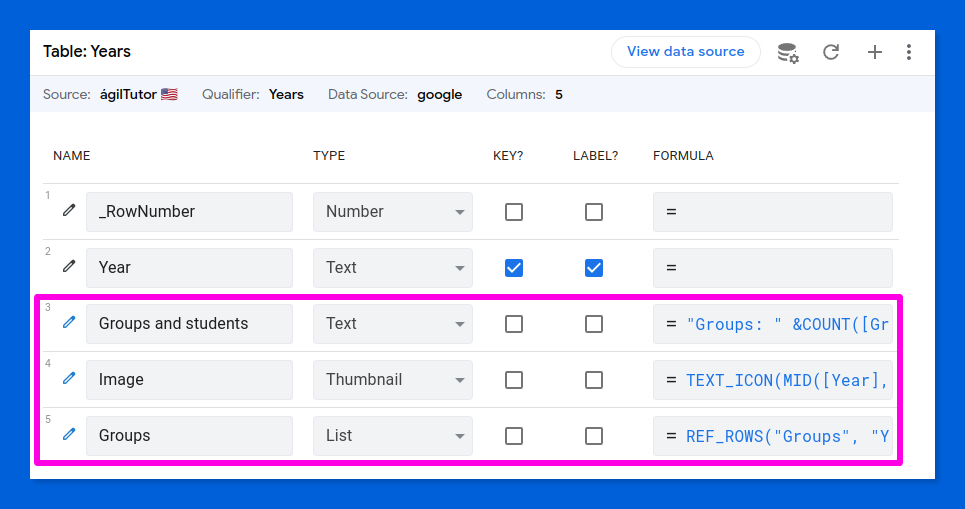
In this table, AppSheet creates, also on its own, another virtual column called Groups, which retrieves the full list of groups for each school year from the table of the same name by using the REF_ROWS() function.
☝ To be more precise, the above function actually pulls the values contained in the key column of the related rows of the Groups table.
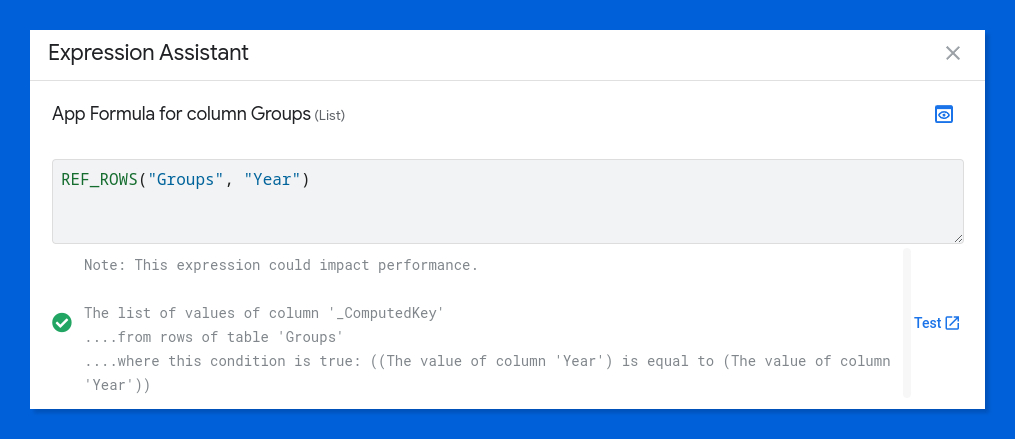
REF_ROWS("Groups", "Year")And this, my dear friend, is what AppSheet calls a reverse reference, which, as you can imagine, comes in handy, no matter how "reverse" it is. Learn to love it the way it deserves to be loved.
We're almost there!
Now, we'll add another virtual column named Groups and Students to the Years table, which will do the counting of (surprise!) groups and students.
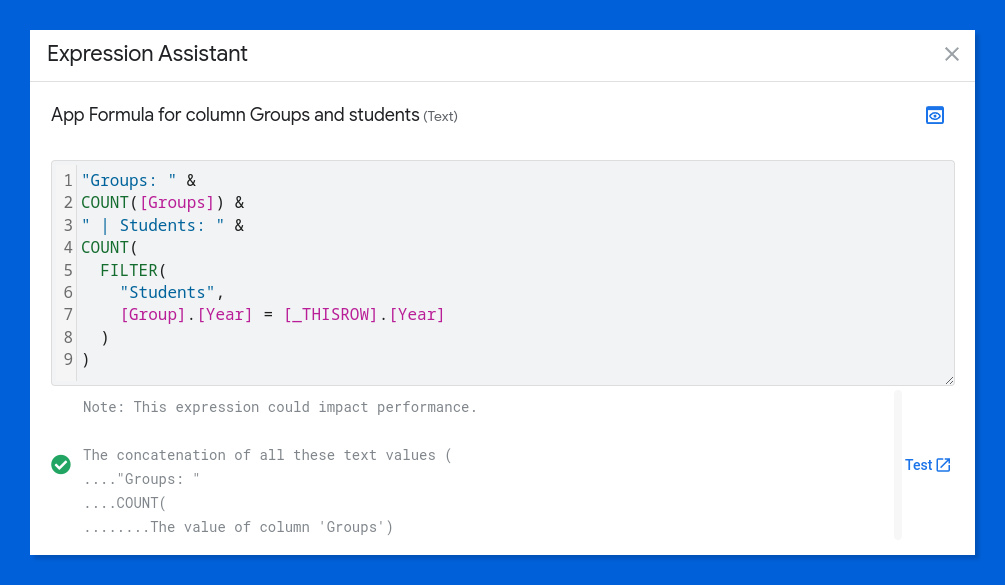
"Groups: " &
COUNT([Groups]) &
" | Students: " &
COUNT(
  FILTER(
    "Students",
    [Group].[Year] = [_THISROW].[Year]
  )
)
But wait, what kind of witchcraft is this? 👇
[Group].[Year] = [_THISROW].[Year]
Well, that, my most dear friend, is the remaining third feature of AppSheet's formula language that —you already know— changes everything.
3️⃣ You can traverse related tables, until you reach the column you want, by using expressions that concatenate column names, between square brackets, separated by periods.
But let's take it one step at a time...
COUNT([Groups]) & " | Students: "
[Groups] represents the virtual column defined in the Years table, which as we already know, contains the groups related to every school year. Then, the COUNT() function does the obvious thing of finding out how many groups we have each school year.
We already got the groups in the bag. Let's move on to see what happens with those pesky students (wait and behold AppSheet's coolness 😎).
COUNT(FILTER("Students", [Group].[Year] = [_THISROW].[Year]))Thanks to the a-m-a-z-i-n-g FILTER() function, we target the table containing the information about our students (Students) and fetch only those who are actually enrolled in groups pertaining to the school year for which the calculation is performed.
Here, [Group] is a Ref field in the Students table, which is used to establish a relationship with the Groups table. That is, it associates each student with a specific class group.

This expression obtains the school year (column Year) of the group (column Group) each student is enrolled in.
[Group].[Year]
And this value is compared with every value in the Year column of the Years table thanks to the [_THISROW] expression, which represents every single row of this table on which the formula is evaluated.
[_THISROW].[Year]
In short, we have managed to apply a filter to get the list of students enrolled in the groups of any given school year, a list whose length we then calculate.
Finally, a compound text string is built by conveniently combining the results of both counts to make sense of it all.
"Groups: " &
COUNT([Groups]) &
" | Students: " &
COUNT(
  FILTER(
    "Students",
    [Group].[Year] = [_THISROW].[Year]
  )
)
Clean and simple. Isn't the AFL beautiful?
☝ Obviously, the way AppSheet works has many things in common with my (also) beloved Coda (I don't care if it was the chicken or the egg that came first 🤷). And, of course, both Coda and AppSheet were built to make managing related data tables a breeze, so it's not surprising that their creators have made some convergent design choices. Good thing!
Are you getting the hang of how AppSheet thinks?
Let's do some more examples to make sure.
Dynamic options in drop-down lists
My app is all about registering annotations that help teachers deliver the best possible tutoring and mentoring to their students.
Teachers will need to use a form like this to first select the group and then the student they want to track to add comments to assess progress, attitude, and some other relevant aspects.
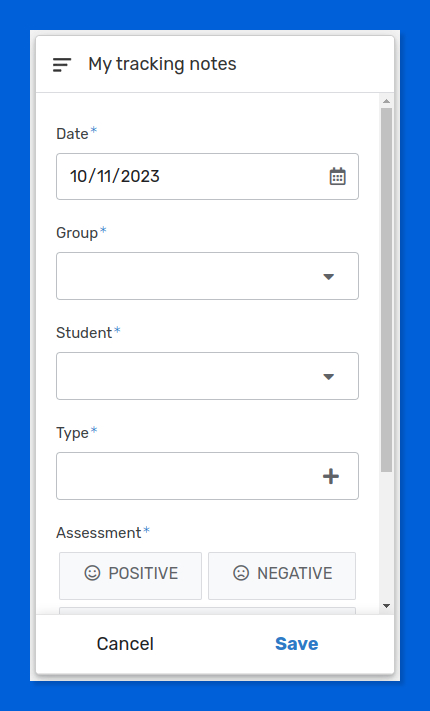
To make life easier for my hard-working tutors, ideally both selection items, group and student, should behave like this:
- Tutors should only be able to choose a group assigned to him or her.
- Tutors should only be able to pick up a student that is enrolled in the previously selected group.
- Both lists of groups and students should be sorted alphabetically for easier selection.
Therefore, we will need to filter out dynamically all those groups and students that are not relevant for a particular tutor. And sort both sets of items as a bonus (the easy part).
As you might expect, the Notes table is linked to the Groups and Students tables by a Ref column. I'll show it to you in all its entirety so that you can mentally connect it to the note-taking form above.
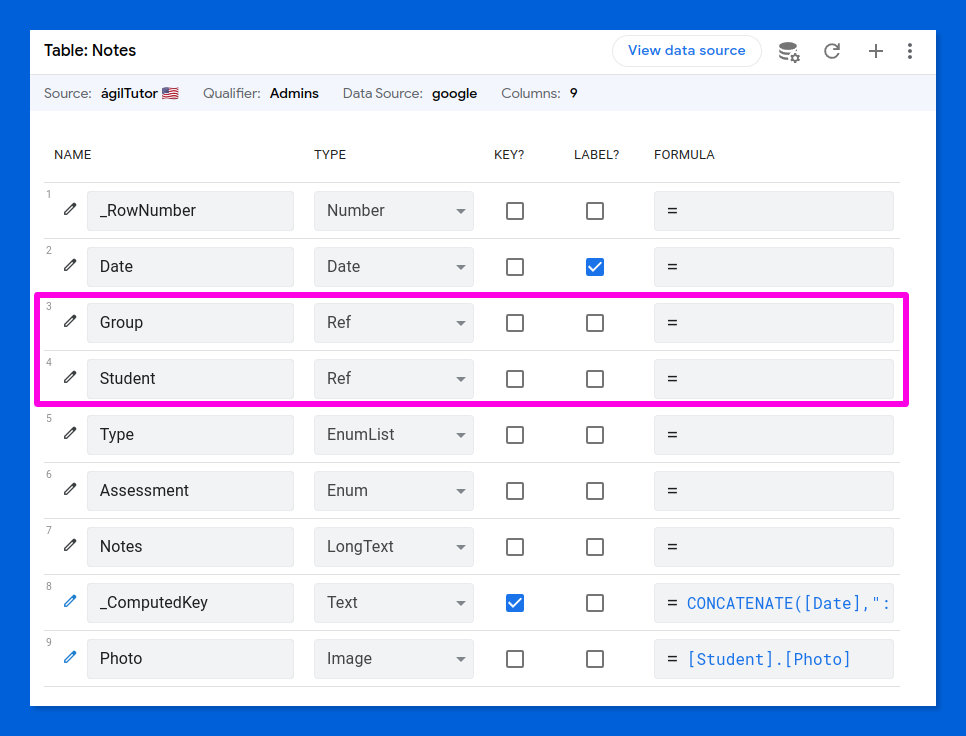
AppSheet displays these relationship columns as drop-down list controls in your app views for entering or editing data.
These lists are fed from the values stored in the key column of the table on the other side of the relationship, but they are displayed in the order that determines their position (row) in the source table. This is quite underwhelming.
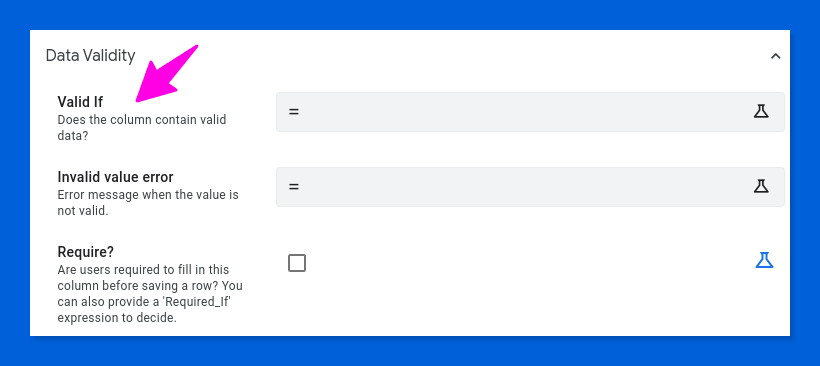
To solve this, we can use the data validity settings that AppSheet gently provides.
More specifically, you should look for the Valid if setting in the Data Validity section, which initially appears collapsed.
I have to admit that I got stuck here for a few minutes 🤔...
In the name of all the holy spreadsheets, how a validation rule, which should return a true or false value to accept or reject an input accordingly, can be used to filter a list of possible items?
Well, it turns out that the Valid if setting has something like two modes of operation. You can enter a formula that returns either a boloean result to accept/reject values or a list of possible values that will be displayed as option items in the list box. The wonders of AppSheet, no doubt.
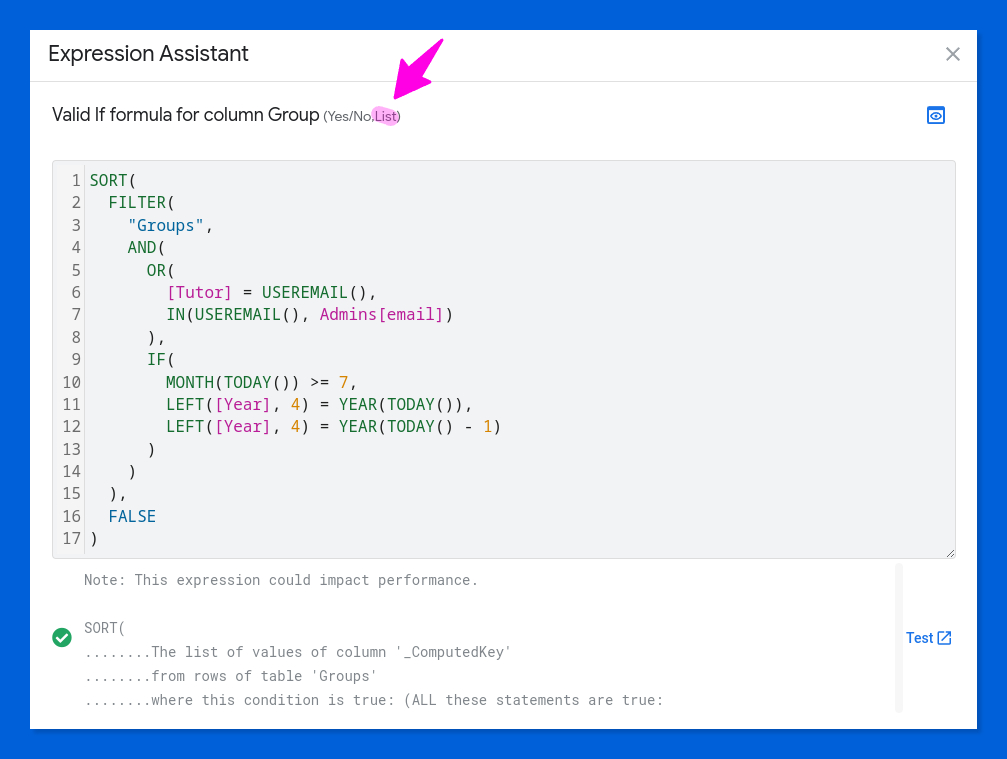
The magic expression for the Group field looks like this.
SORT(
  FILTER(
    "Groups",
    AND(
      OR(
        [Tutor] = USEREMAIL(),
        IN(USEREMAIL(), Admins[email])
      ),
      IF(
        MONTH(TODAY()) >= 7,
        LEFT([Year], 4) = YEAR(TODAY()),
        LEFT([Year], 4) = YEAR(TODAY() - 1)
      )
    )
  ),
  FALSE
)
We use the SORT() function to sort the list of allowed values, which are obtained from the list of groups in the Groups table that:
- Are tutored by the teacher using the form.
- Belong in the current school year. My school years are something like "2023/2024", and in Spain classes start at the beginning of September and end towards late June next year. That being so, an "active" course for me is that whose year before the / symbol is either equal to the current year from July onward, or equal to the year before if the current month is prior to July.
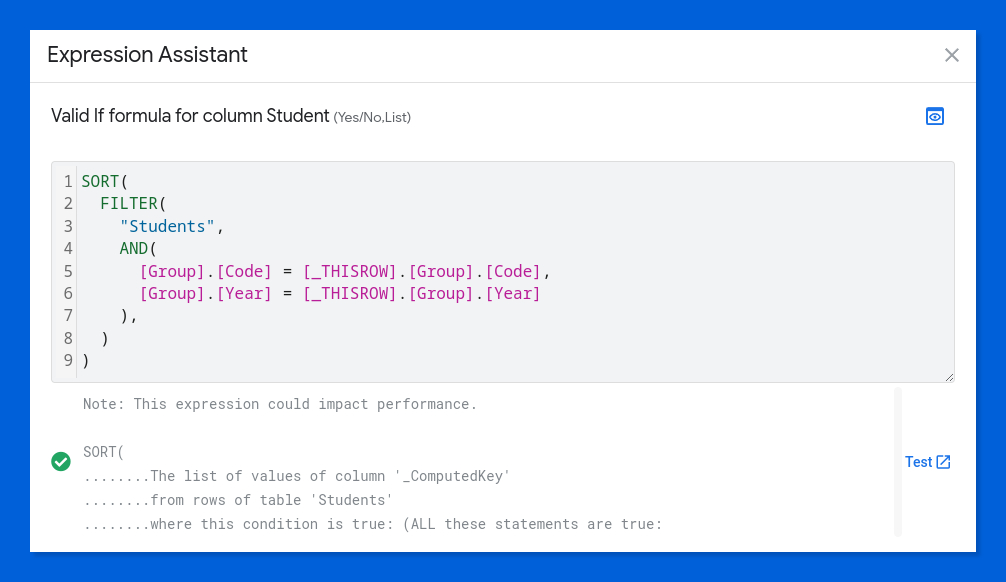
Things are actually simpler when dealing with the student selector:
SORT(
  FILTER(
    "Students",
    AND(
      [Group].[Code] = [_THISROW].[Group].[Code],
      [Grupo].[Year] = [_THISROW].[Group].[Year]
    ),
  )
)
Here we politely ask AppSheet to build a list of students who are enrolled in the group previously selected in the group drop-down list, i.e. the group whose Code and Year fields match the chosen one in the form.
Assuming the risk of being considered a formula freak, I would like to insist on the relevance of being able to hop from one table to another, like a geeky squirrel 🐿 jumping from relational tree to relational tree, thanks to this helpful syntax composed of brackets and periods:
[_THISROW].[Group].[Code]
Let's look again at the formula we have just used to filter the data:
- [_THISROW] represents the current row of the Notes table, that is, the still incomplete record as it is being entered through the form.
- The expression [_THISROW].[Group] gets the row containing all the details of the selected group from the Groups table.
- Finally, with the twin expressions [_THISROW].[Group].[Code] / [Year], we fetch the internal code of the course and the school year of the group, respectively, which we will both use as comparison elements within the FILTER() function to eventually retrieve the list of students enrolled in the chosen group.
I warned you, the AFL is beautiful. And rather addictive, too 😏.
Row-level security (aka filter by email)
Let's start with a simple one: tutors should only see the list of groups they are tutoring.
To do this, hit the settings button ⚙ in the Tutors table and find the Security → Security Filter item.
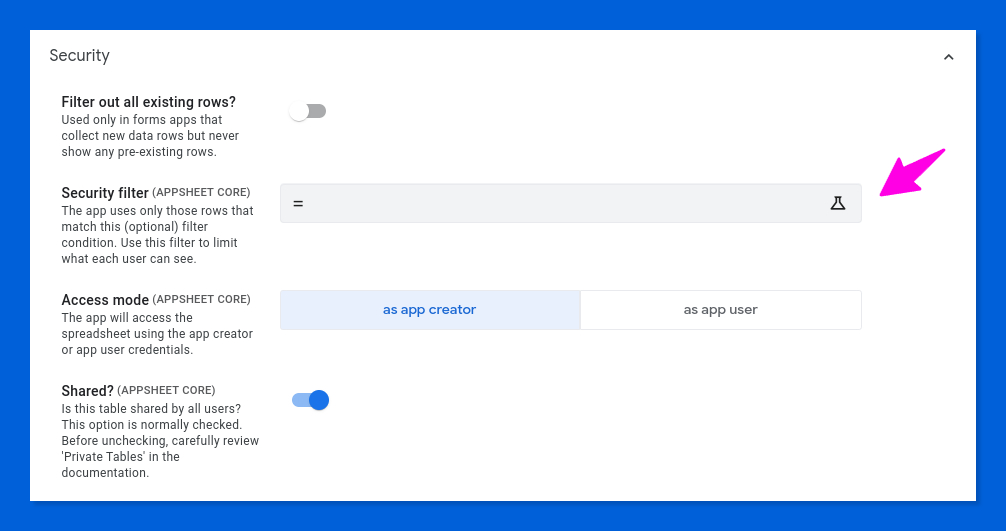
This is the expression we need:
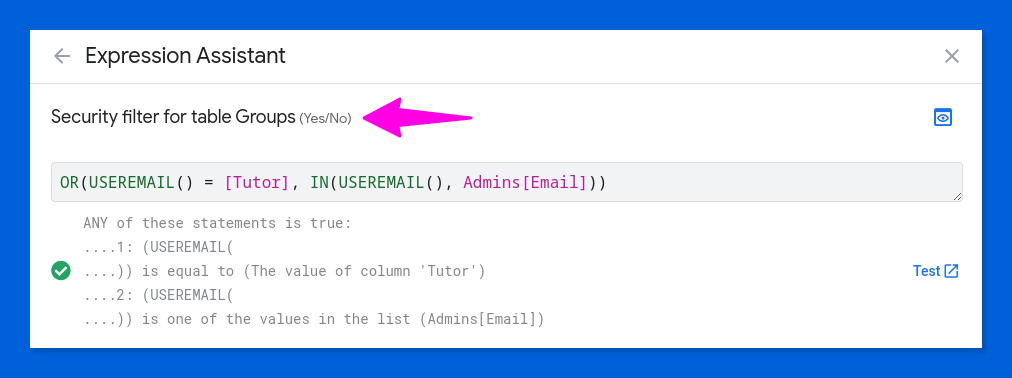
OR(USEREMAIL() = [Tutor], IN(USEREMAIL(), Admins[Email]))
You nailed it. School managers will also enjoy full access to all records (agreed, rows) in the groups table.
Let's give this record-level security thing a twist.
What if we want tutors to only see the school years with groups they were assigned to do their tutoring?
To make each record in the Years table visible, we need to check that the current user's email address appears in the Tutor column of any of the rows in the related Groups table.
And what better way to perform this check than to introduce a shiny new function, the enormously versatile SELECT().
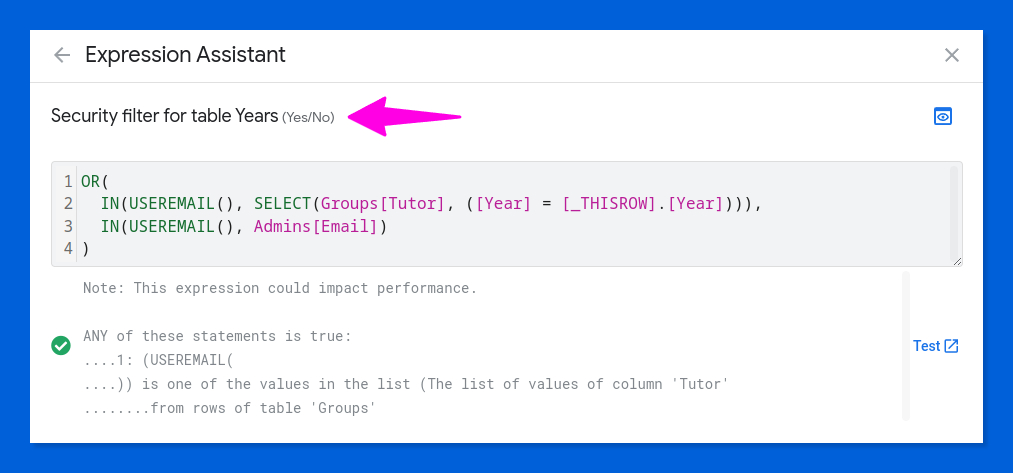
OR(
  IN(USEREMAIL(), SELECT(Groups[Tutor], ([Year] = [_THISROW].[Year]))),
  IN(USEREMAIL(), Admins[Email])
)
I guess that at this stage of the party not much more clarification is needed on the formula up here (you can tell otherwise in the comments section of this post 🙏).
I almost forgot. As you can see, I've become quite fond of having my application behave differently depending on the active user running it. Not just an obsession of mine, but a useful feature, if not a frequent requirement.
And it seems that the designers of AppSheet feel the same way. For this reason, they have provided a very convenient procedure that allows you to verify its correct operation by assuming different identities during development.
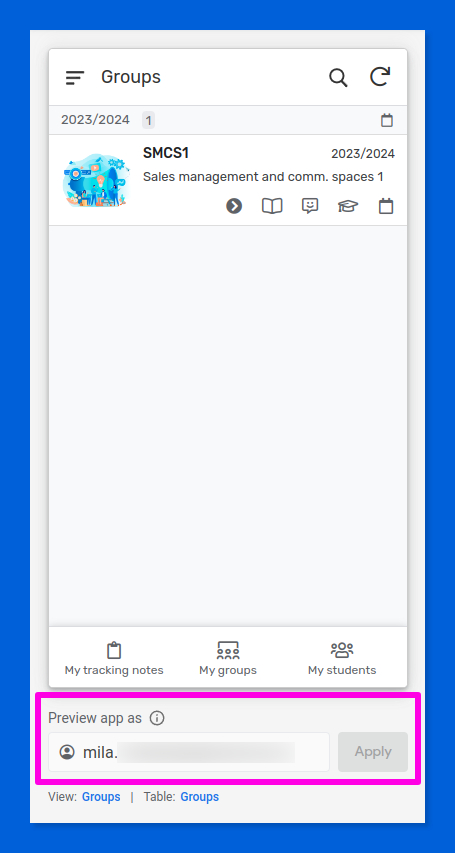
Just throw in the email address of the user you wish to test your app as in the box below the preview. No passwords. No hassle. All good.
And to close this section, something quick and eye-catching next.
Initial values for column data & the TEXT_ICON() function
The settings that control the appearance and behavior of the columns of a table include an interesting section called Auto Compute.
There, you will find a setting called Initial value. I used it to insert a default image showing the student's initials in the Photo field of the Students table.
Of course, the student's tutor can always replace it with a real picture, which can be taken on the spot with the camera of your mobile device.
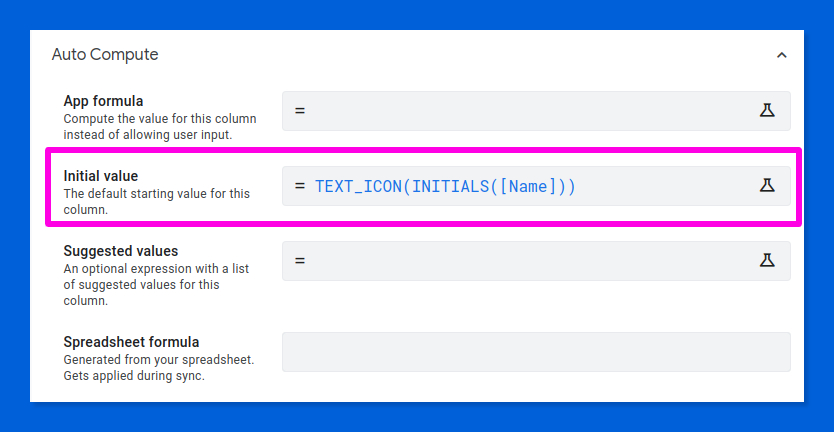
TEXT_ICON(INITIALS([Name]))
The TEXT_ICON() function is a little genius that generates an icon from the text passed as a parameter. Since brevity is the source of wit, I combine it here with INITIALS() to get a nice little image that shows the student's initials.
On the not-so-cool side of AppSheet's formula language, I was surprised not to find functions for handling regular expressions. Maybe I wasn't looking hard enough.
True, we have an interesting EXTRACT() function out there, and we can also case use spreadsheet formulas to overcome this apparent limitation somewhat, but I could not pass up the opportunity to put in some "but" 😁.
After this last example, I think we have already talked more than enough about the fascinating AppSheet formula language, although the truth is that it will be difficult for us to escape it in the rest of this article 🙃.
An now the time has come for me to tell you about some of the things that really caught my attention when first approaching AppSheet's Views. But you'll have to wait for part three of this series to find out.
Until then, happy appsheeting!
Comentarios