
Discovering Google AppSheet in 48 hours | Part 3

👋 This article is the third installment in English (of a series of four) of the original Spanish post "Descubriendo Google AppSheet en 48 horas", which was previously published on this blog in August 2023.
Part I. Introduction and data
Part II. Tables and the formula language
Part III. 🡆 Views 🡄
Part IV. Actions, catch-all section and closing comments
🙌 Thanks to Christian Schalk for suggesting an English version in the first place and for his help and encouragement along the way.
An AppSheet with a view
Views in AppSheet control how the information contained in tables is displayed in your application. To create, edit, and manage views we will use AppSheet's Views panel.
Let me tell you just four insights about views (you know, this is not a tutorial 😉). If you still crave for more, take a look at this.
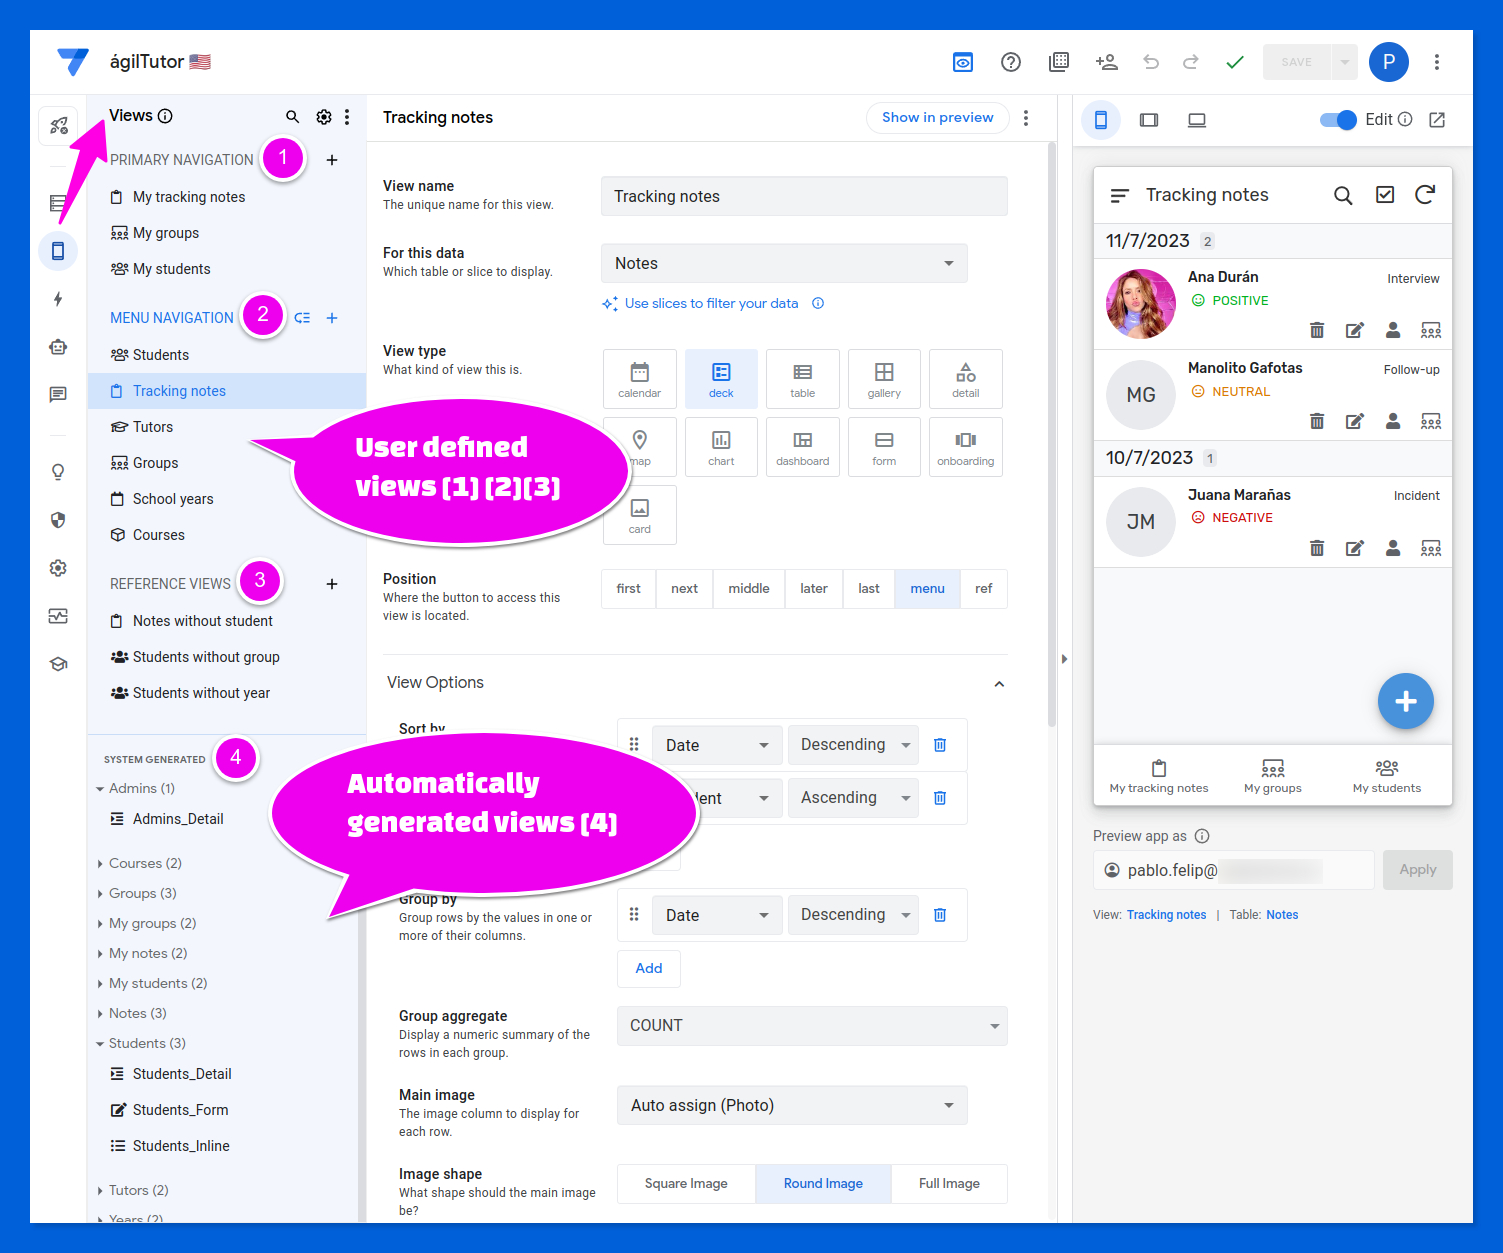
1️⃣ Each view is associated with a data table.
Views can also be based on a "slice" of a table. These slices can show a subset of the rows and columns of the original table. We'll go into this in a minute or two.
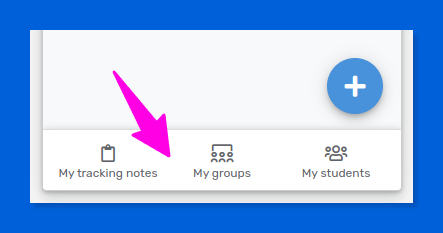
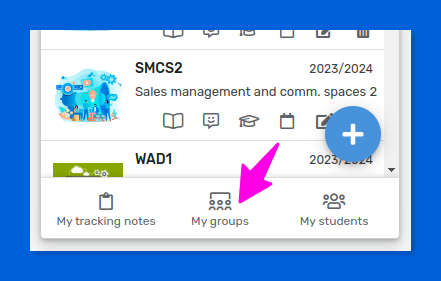
- Primary navigation views. You can open them using the buttons shown at the bottom of the screen. These buttons provide the users of your app a straightforward way to interact with your most important data. In my case, I've arranged quick-access shortcuts here so that my tutors can manage their tutoring notes, groups and students immediately upon launching the application.
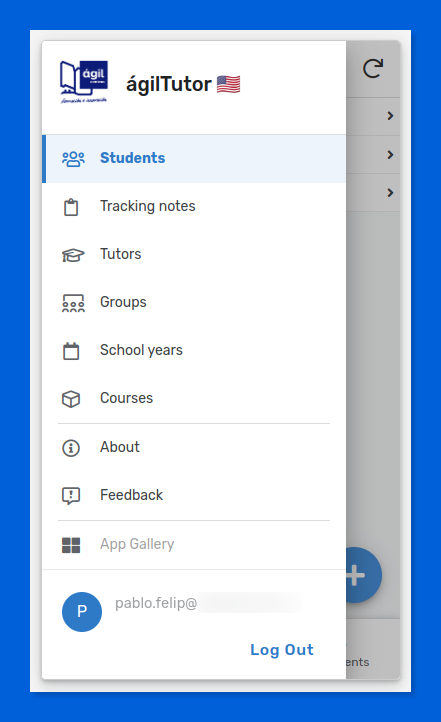
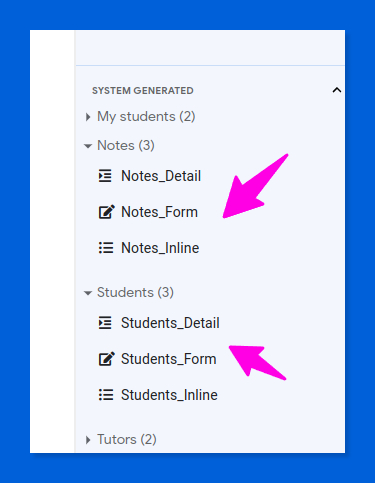
Some views in the primary navigation area of my app. - Menu navigation views. They are similar to the previous ones, but these can be accessed from the side navigation menu of your application. I have set up this menu to display as many views as there are entities (tables) that my application manages, with the sole exception of the Admins table, which I intentionally kept hidden from users in the UI and thus must be edited in the source spreadsheet.
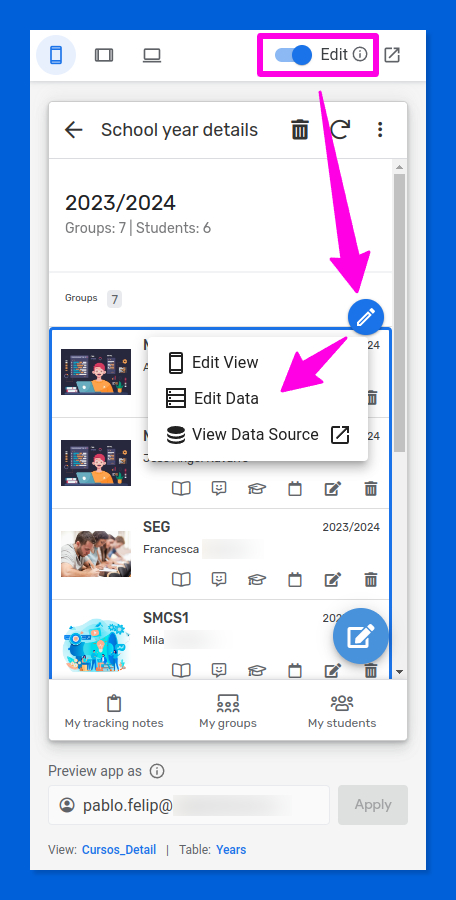
AppSheet's menu navigation. - Reference views. They are hidden, so you will reach them by interacting with one of the previous navigation views. These interesting beasts let you to view a record in detail, edit it, or display related data in a secondary view within a main view. Here is a sample reference view of the third type, which displays the list of groups for a given school year.
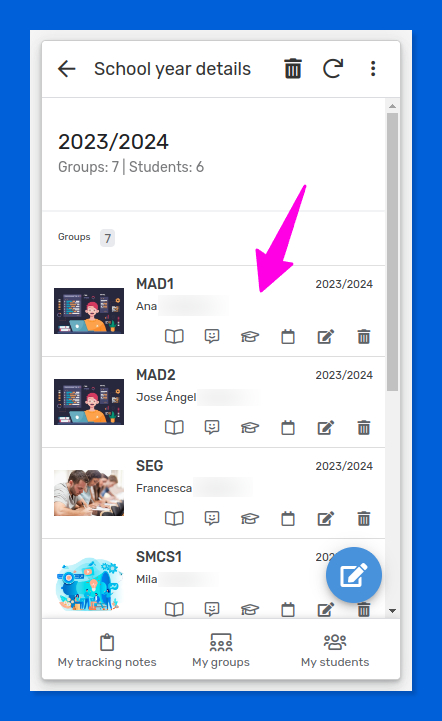
A reference view that displays school year details and related groups.
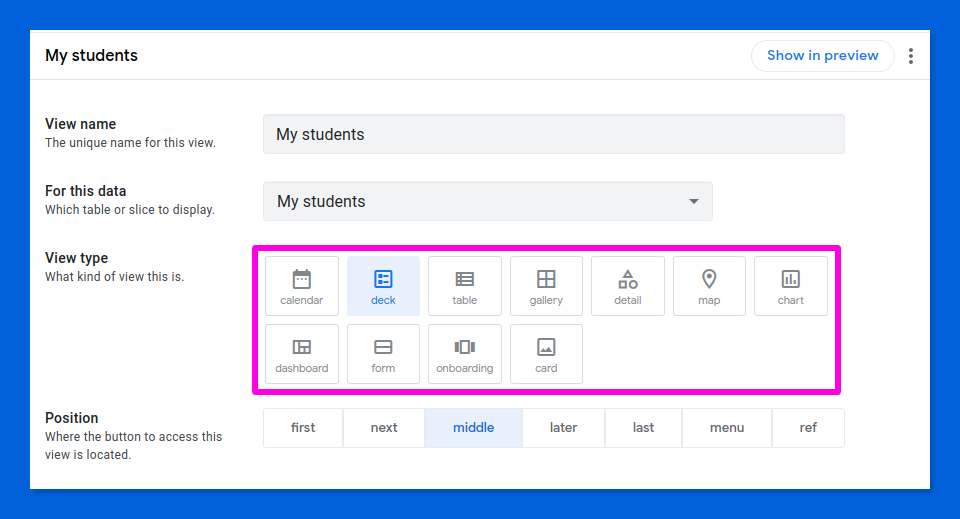
3️⃣ You can thoroughly customize the position and appearance of your views and the way they will display table data.
The View type setting in the editor determines how data is displayed: Calendar, Maps, Gallery, Map, Chart, Graph, Form... you have a wide variety of views to choose from, each with its particular features. It's a good idea to experiment with them and familiarize yourself with their bewildering settings so you can decide which one works best for each use case.
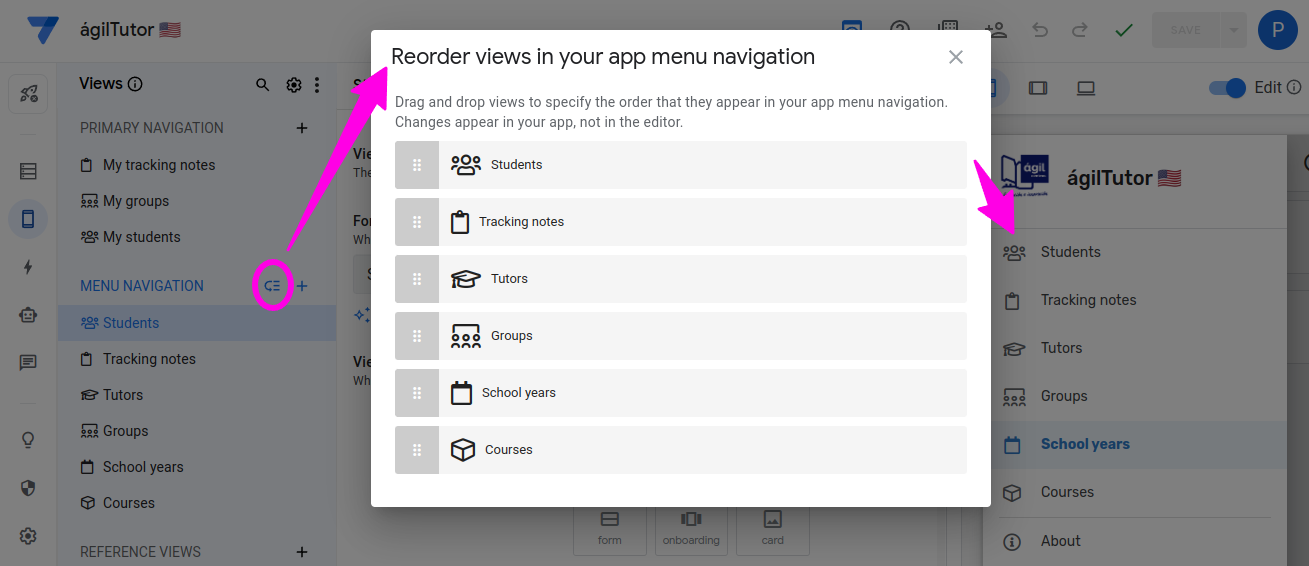
The position where the button or menu item used to activate a particular view appears is controlled by the Position setting, just below the one used to choose the view type.

In addition and as expected, the order in which views are displayed in the navigation menu can also be conveniently set.
AppSheet's view editing panel conceals enormous customization possibilities. Available settings may change, though, depending on the type of view you choose.
You can adjust aspects such as sorting and grouping (with multiple criteria) of table rows, the number and position of columns to display, and a long list of parameters that control both the appearance and behavior of views.
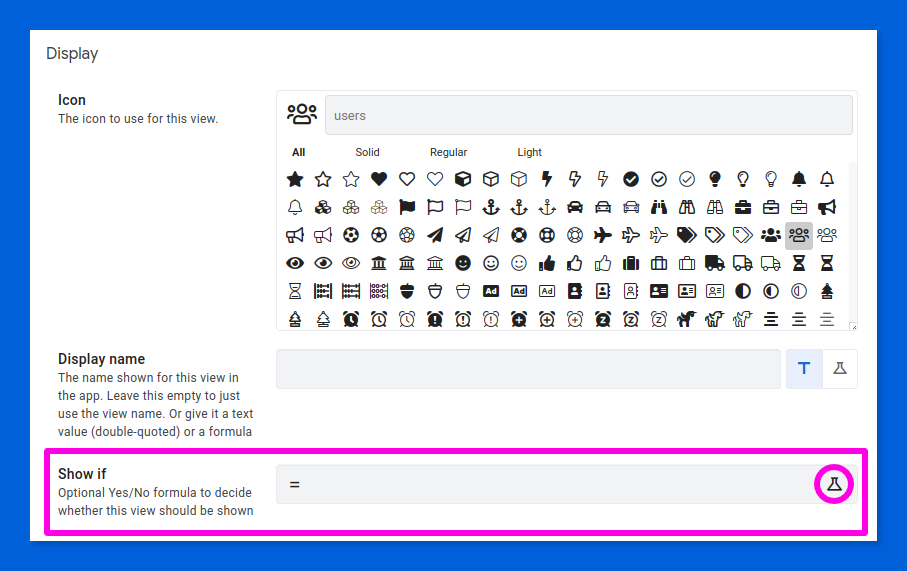
Views can also be hidden using conditional expressions that take the app's context as input, such as those previously covered in the AppSheet formula language section.
4️⃣ AppSheet will automatically generate reference views for your tables as they are needed.
To tell them apart from user views, AppSheet will prepend the names of the tables on which they are based with _Detail, _Form, or _Inline accordingly, depending on whether they are detail, edit, or secondary views, respectively.
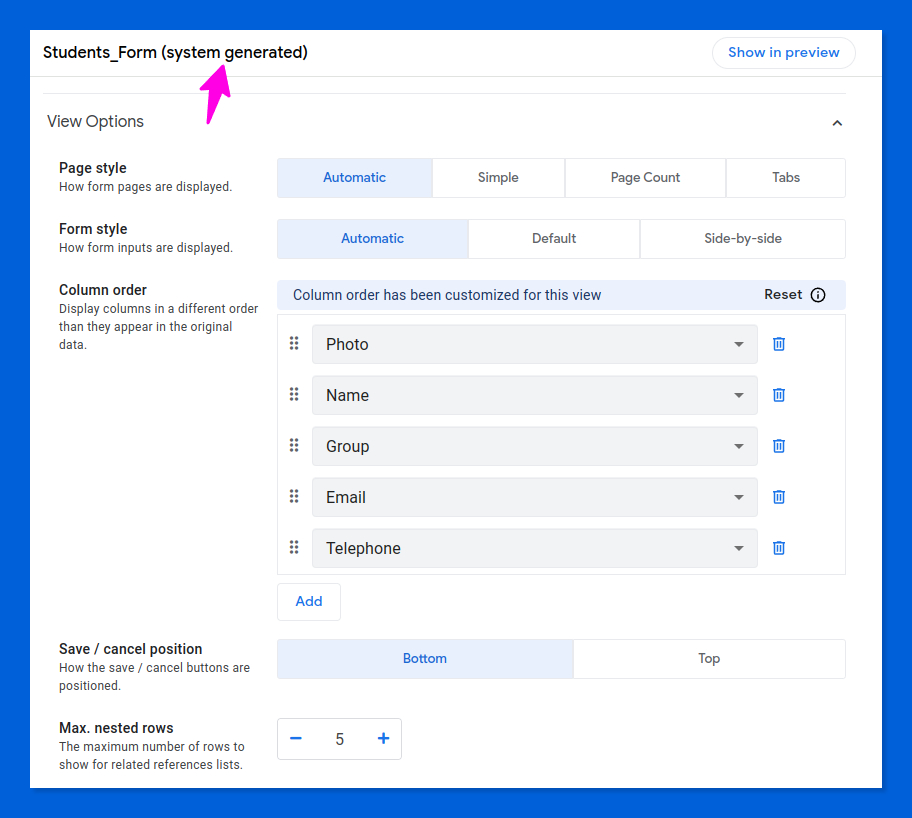
Much in the same way as navigation and reference views created by users, the system-generated ones can also be customized. The degree of customization also depends on the specific purpose of each reference view.
It is also possible to replace any of the automatic views with your own. Simply create a new reference view based on the same data source for AppSheet to use it instead of the system-generated one.
👏 The AppSheet editor has recently been revamped with an extremely useful feature: a visual editing mode in the app preview. Just hover your mouse over relevant elements and use the contextual menu to swiftly edit views, tables, columns and other items. Just awesome!
Already in love with Appsheet's vibrant views? Good for you. Let's talk about slices and further (and deeper) view customization.
Data slices and custom views
It is rather unlikely that you can avoid data slices (or, simply, slices) in your AppSheet journey. In fact, I already mentioned them a while ago when uncovering views.
Slices are a tasty ingredient when cooking AppSheet apps. We can use them to display a subset of the rows and columns of any table.
But didn't we manage to pull that before using calculated expressions in the table security filter?
Er, yes, but even if the end result is apparently identical, slices do not work entirely in the same way. You'll understand if you read the article about scaling using security filters in the excellent AppSheet's documentation, but let me summarize the gist of it for you:
- Security filters are computed in the AppSheet backend. Logical tests are applied to each row in the dataset before sending it to your device for display.
- When using data slices, the filtering process is performed in the client instead, which needs to download all data first, which is less efficient.
Despite this difference, which can become critical when dealing with large amounts of data, there are times when we have no other choice but to use slices.
When shall this be the case?
For example, if we intend to display the data in a table in different ways in different views of our application.
Let's look at a real-world situation.
In my student tracking application, I want each teacher to have access only to his or her personal stuff (groups, students, tracking records, etc.). In the case of groups, for example, we used a security rule like this on the Groups table:
OR(USEREMAIL() = [Tutor], IN(USEREMAIL(), Admins[Email]))
In this way, each tutor will be able to see only his or her groups when using the app, while school admins will have full access to all groups for general monitoring.

The problem with this approach is that if users with administrative roles also perform tutoring tasks, it may be counterproductive for them to see everything in their day-to-day work.
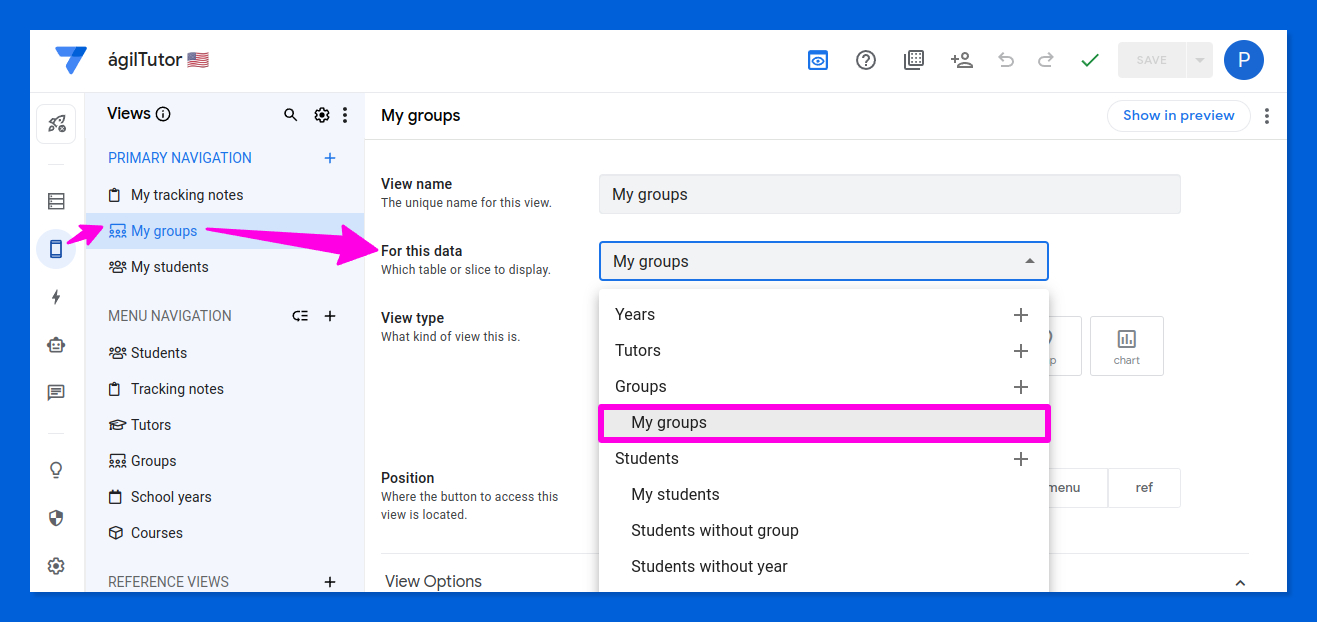
For this reason, I have created a slice called My groups that is based on the Groups table that restricts visibility to administrators as well.
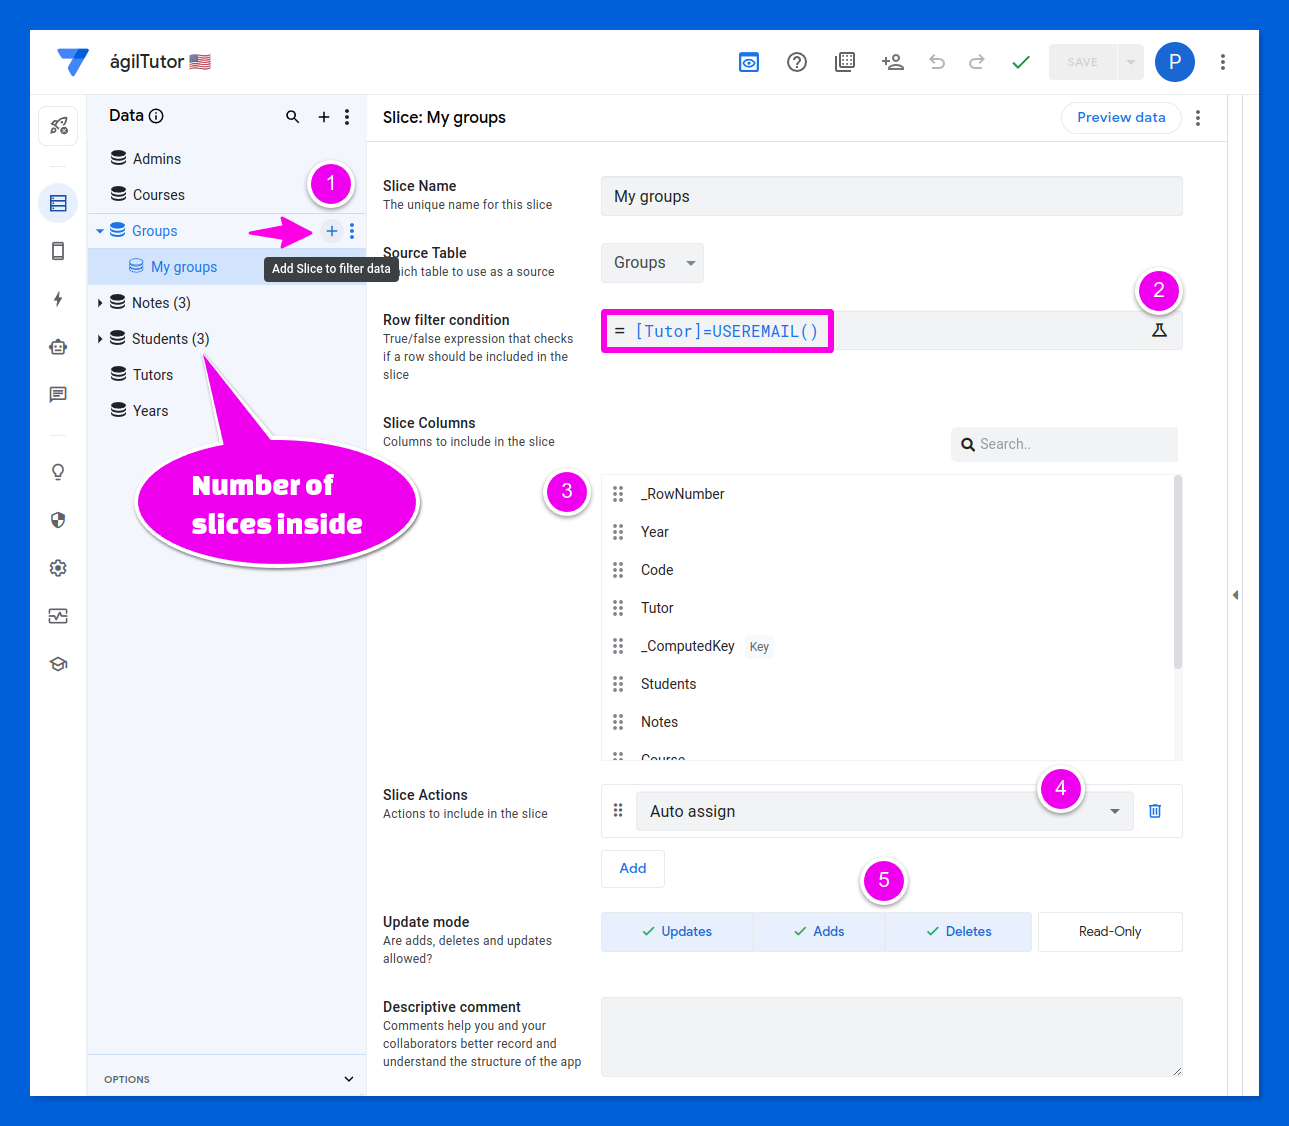
Let's look into some relevant elements of data slices:
- We can create ➕ as many data slices in each table as we fancy. They will all be grouped hierarchically under the table they come from.
- The place to enter the filter expression. Does this ring your bell 😏?
- Next, we choose the columns we want to display. The dotted icons to the left of each column name allow you to change the order in which they are shown. It is not visible in the image, but by hovering the mouse over any column, a ➖ button appears to its right to remove it from the data slice.
- We can also customize the number and layout of actions we want to appear in the views associated with this data slice.
- Finally, we can also establish the access permissions. Note that unlike the analogous setting available at the table level, there is no way to use a calculated expression here (I guess you can't always have everything 🤷).
All we have left to do is create a new view in the main navigation section of our application for the new data slice, and we are set.
Learning how to dance elegantly inside this salad of...
🥗 Tables → Slices → Views → Actions 🥗
...elements that are all related to each other, is key to provide our AppSheet application with an attractive user interface but also to craft a user experience that should prove intuitive, agile and satisfying for your users. Give this thought a few spins 🧠!
☝ Slices have another astonishing super-power that is much less obvious: we can also use them to generate different secondary views depending on the main view where they are displayed, replacing when applicable the system-generated ones (those with the _Inline suffix).
For example:
- When displaying the list of students enrolled in a given group we don't want to show the column that contains the name of the group (group → students), since they all belong to the same group.
- On the other hand, we may want to have information about the group in which the student is enrolled when displaying a view that shows the list of all the students in charge of a given tutor (tutor → students).
We can also come up with an analogous situation when analyzing how students and tutoring notes are related:
- It seems reasonable that a view that shows the full list of tracking notes also displays the student's names.
- However, when the list of tracking notes is displayed as a secondary view within a view that shows information about a particular student, a name column in every record seems completely redundant.
Let's see how we can pull this new trick:
The recipe:
- Create a data slice from the tracking notes table whose appearance you want to customize when displayed as a secondary view in the student's detail view. No filtering will be applied by means of the data slice settings.
- Create a view associated with the data slice. Here is where you select the columns that you actually want to keep visible.
- Modify the reverse reference of the Students table to pull data from the Notes without students table. This implies changing the REF_ROWS() formula in the Notes column of the former so that it retrieves the tracking notes from the slice we just set up rather than directly from the Students table.
REF_ROWS("Notes without student", "Student")⚠️ Don't forget to set as well the referenced table name of the Ref column accordingly for the new view to take precedence over the system-generated, default inline view.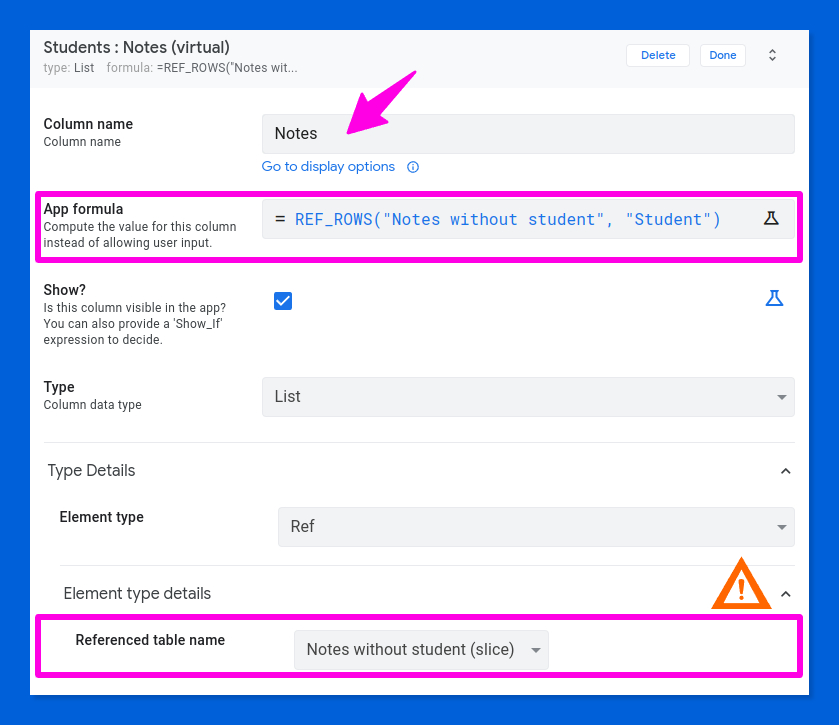
Beware, this can easily slip under your radar!
Fancy peeking at the guts of an app that showcases this technique? Here you are!
We are actually using the new data slice as a sort of decoy so that when you open the detail view of a student, AppSheet will use our custom secondary view that we have prepared for this particular case.
Another example. Suppose now that we'd like to display the list of tracking notes in a different context, for instance inside the detail view of a group. In this case, we'd better hide the column that shows the name of the group where each note was registered, to avoid unnecessary information on the screen. This time, we would have to change the inverse relationship in the Groups table.
This technique is apparently quite common for AppSheet practitioners, but I personally can't help but finding it a bit on the convoluted side.
☝ An alternative strategy might be used to solve this problem. Perhaps we could use calculated show-if expressions based on the CONTEXT() function in either specific columns or views to adjust their visibility conditionally. We will discuss this rather interesting function in a minute.
Anyway, it is what it is 🤔.
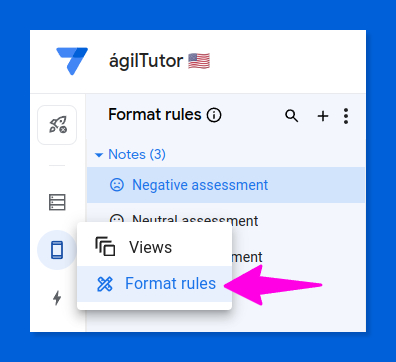
Conditional formatting
As busy as I was trying to understand how all this AppSheet views and actions stuff work —we'll discuss actions briefly in the final chapter of this series— while building my student tracking app, I almost didn't notice that AppSheet also lets you apply format rules conditionally to the columns of your tables. Yay!
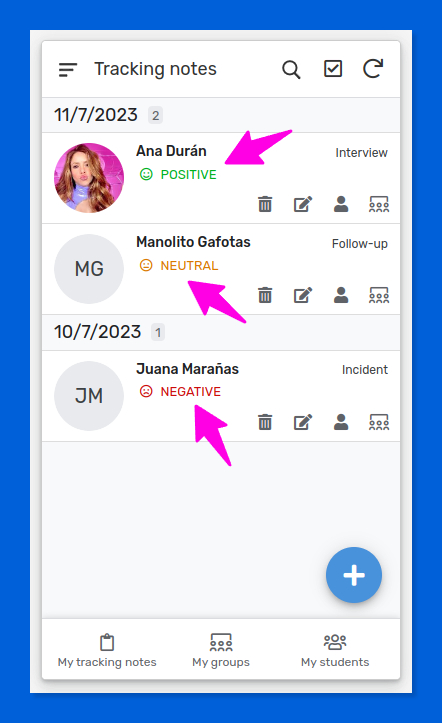
In my application, I used three of these rules to highlight the field that collects the assessment of the student's records. This is what it looks like in the tracking notes view:
Closely adhering to the principles of AppSheet design, conditional formatting is established using expressions built with its formula language. These rules can be applied to one or more columns of a given table, but not specifically to the data slices you have defined from them.
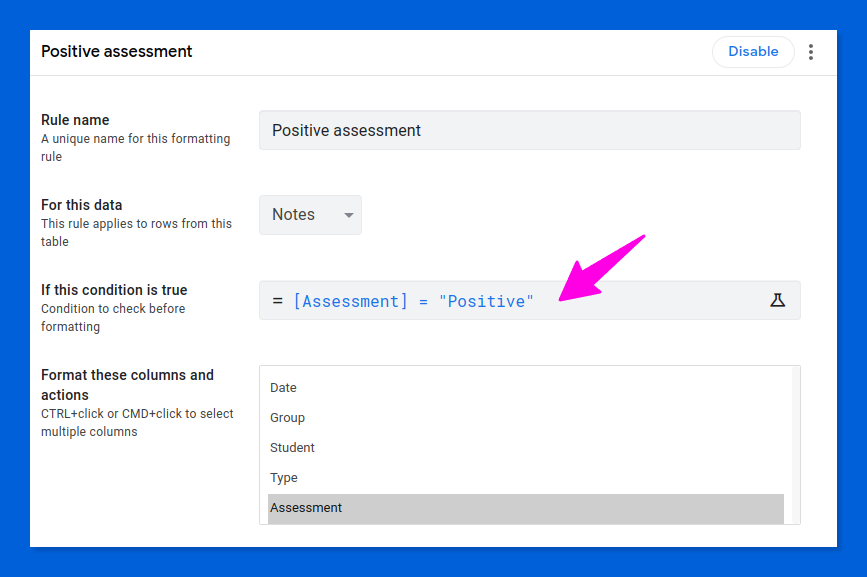
AppSheet's conditional formatting settings are generous.
On the one hand, it is possible to select an icon that visually reinforces the result and set both its color and the color of the text displayed in the column affected by the conditional format rule.
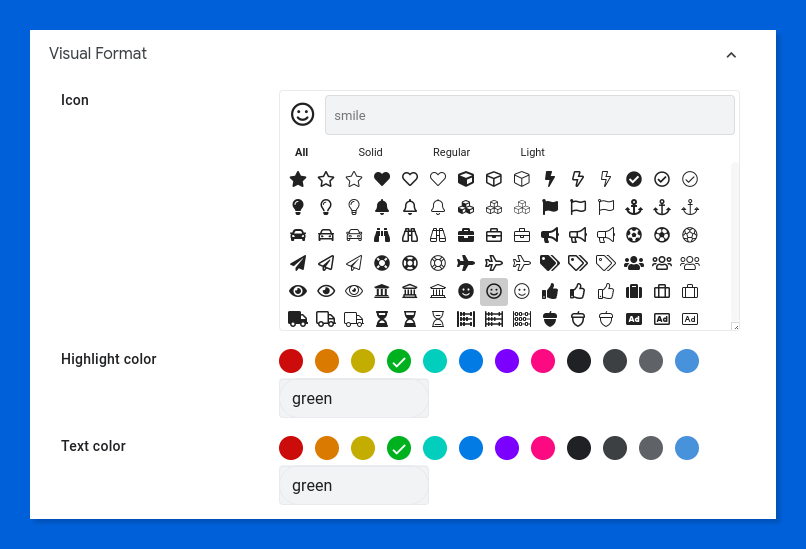
On the other hand, we obviously can also change the text formatting attributes of table columns.
The rule above takes effect in all the views fed by data in the Notes table. But what about taking action just in some particular views?
To achieve this, we can use view-aware expressions (formulas galore!) that leverage Appsheet's CONTEXT() function.
For example:
AND([Rating] = "Positive", CONTEXT("View") = "Notes")In this way, the rule would only take effect on the view by the name Notes.
I am pretty sure that this technique will suggest you a different approach to solve the problem of building different secondary (inline) views we discussed in the former section.
For more complex rules, you'll probably want to use the SWITCH() or IFS() functions instead.
☝ Be sure to look at the CONTEXT() documentation to find what additional context information of the running app it can provide.
Yes, conditional formatting is your friend, one of those "cheap" features that are well worth learning.
Time has come to talk about how to tame the fearless AppSheet's Actions. But we have to call it a day and wait for the fourth and final part of this AppSheet saga.
Until then, happy appsheeting!
Comentarios