
Using community connectors to go beyond filter by email in Data Studio

TL;DR
This article discusses row-level security in Google Data Studio and shows how community connectors can be used to overcome the limitations of the native feature when accessing data stored in Google Sheets.

TABLE OF CONTENTS
- Google Data Studio and row-level security
- Advanced filter by email using data blending
- Community connectors to the rescue
- CC Mk I: ACL with comma-separated emails
- CC Mk II: Let there be service accounts
- CC Mk III: Why not a combined group / domain / * ACL?
- CC Mk IV: Other Auths and stepped configuration
- Recap and next steps
Google Data Studio and row-level security
Row-level security by email has to be one of the most ground-breaking features to grace Google Data Studio. When it was first introduced, back in February 2020, a new and powerful way of delivering reports suddenly arose. Information could be segmented in a way that only specific viewers would possibly access certain rows of data pulled by the data sources used inside a report.

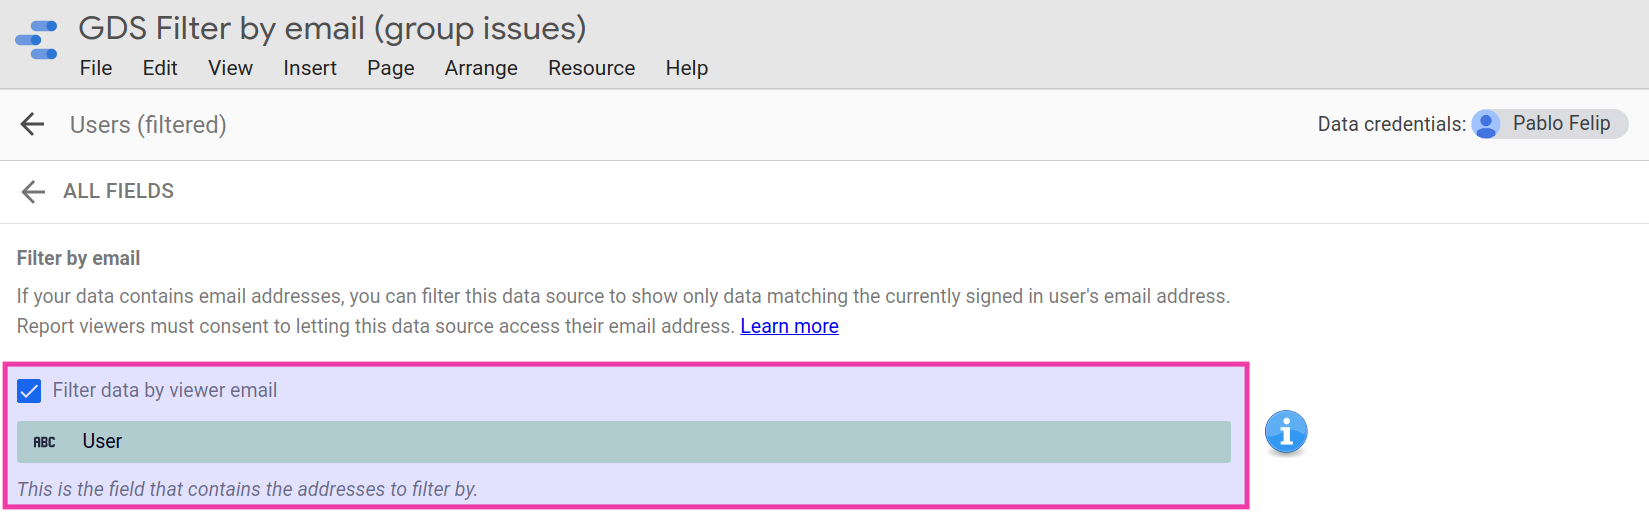
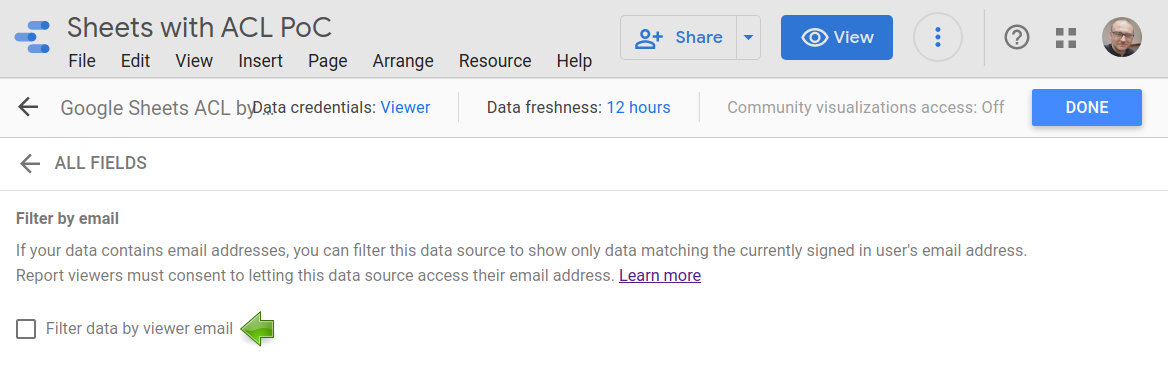
Filter by email acts as a sort of security toggle that has to be activated on a per-data source basis and a field of the data source that contains Google email addresses (consumer or corporate) has to be designated. Afterwards, the report viewer’s email will be checked against it, for every row, to either show or not any given record accordingly. Hence, only matching records fetched by the data source will be displayed to the viewer when interacting with the report.
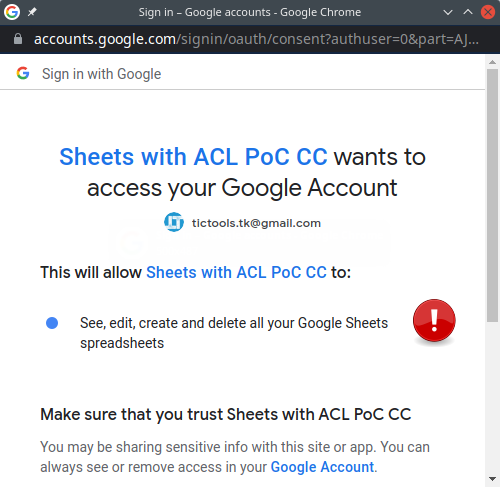
As a (needed) side-effect, viewers will have to log in using their Google accounts and grant permission to share their emails with any data sources where this filter by email feature has been enabled.
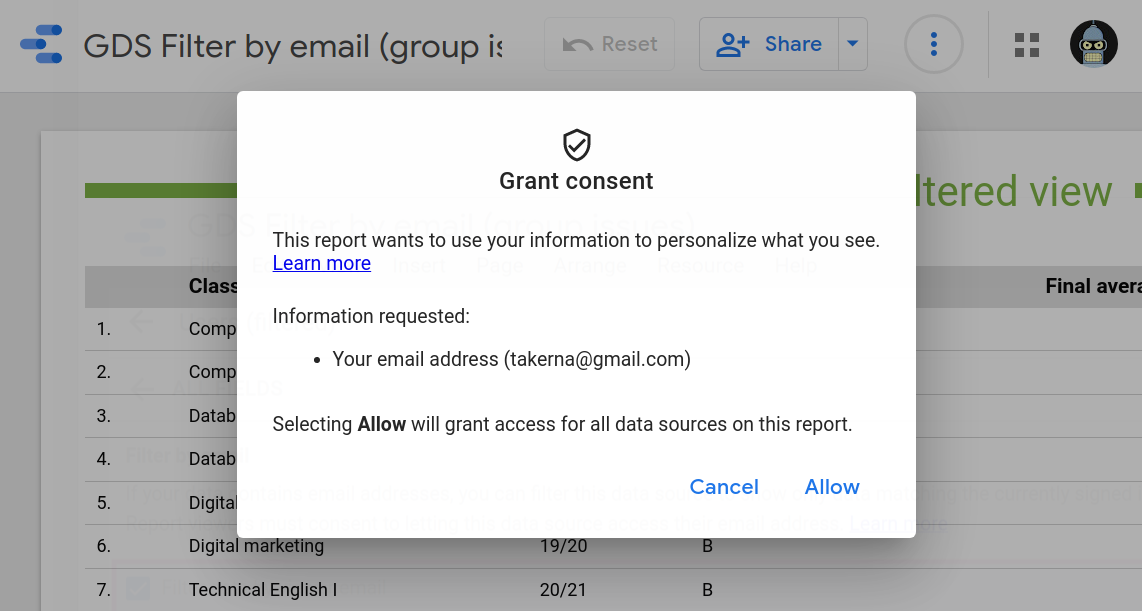
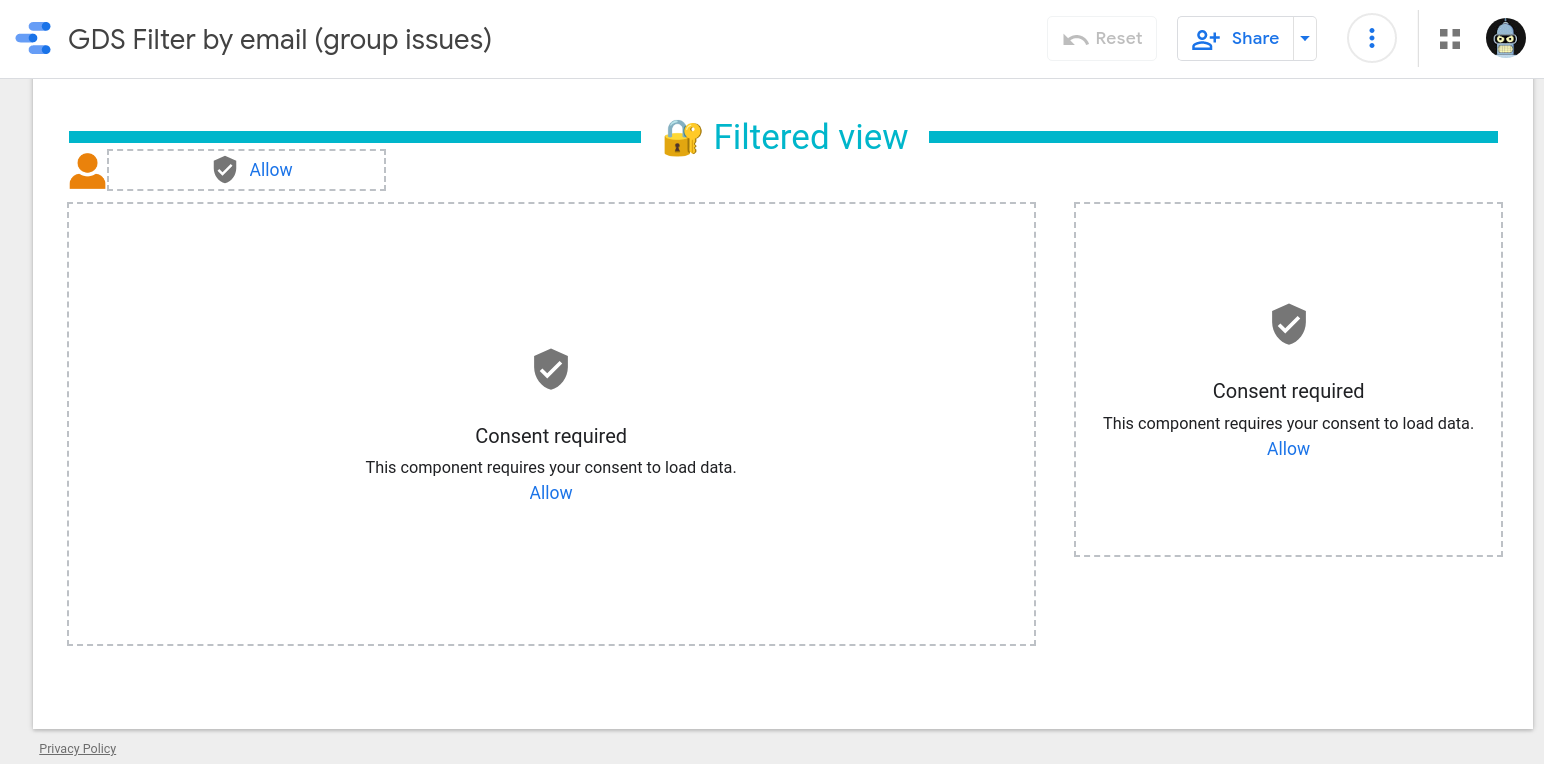
Failing to do so will render any charts based on email-filtered data sources unavailable for the viewer, as expected. Therefore, anonymous access to the report will no longer be possible, even when it has been shared publicly.
As you can see, this mechanism greatly improves the way we can build targeted reports when users are expected to access personalized data while preserving confidentiality.
But what happens when access rules get more complicated? Can we easily manage groups of users?
The fact is that we can neither use group emails, such as the ones provided by the Google Groups service, nor a useful comma-separated list of addresses in the field that stores the email address that is used for matching.
What then? We’ll face this problem in the next section.
Advanced filter by email using data blending
Much has been written about how to transcend some of the shortcomings of the built-in row-level security of Data Studio.
The official documentation devotes a whole section to explaining how data blending can be used to create something that bears some resemblance to groups of users with the same view permissions and grant them access to specific records in a more convenient way.
In a nutshell, the smart idea, or idea feliz (happy idea) as we like to say in Spain, consists in blending an auxiliary access control list (ACL) table with the data source that has to be email-filtered using a common, arbitrary, field as the join key. We are, essentially, modeling a many-to-many relationship to spawn a new data view.
You may also want to read my take on this technique here 👉 Advanced filter by email in Google Data Studio, an article from where the diagram above has been reused.
But this idea feliz is not devoid of some quirks that boil down to the fact that data blending in Data Studio is nothing more, nothing less, than a left outer join operation.

Let’s have a look at those quirks with this sample dataset and its related Data Studio report.
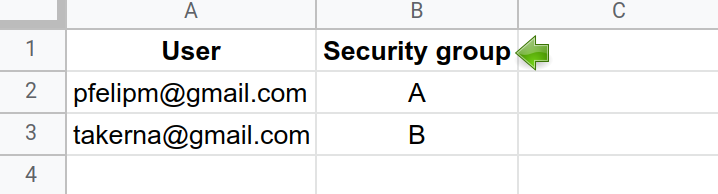
Our sample dataset lives inside tab Classes of this 👉Google spreadsheet. It is a simple table that stores some average class grades of certain subjects and school years. Notice the Security group field, which has been used to tag each record with an arbitrary A or B letter.
And this is the ACL table in tab Users of the same spreadsheet. Users (emails) are labeled and thus grouped together.
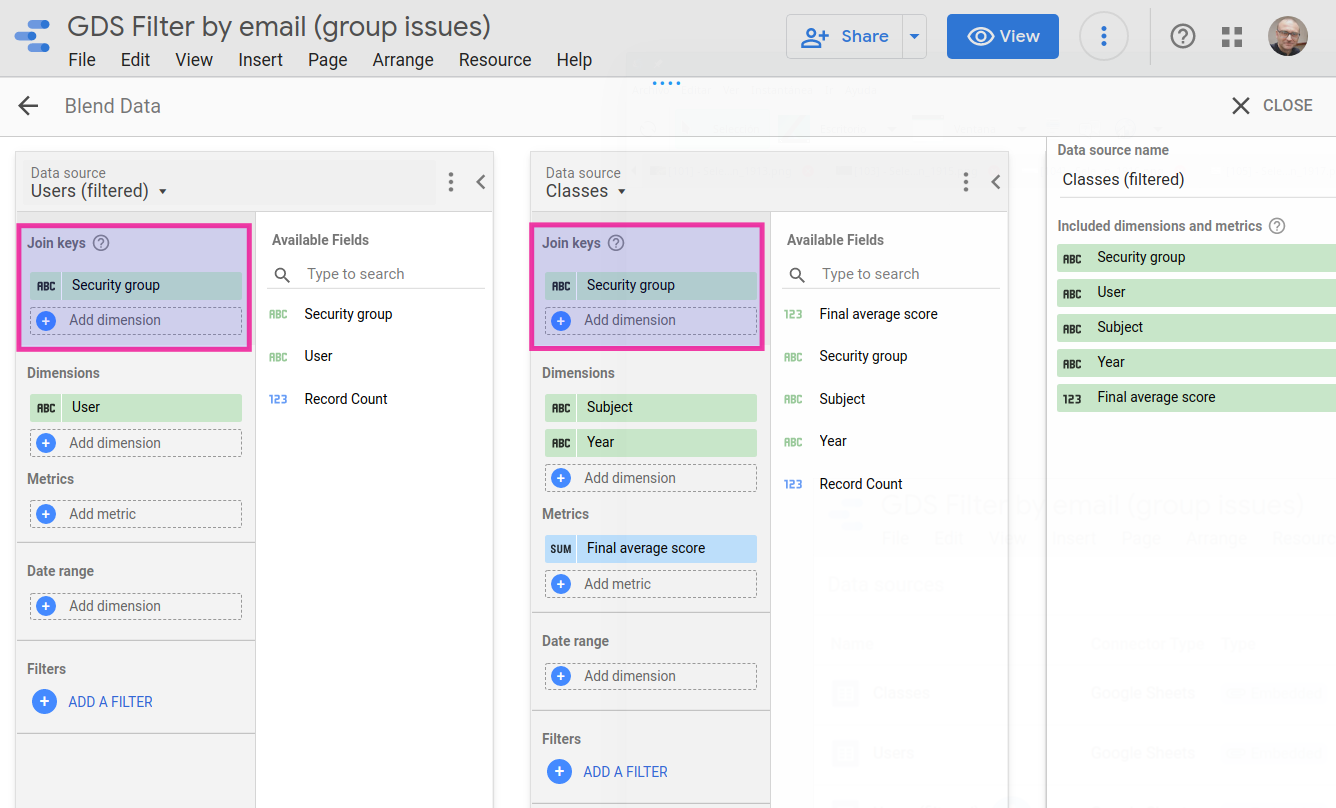
Both datasets are brought into this 👉Data Studio report. The latter one, Users, appears twice in the data source view because one of its instances is filtered by email (field User), while the other is not, for demonstration purposes.

☝ Note: You may want to make copies of the spreadsheet and associated report for testing. Remember to change the email addresses in tab Users for some of your own!
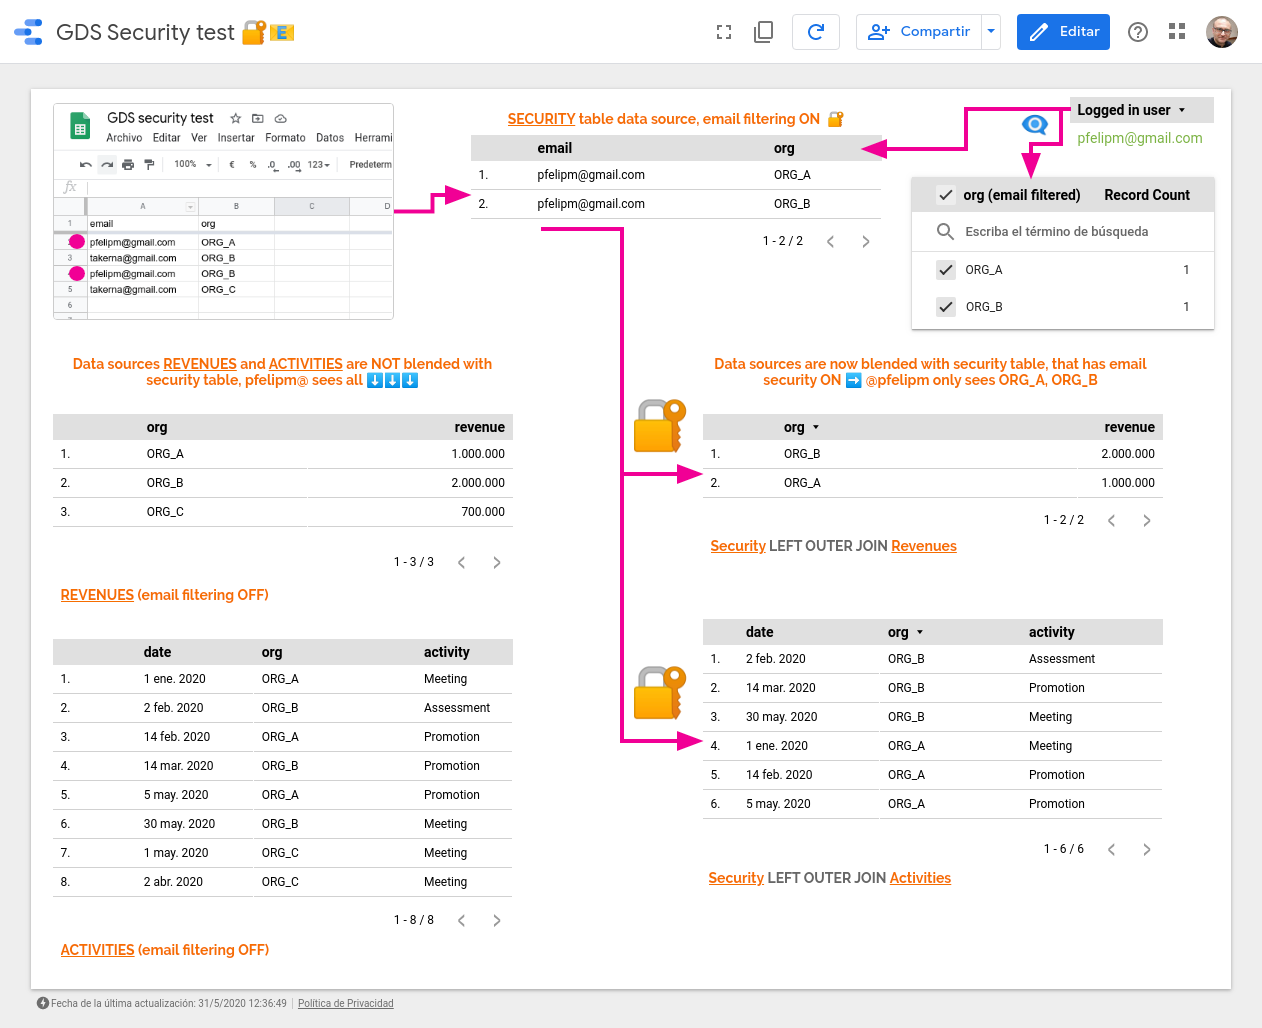
The data blend in place involves the filtered version of Users (left side) and Classes (right side). The Security group field constitutes the join key of the combination.

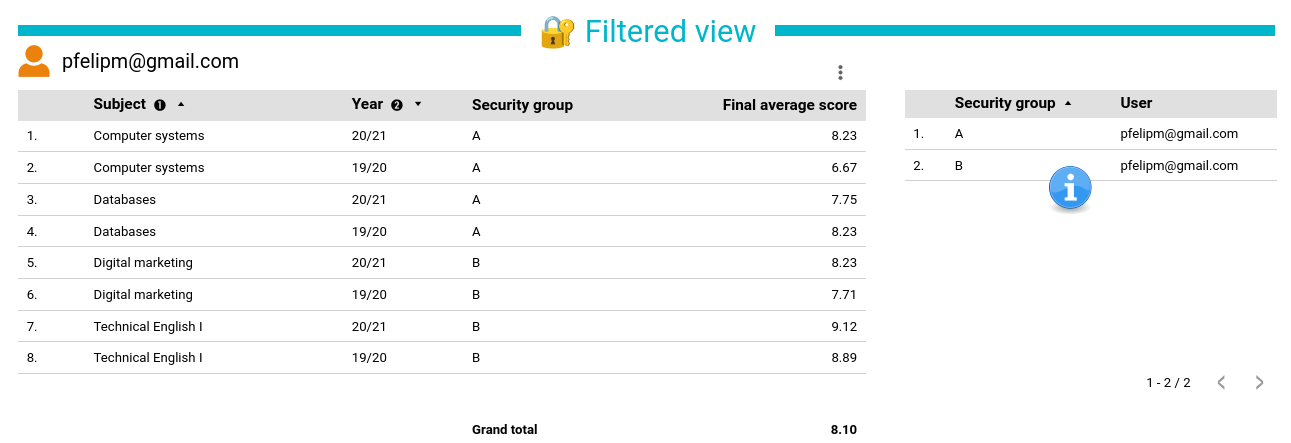
Assigning a given user to more than one security group poses no problem: User pfelipm@gmail.com will see all records allowed for groups A and B, provided that he belongs to both of them in the ACL table:
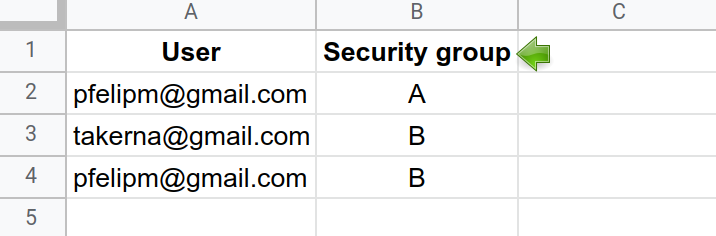
But what would happen if we wanted to assign more than one security group to a single record in Classes? Unfortunately, a simple and nice comma-separated expression such as “A, B” is not a valid value for the Security group dimension, so we could be tempted to do something like this:
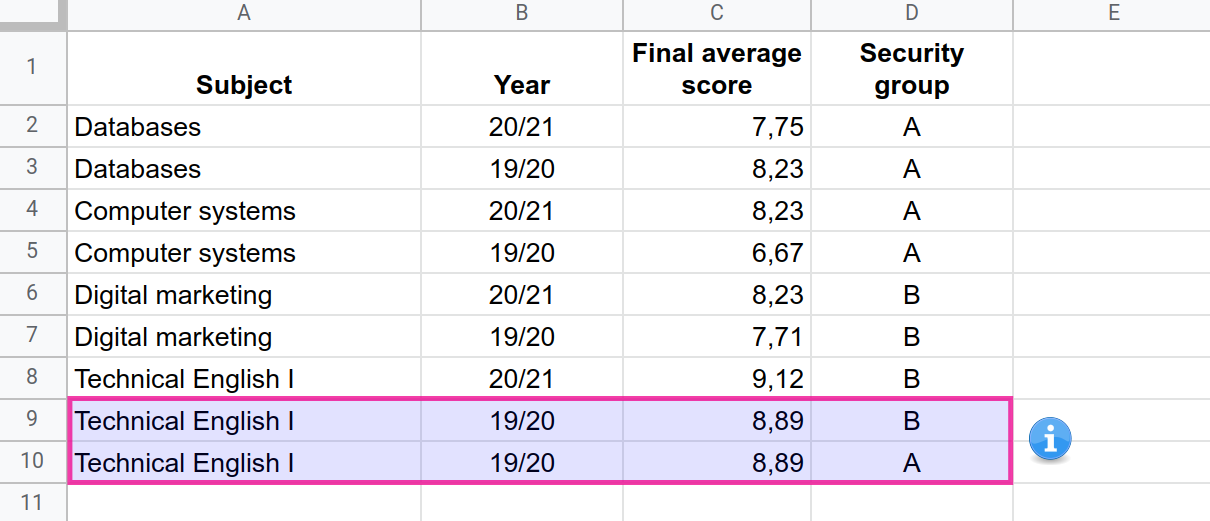
The nature of the left outer join operation used to blend both data sources makes the record Technical English I of year 19/20 appear twice for user pfelipm@gmail.com.
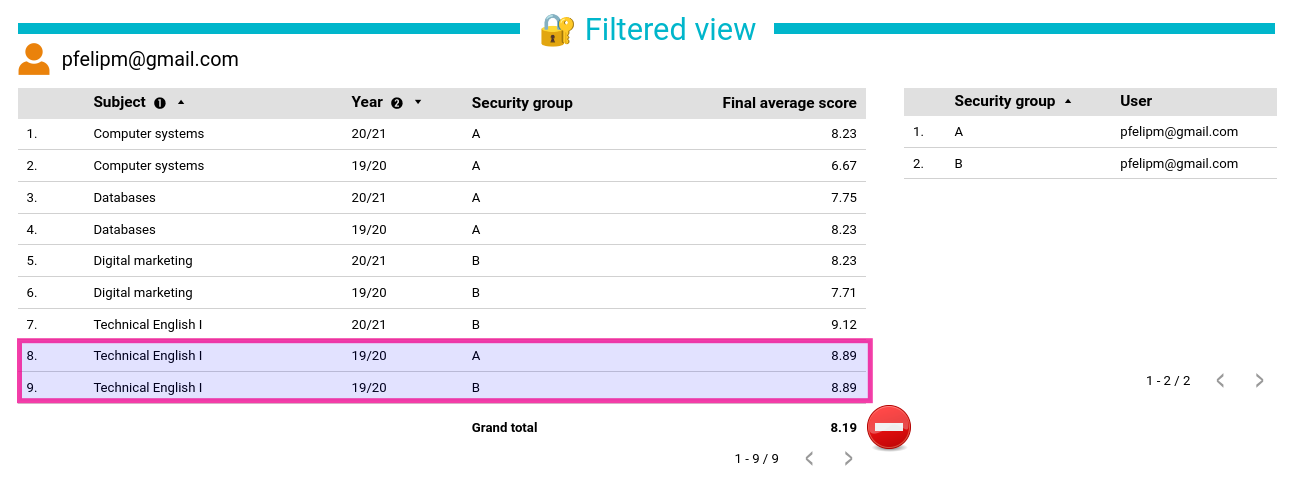
This circumstance affects the calculation of the aggregate average shown in the summary row of the table, which deviates from its real value.
This outcome is not acceptable and suggests that the use of this data blending technique is limited to situations where the access control list can be set up in a way that each user (email) is simply mapped to one or more groups.
The aforementioned restriction could eventually be cumbersome to abide by in some use-cases where a more complex set of security rules would apply, for instance when there is a supervisor-like user or group that has to be granted access to every record on top of some other rules for other users or groups.
Besides this, extreme care should be taken to avoid the generation of duplicate rows as a consequence of the nature of data blending that could ruin the calculation of aggregate metrics, as we have just seen.
Wouldn’t it be easier if we could disregard data blending and use a comma-separated list of emails instead to tag each record, or be able to somehow filter records by group addresses?
BigQuery data sources have data transformations capabilities beyond those built into Data Studio. So, clever tricks like matching the @DS_USER_EMAIL parameter against a comma-separated list of emails using regular expressions or maybe even some hard-wired clustering of email addresses using conditional SQL clauses can be performed.
As of August 15th, 2021 this parameter has also started to be available, as the DS_USER_EMAIL() built-in function, for other data sources 😵.
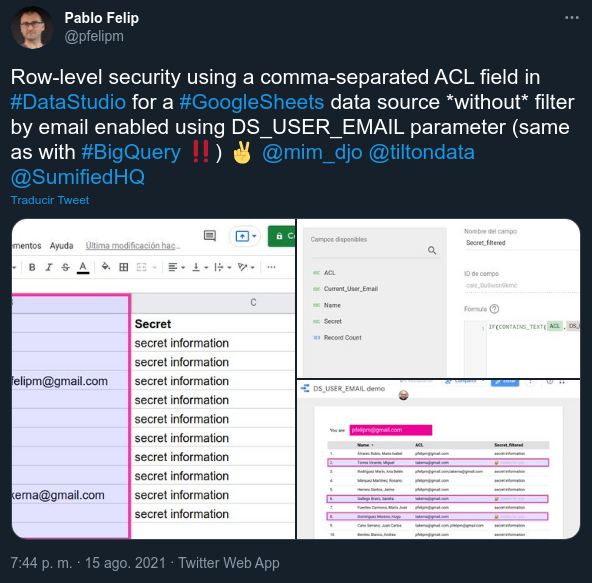
This yet to be announced (at the moment of writing this) feature, together with the August 19th. Data Studio product update, that improves the power of text-matching functions in calculated fields, and appropriate filtering at the report, page or chart level make for endless possibilities when it comes to applying row-level security on the basis of the email address of the report viewer. All of a sudden, such things as these seem within reach:
- Global field-level security.
- Field-level or full row-level security using a comma-separated list of emails
- Full row-level security by domain list or view-all wildcard (*).
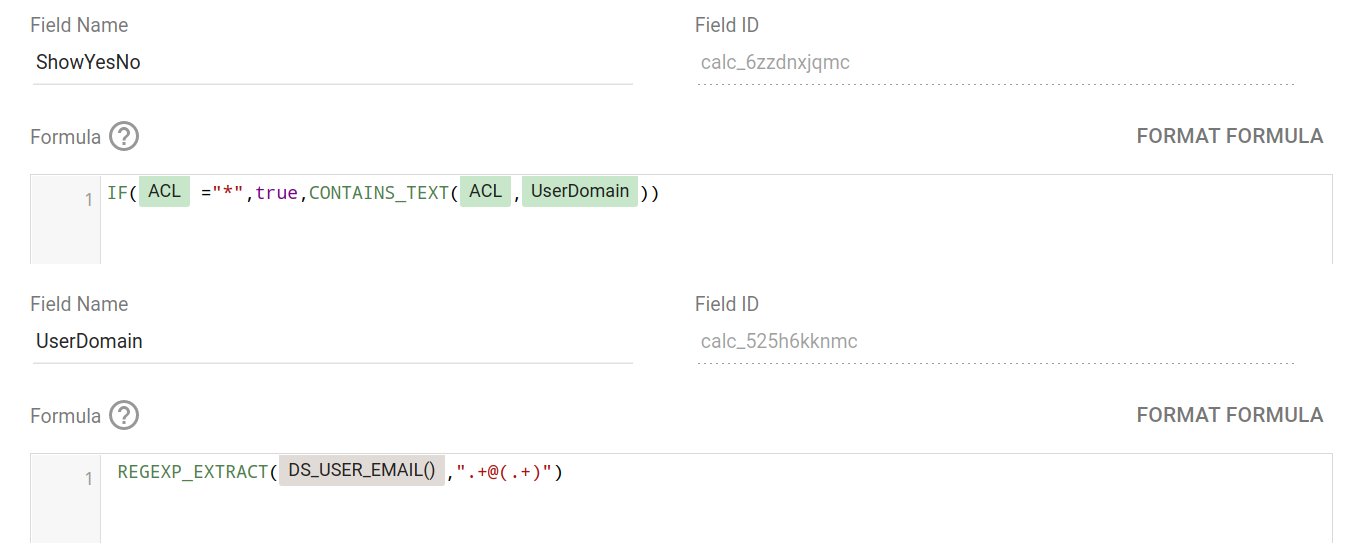
DS_USER_EMAIL() in a calculated field. Just set up a filter and call it a day.⚠️ Update: The techniques shown in the examples above are not fully correct, as the CONTAINS_TEXT() function they rely on may cause false positives. For example, let’s suppose that pablo.felip@domain.com is on the access control list and is thus allowed to view certain records, but felip@domain.com (a substring of the former) would also pass the security check. This is a serious issue that nevertheless may not be critical in situations where there is a reduced number of known users that could potentially access the report and string overlapping problems affecting their email addresses can be assessed and discarded beforehand (not ideal at all, though). You can find a safer workaround here.
But despite all these most welcome goodies (and those already in the pipeline, for sure!), we could get much more creative right now if provided with some lines of code, don't you feel?
Enter the world of community connectors for Data Studio!
Community connectors to the rescue
One of the reasons for the popularity of Data Studio has to be its extensibility. You can write your own code to expand its capabilities with:
- Community connectors to read data from different sources other than the ones that are directly supported, built using solely Google Apps Script (GAS).
- Community visualizations, that add new types of charts to the already rich set built into Data Studio, developed using JavaScript, CSS and (indirectly) HTML.
So, the fun is not limited to juggling with data sources, blending, calculated fields, charts and the like. You can actually see the guts of the beast and do some real tinkering inside!
Probably, the best way to start learning about community connectors (CCs) is this codelab hosted by Minhaz Kazi, developer advocate at Google. It covers all fundamental key points and constitutes an excellent springboard to delve deeper into building more advanced connectors. If you are not familiar with how CCs work please, consider taking some time (between 15-30 minutes) to complete this codelab before proceeding into the next sections to fully understand the code snippets that we’ll be dealing with.

Further relevant documentation can be found here:
In my opinion, the absolute greatness in CCs comes down to the fact that you can use all Apps Script services without the need for any kind of those obnoxious (agreed, that’s an overstatement 😬) OAuth2 flows. This fact may seem rather obvious, but it took me some time to interiorize.
Of course, you can also consume any public Google APIs—and hit non-Google RESTful APIs, for that matter—using the URL Fetch Service and a properly scoped OAuth token.
In the next sections, we’ll be doing some coding to build a progressively more sophisticated community connector capable of filtering data according to the email address of the report viewer without resorting to the standard filter by email feature of Data Studio. This will lead to some relevant gains but will also bring forth some drawbacks that we’ll try to somewhat mitigate.
CCs can be shared with other users by a direct link or published in the Data Studio Connector Gallery after a strict set of conditions are met. The process is similar to the publishing of Google Workspace or editor add-ons, but much straightforward, nonetheless. For the sake of simplicity, I will use the first option to provide you with several working code samples to test the four connectors we are going to build.
And one more thing before we get started. These connectors, or more specifically, versions of a proposed baseline connector, are in no way intended as final products. They pay little attention or wholly neglect several key aspects that any connector should take very seriously when used in production environments. To mention but a few:
- Deal with duplicate headers in the dataset or labels with special characters.
- Handle run-time errors in a robust and informative manner to guide the user when exceptions crop up (and they do rear their ugly head quite often!).
- Implement some form of low-level data caching and other optimizations to reduce the number of actual queries, improve performance and make for more responsive reports.
For this reason, all code in this article is provided just as a proof of concept (PoC) that strives to show some of the superpowers you can get when using some simple appscripting at the data connector level.
Let’s get those Apps Scripts rolling!
CC Mk I: ACL with comma-separated emails
ur first attempt at a CC that provides row-level security will work much in the same way as the built-in filter my email, but the field in the data source that contains viewer email addresses will now admit a comma-separated list of values, as shown in this 👉sample spreadsheet.
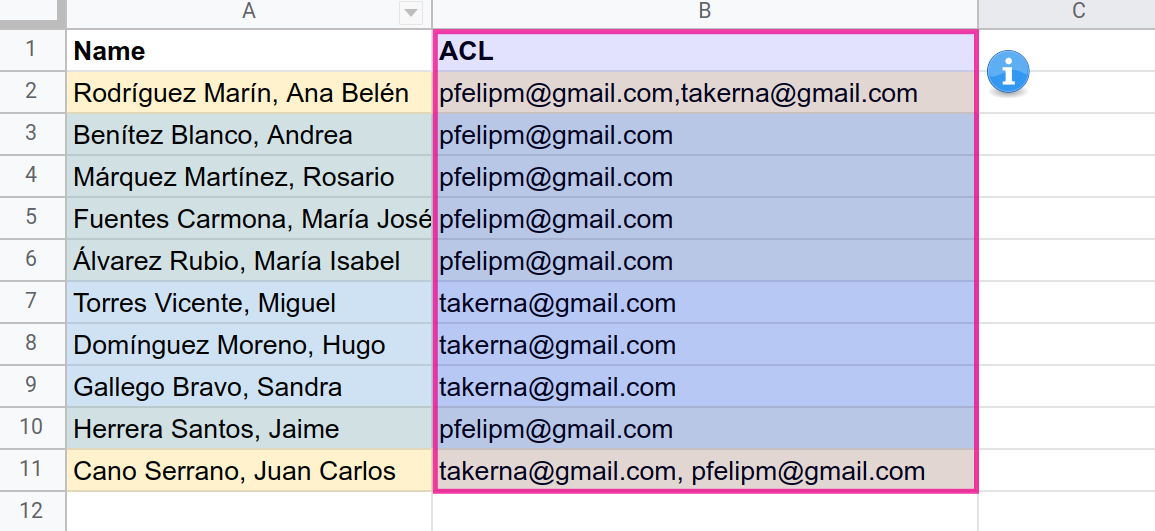
I’ve highlighted the rows in the dataset with different shades to highlight the records that should be shown to different users or groups of users.
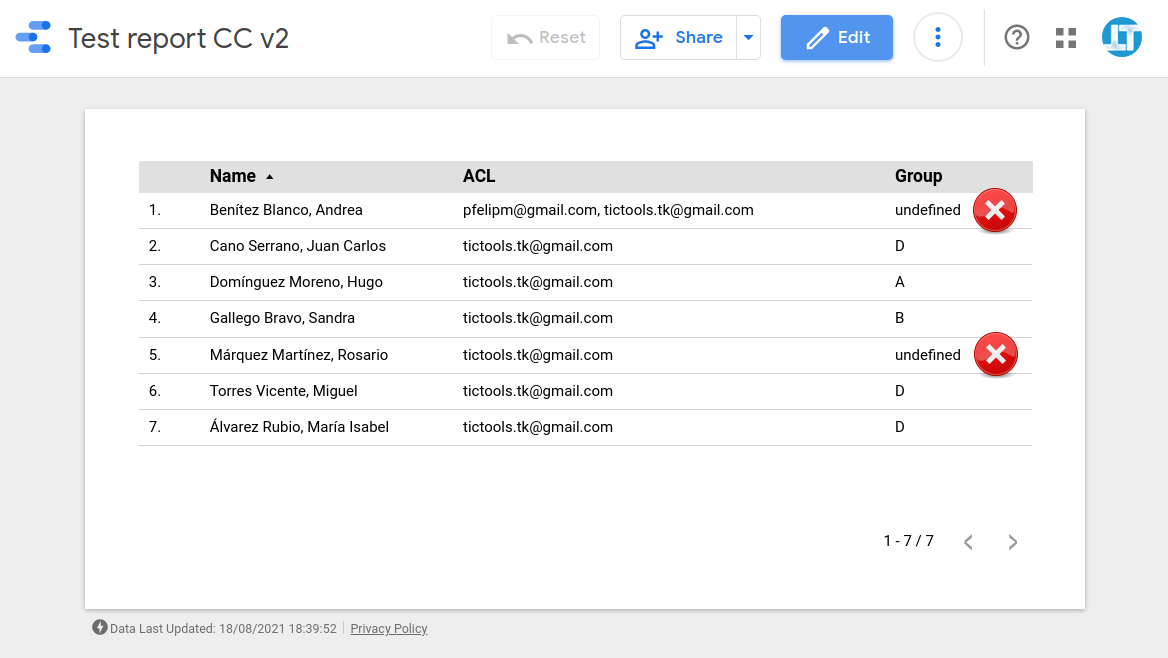
As you can see, our 👉new report will only display the rows for which the connected user (pfelipm@gmail.com) has security clearance, with no substring issues whatsoever this time.
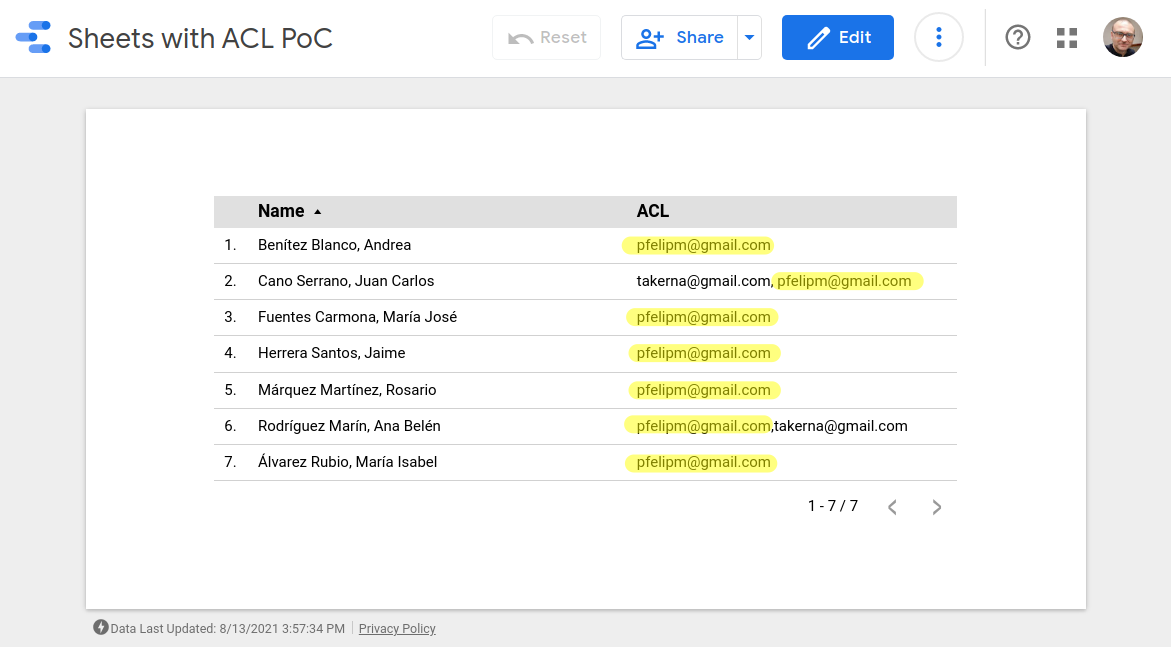
☝ Note: Your view will be empty because your email address is not authorized in the ACL column of the spreadsheet, but make a copy of both the spreadsheet and the report and use your own data for the ACL, if you fancy.
And this time we are getting this without filtering by email at the data source level.
Get hold of the 👉CC script and let’s check it out.
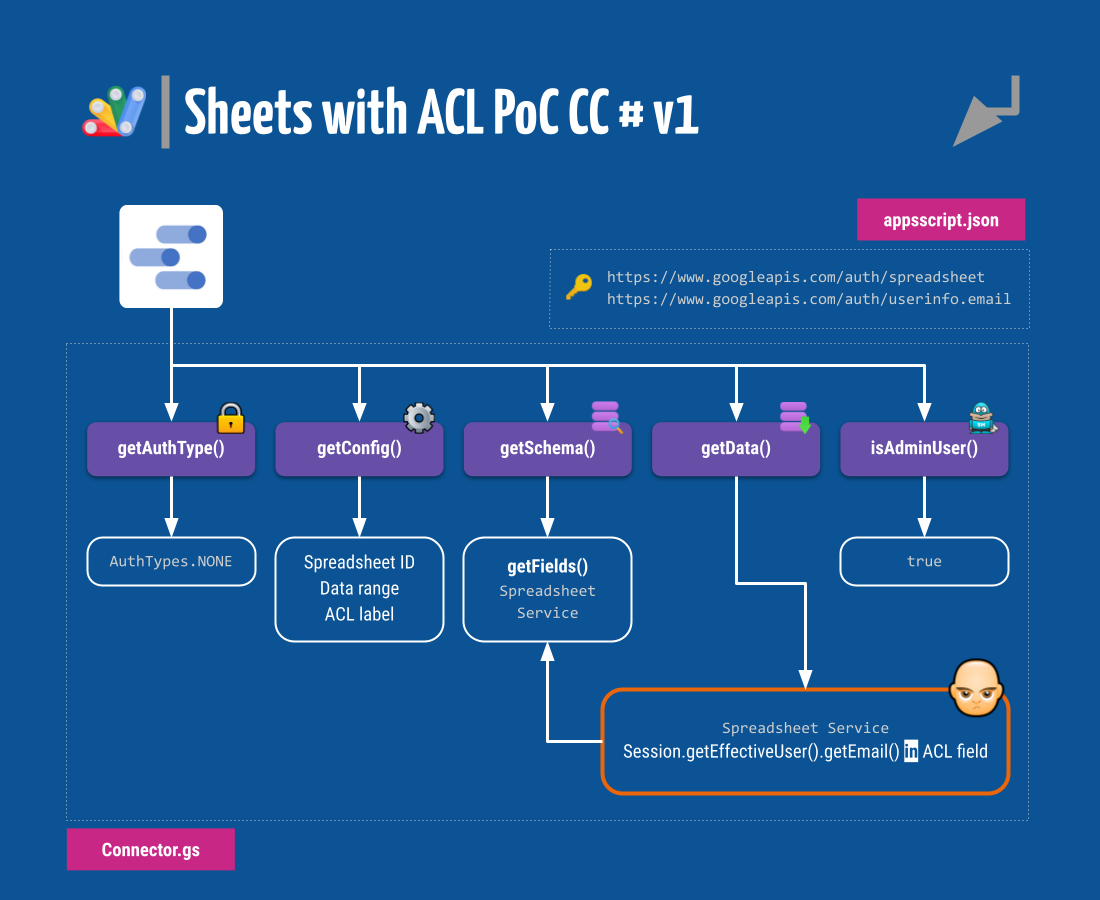
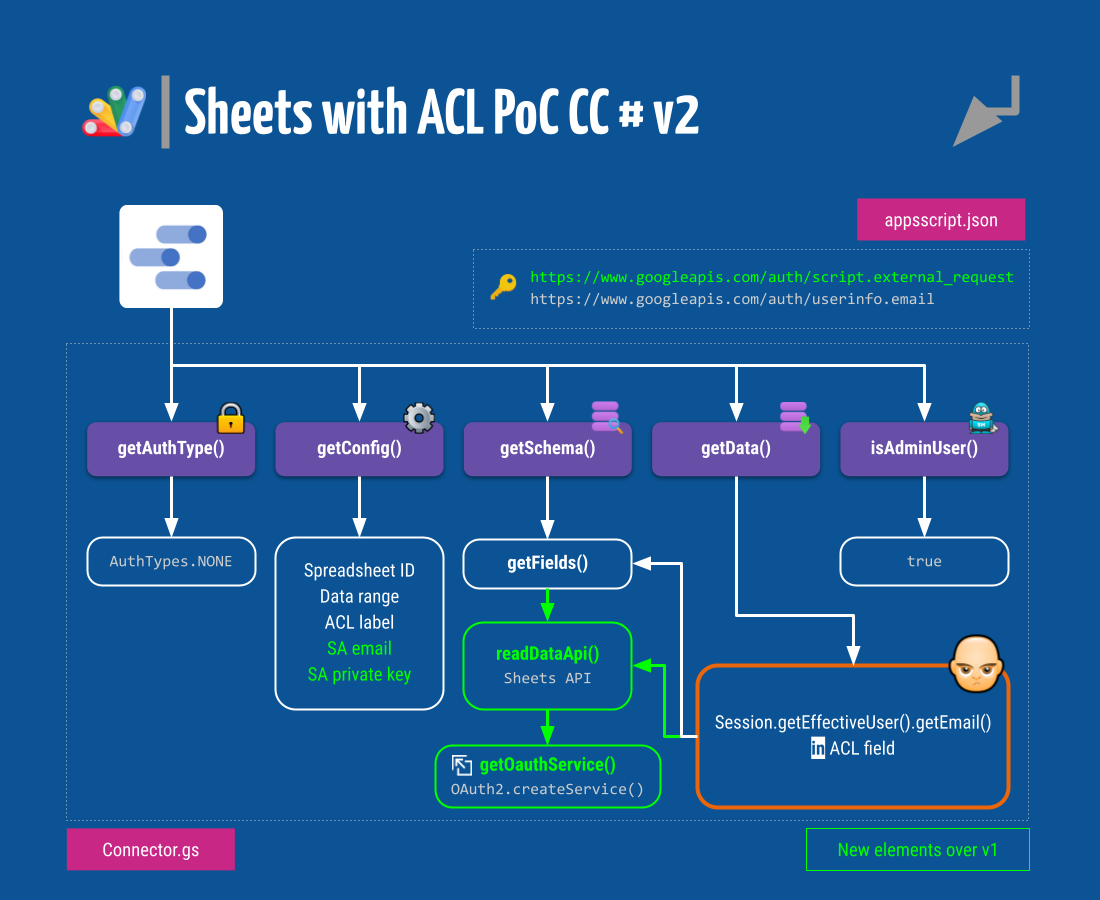
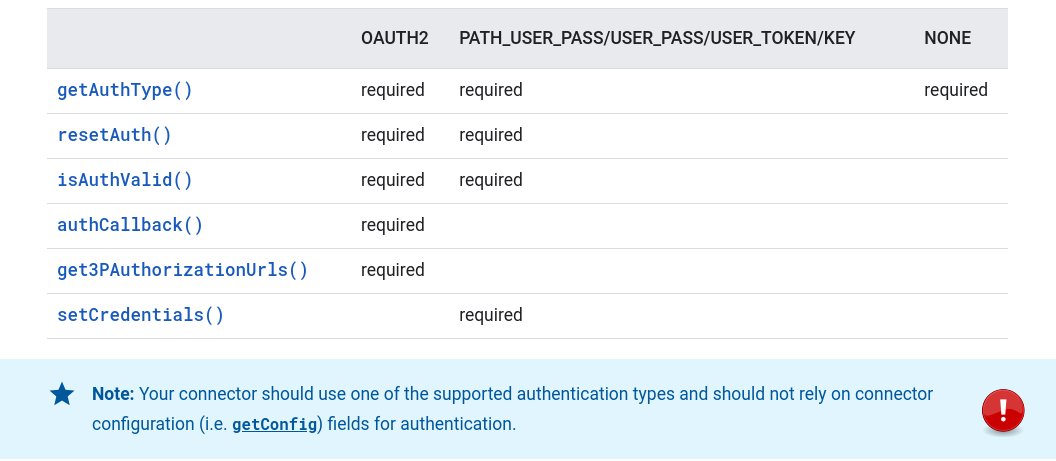
You can see that it is the usual community connector fare, with the standard interface comprised of the getAuthType(), getConfig(), getSchema(), getData() and optional isAdminUser() functions that the Data Studio back end calls whenever it needs something from the connector. An appsscript.json file is also needed to declare the security scopes the script will be using and provide some configuration options for the connector.
You can get a glimpse of how all these moving parts work together here. As this is our first attempt at a working CC, we’ll be breaking it down next.
Appsscript.json
This is a standard Apps Script manifest file with some additional keys specific to custom connectors.
{
  "timeZone": "Europe/Madrid",
  "dependencies": {
  },
  "oauthScopes": ["https://www.googleapis.com/auth/spreadsheets", "https://www.googleapis.com/auth/userinfo.email"],
  "runtimeVersion": "V8",
  "dataStudio": {
    "name": "Google Sheets ACL by emails [PoC]",
    "logoUrl": "https://cdn.bitrix24.com/b9316961/landing/027/027c19d37fefaaa64fc64510f40c2e60/Selecci_n_567.png",
    "company": "Pablo Felip",
    "companyUrl": "https://www.tictools.tk/",
    "addonUrl": "https://www.tictools.tk/",
    "supportUrl": "https://www.tictools.tk/",
    "termsOfServiceUrl": "https://www.tictools.tk/",
    "description": "PoC ACL for Google Sheets.",
    "sources": ["GOOGLE_SHEETS"],
    "authType": ["NONE"],
    "feeType": ["FREE"]
  }
}
The most important part is the explicit enumeration of the authorization scopes used by the project in the oauthScopes key. These scopes have to be added manually to the manifest file for the CC to work properly.
The CC will use the Apps Script Spreadsheet Service to open a Google spreadsheet by its ID and pull data from arbitrary cell ranges. The user’s email is also necessary for the ACL part and will be obtained with the Base service. Therefore, these are the two needed scopes:
https://www.googleapis.com/auth/spreadsheetshttps://www.googleapis.com/auth/userinfo.email
Notice that https://www.googleapis.com/auth/spreadsheets grants the script full read and write access to all the user’s spreadsheets. This requirement will result in a rather alarming (for the user) script authorization prompt, even though our connector is not really writing anything back to any spreadsheet (but it could!).
Either way, SpreadheetApp.openFileById() demands this scope, so using in the manifest https://www.googleapis.com/auth/spreadsheets.readOnly instead will not work (ah those loose Apps Script scopes!). We’ll address this annoyance later.
☝Note: A CC is usually expected to just fetch data from a dataset after all, but nothing would stop us from coding a connector with write capabilities, for example, to log users’ access somewhere, even inside the same dataset.
Other subkeys in the manifest, under the dataStudio key, provide relevant information such as name, description, logo, branding, support details and some additional metadata.
For more details, please check the full manifest reference.
Connector.gs ⇒ getAuthType()
Remember what I told you before about the greatness of using Apps Script to build CCs?
We need no authentication at all to read data from a spreadsheet or find out the viewer’s email. No OAuth. No security token (but the hidden one managed by the Apps Script back end). In consequence, this function returns AuthTypes.NONE.
/**
 * CC's auth type
 */
function getAuthType() {

  // Set auth type
  const AuthTypes = cc.AuthType;
  return cc
    .newAuthTypeResponse()
    .setAuthType(AuthTypes.NONE)
    .build();
}
The type of authentication used by the connector should be set in the manifest file accordingly (authType key), but I’ve messed this up in some tests and the connector seemed to keep working as expected. Anyway, better follow the available guidelines.
No need to say anything else about authentication (for now), but you can already get further details about this function in the API reference for getAuthType().
Connector.gs ⇒ getConfig()
Nothing to write home about in this function, just a welcome message and some prompts to get the required parameters.
/**
 * CC's setup
 */
function getConfig(request) {

  // Initialization
  const config = cc.getConfig();

  // Instructions
  config.newInfo()
    .setId('settings')
    .setText('Connector settings:');

  // Spreadsheet's ID
  config.newTextInput()
    .setId('id')
    .setName('ID')
    .setHelpText('Google spreadsheet ID.')
    .setPlaceholder('e.g.: 1kSrlo...');

  // Data range
  config.newTextInput()
    .setId('range')
    .setName('Data range')
    .setHelpText('Input range to pull data from, INCLUDING sheet name.')
    .setPlaceholder('e.g.: Sheet 1!A1:J100');

  // Header of ACL column
  config.newTextInput()
    .setId('acl')
    .setName('Label in header of ACL column')
    .setHelpText('Cells in column must contain a comma-separated list of Google emails.')
    .setPlaceholder('e.g.: ACL');

  return config.build();
}
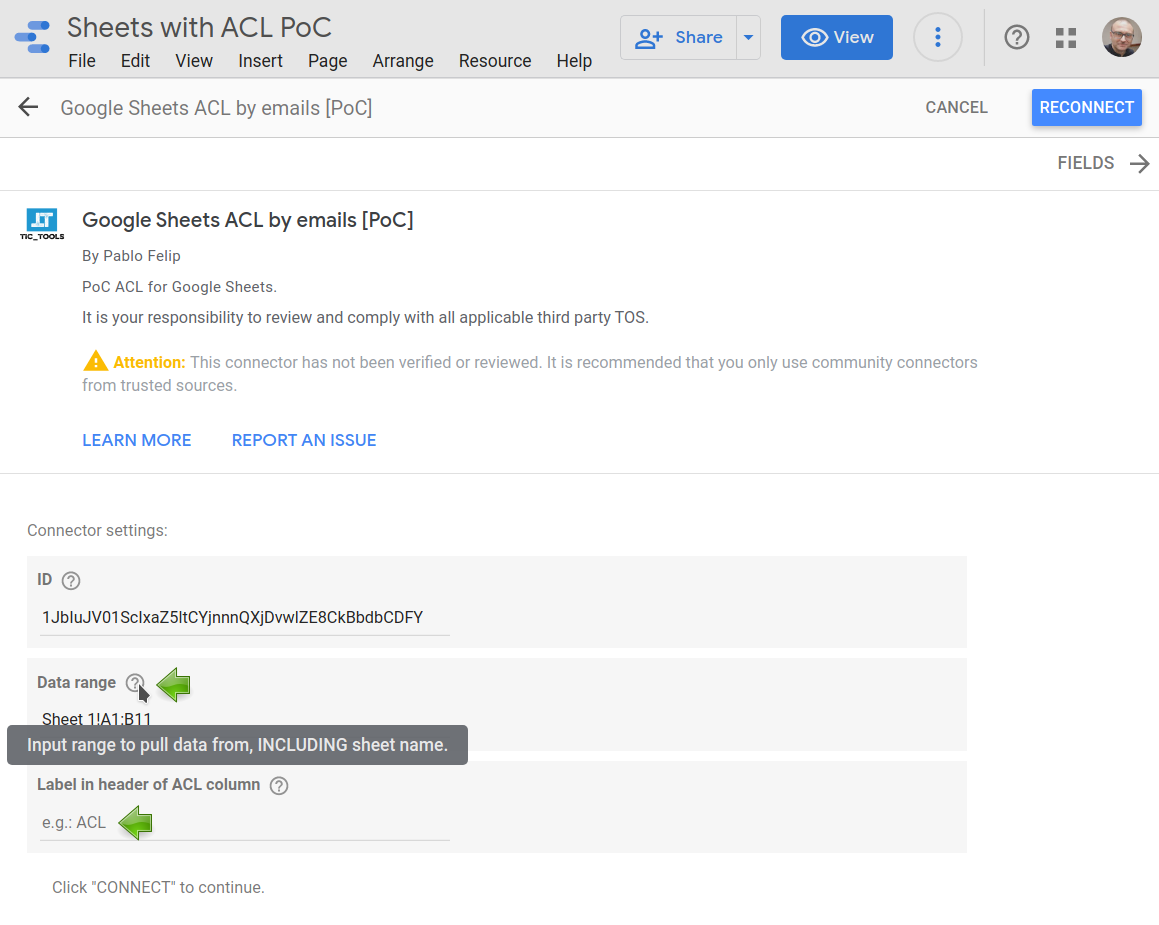
These configuration parameters are defined when associating the connector to a given data source. Three are needed for a successful connection to the underlying dataset:
- The ID of the spreadsheet.
- The fully qualified data range (that is, including the prefix with the sheet’s name and the
!symbol, e.g.Sheet 1!A1:B11) to pull into Data Studio. - The label of the column that contains the ACL.
Text placeholders and help hints are used in every parameter to assist the user along the connection process.
Six different types of fields are available but, to the best of my knowledge, there is no straightforward way of summoning a file picker as for now.
More information in the API reference for getConfig().
More information in the API reference for getConfig().
Connector.gs ⇒ getSchema() / getFields()
These two functions are used to enumerate the fields in the dataset.
The first one, getSchema(), receives a request object that contains all configuration parameters defined by the getConfig() function and passes it on to getFields().
/**
 * CC's schema
 */
function getSchema(request) {

  let fields =  getFields(request);
  fields = cc.newGetSchemaResponse().setFields(fields).build();

  return fields;
}
The second one, getFields():
- Opens the spreadsheet.
- Extracts the header row of the specified data interval.
- Builds and returns a
Fieldsobject.
/**
* CC's fields
*/
function getFields(request) {
const fields = cc.getFields();
const types = cc.FieldType;
try {
const headers = SpreadsheetApp.openById(request.configParams.id).getRange(request.configParams.range).getValues().shift();
headers.forEach(h => {
if (h) {
fields.newDimension()
.setId(h.toLowerCase().replace(/ /g, '')) // Special characters should also be removed!
.setName(h)
.setType(types.TEXT);
}
});
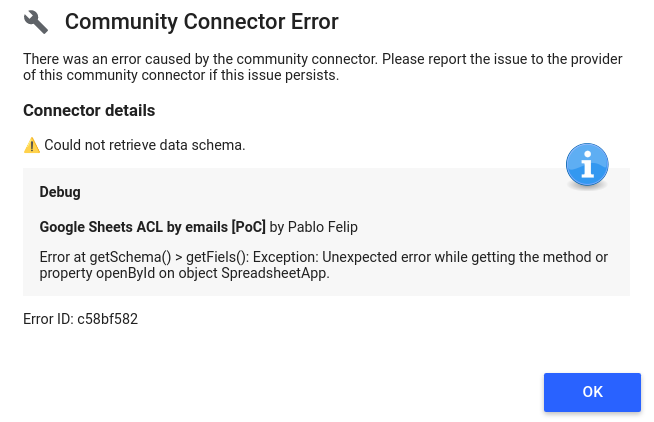
} catch(e) {
cc.newUserError()
.setDebugText(`Error at getSchema() > getFiels(): ${e}`)
.setText('⚠️ Could not retrieve data schema.')
.throwException();
}
return fields;
}
Some shortcomings:
- Data Studio does not like spaces and other non-latin characters in the ID property of field objects. The code above uses the names of the columns (header labels) of the dataset as IDs after removing spaces but does nothing with special characters such as
ñ,à,ü, etc. - All fields in the dataset are interpreted as dimensions and no attempt to guess their data types is made. Types and default aggregations can be set by the user manually in the data source configuration panel anytime, though.
Did I already tell you that this was a PoC?
Connector.gs ⇒ getData()
This might be the most relevant part of any corrector. This function is invoked every time Data Studio needs data to populate the charts in the report. Our ACL trickery will live inside.
Data Studio may not need all fields (columns) of the dataset in every call it performs to getData(). So, we first need to enumerate the fields that have been requested.
/**
 * Pull data from spreadsheet
 */
function getData(request) {

  // Identify requested fields
  const requestedFieldIds = request.fields.map(f => f.name);
  const requestedFields = getFields(request).forIds(requestedFieldIds);
Next, the configuration information inside the already-known request argument is used to connect with the dataset and read the chosen data range into both arrays, headers and records.
  // Read data from spreadsheet
  let interval, headers, records;
  try {
    interval = SpreadsheetApp.openById(request.configParams.id).getRange(request.configParams.range).getValues();
  } catch(e) {
    cc.newUserError()
      .setDebugText(`Error at getData(): ${e}`)
      .setText('⚠️ Could not connect with spreadsheet.')
      .throwException();
  }
  [headers, ...records] = interval;

  // Convert headers of dataset to lowercase and remove spaces to match with requested fields by ID
  headers = headers.map(h => h.toLowerCase().replace(/ /g, ''));
After that, a data response object is initialized with the requested fields, which do not necessarily come in the same order (left to right) found in the dataset.
  // Get requested fields and prepare data response
  const data = cc.newGetDataResponse().setFields(requestedFields);
  const fieldIndexes = requestedFields.asArray().map(f => f.getId()).map(f => headers.indexOf(f));
And finally, this is where the row-level security part is performed. The email of the user currently viewing the report is obtained with getEffectiveUser().getEmail() method and matched against the comma-separated list of email addresses find in the ACL for each and every record.
  // Check viewer's email against ACL
  const aclCol = headers.indexOf(request.configParams.acl.toLowerCase().replace(/ /g, '')); // Remove spaces to match with headers
  const viewerEmail = Session.getEffectiveUser().getEmail();
  records.forEach(r => {
    const row = fieldIndexes.map(f => r[f]);
    const allowedEmails = r[aclCol].toLowerCase().split(",").map(email => email.trim());
    if (allowedEmails.some(email => email == viewerEmail)) {
      data.addRow(row);
    }
  });

  return data.build();
}
We have to make a halt at this point to discuss something of utmost importance that is related to the way community connectors work.
We already know that CCs are just Apps Scripts. By default, these scripts run as the owner of the data source, that is, using his or her security credentials to access the plethora of integrated Google services in the way we discussed earlier.
This means that using the getEffectiveUser().getEmail() method will not return the email address of the user currently viewing the report, but rather that of the owner of the data source, and getActiveUser().getEmail() will yield the same result.
☝ Note: This behaviour has some, but not all, points in common with Apps Script web apps deployed as “execute as me”.
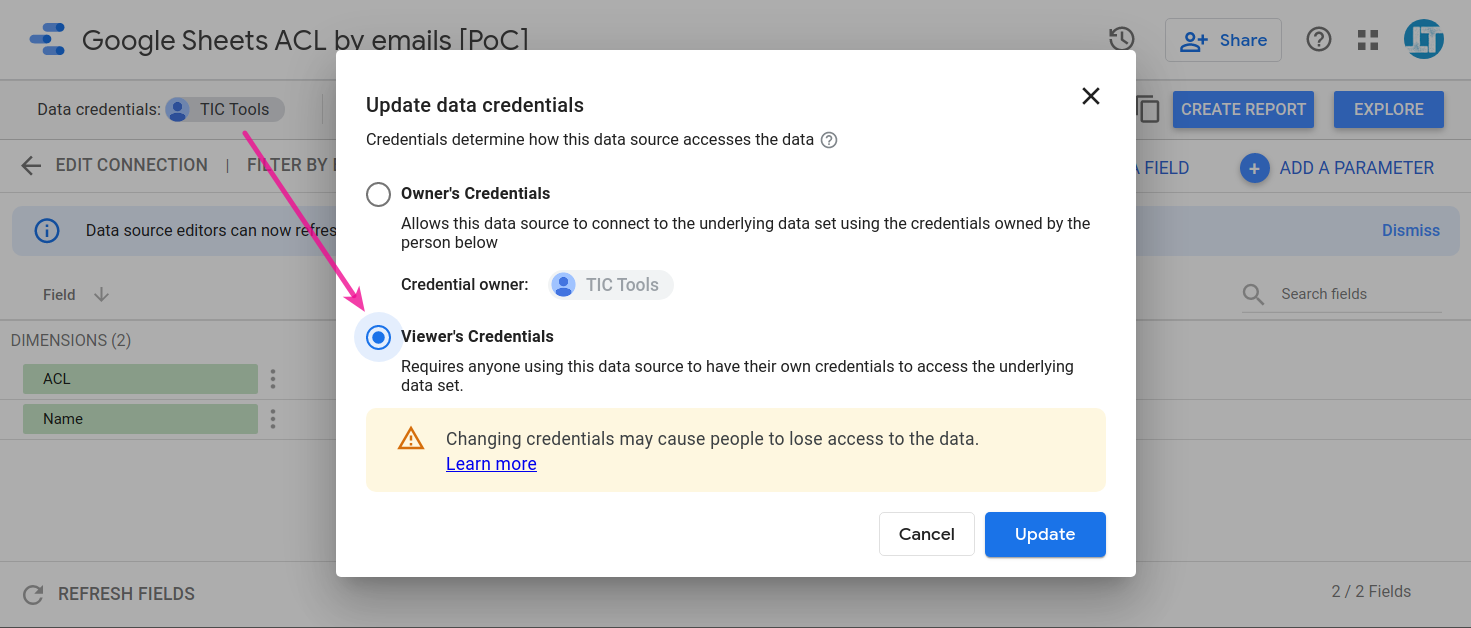
To beat this problem we need to set the data source so that it uses the viewer’s credentials.

Now the CC’s script will run as the user viewing the report and the desired email address will be picked up.
This setting has a two significant implications:
1️⃣ All users viewing the report will need read-access to the script to be able to run the community connector. Notice that you also have to share the script this way to distribute the community connector in order that other people could use it in their own reports. So, in my opinion, this is no big deal.
2️⃣ As the script is now running inside the viewer’s security context, the connected dataset (the Google spreadsheet!) also needs to be accessible to anyone expected to use the report. And this is more problematic. On one hand, the URL of the spreadsheet is not available to the people consuming the report as just viewers. On the other hand, we know that brute-forcing those URLs seems unfeasible, at least for now. But security by obscurity is not real security. All in all, I can’t help finding this situation a little bit disturbing. Anyway, we’ll try to code around this in the next iteration of our community connector.
More about pulling data from datasets in the API reference for getData().
Connector.gs ⇒ isAdminUser()
This optional function is used to tell Data Studio whether it should display extended error messages when exceptions occur. You can use an explicit whitelist of email addresses, together with the getEffectiveUser().getEmail() method, to return a boolean true value when extended debugging information should be provided in visual alerts. Or do it unconditionally.
function isAdminUser() {
  return true;
}
For example, this code is used inside getFields() to catch exceptions when fetching the dataset’s schema.
} catch(e) {
  cc.newUserError()
    .setDebugText(`Error at getSchema() > getFiels(): ${e}`)
    .setText('⚠️ Could not retrieve data schema.')
    .throwException();
}
Regular users will only see the setText() message, while admins will also get the setDebugText() one.
Testing the v1 connector
Time for some testing. Two ways to get started:
Option 1: Just follow this link 👉Google Sheets ACL by emails [PoC] to start using a working copy of the connector in your reports right now. Remember that you will need to grant authorization.
Option 2: Use your own copy of the script.
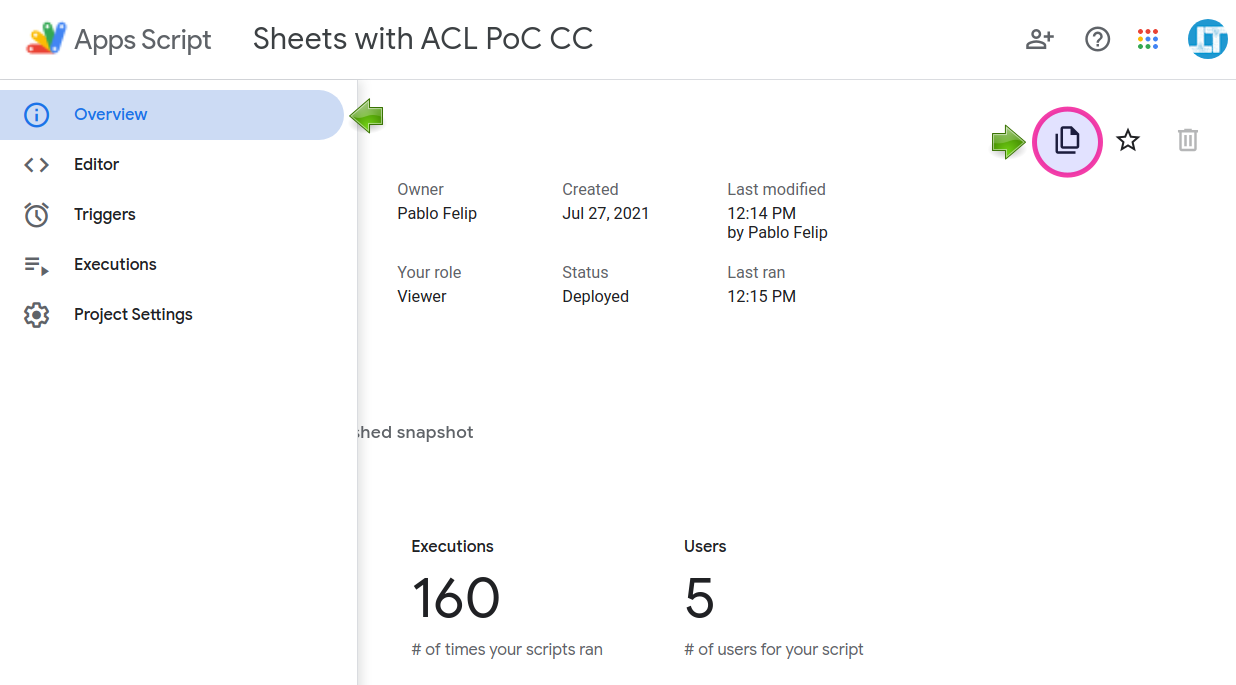
1️⃣ Open this script 👉Sheets with ACL PoC CC, head to the Overview section and hit the Make a copy button.
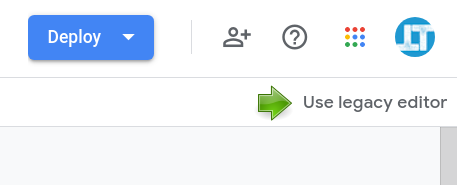
2️⃣ Revert to the good old legacy Apps Script editor.
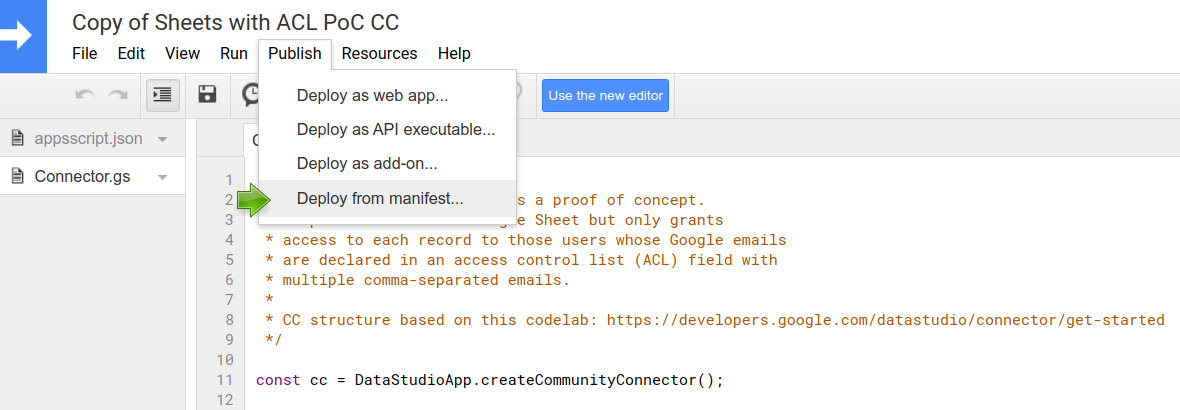
3️⃣ Click Publish ⇒ Deploy from manifest.
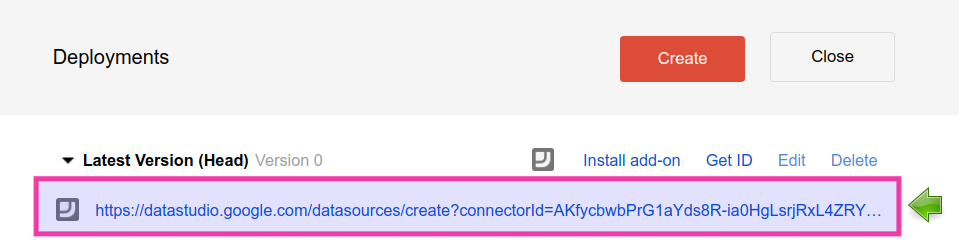
4️⃣ Click on Latest Version (Head) and copy the head deployment URL (nice for testing as you won’t have to redeploy after each edit). You can now get back to the new IDE.
5️⃣ Share the script accordingly. Use an explicit list of users whenever possible (unless the report is intended to go public) with read-only access.

6️⃣ Finally, open the head deployment URL in your browser to authorize the connector and set up a new data source.
In one way or another, you can make a copy of this sample spreadsheet 👉Sheets with ACL PoC (remember to change the email addresses in the ACL column) or bring your own to start playing with our CC version 1. Remember, the spreadsheet needs to be shared with all potential users of the report!

☝ Note: Don’t forget to set the data credentials to viewer in your data sources for the ACL email filtering to work properly. Do not enable the built-in filter by email feature.
CC Mk II: Let there be service accounts
Our first attempt at a better-than-default filter by email using a community connector has some shortcomings, as we already know.
After all, we can already achieve similar, maybe acceptable, results just using the new DS_USER_EMAIL() function, some calculated fields and standard filters. No need to write a single line of Apps Script code. No sharing of the dataset. Simple and clean, although not devoid of some subtle nuances, as we've already discussed.
Some improvements to our community connector are obviously needed to account for all the hassle.
More specifically, version 2 of our PoC connector will use a service account to delegate access to the dataset, thus saving the need to share it with all potential viewers of the report. Our connector, even while running under the viewer’s credentials, will oauth into the service account and access the underlying spreadsheet on behalf of the user who is interacting with the report.
Google developer guides go to some lengths to explain how service accounts can be leveraged when building CCs. You may want to take a peek before reading on.
Let’s see what’s new in this 👉v2 script.
Appsscript.json
Some changes here:
- This time we need to read data from the spreadsheet using the Sheets REST API. The necessary scopes are therefore different.
- The script now uses the ubiquitous OAuth2 library for Apps Script to access the Sheets API as the designated service account.
- Minor update of the description of the CC.
Check them out:
{
  "timeZone": "Europe/Madrid",
  "dependencies": {
    "libraries": [
      {
        "userSymbol": "OAuth2",
        "libraryId": "1B7FSrk5Zi6L1rSxxTDgDEUsPzlukDsi4KGuTMorsTQHhGBzBkMun4iDF",
        "version": "41"
      }
    ]
  },
  "oauthScopes": [
    "https://www.googleapis.com/auth/userinfo.email",
    "https://www.googleapis.com/auth/script.external_request"
  ],
  "runtimeVersion": "V8",
  "dataStudio": {
    "name": "Google Sheets ACL by emails [PoC] v2",
    "logoUrl": "https://cdn.bitrix24.com/b9316961/landing/027/027c19d37fefaaa64fc64510f40c2e60/Selecci_n_567.png",
    "company": "Pablo Felip",
    "companyUrl": "https://www.tictools.tk/",
    "addonUrl": "https://www.tictools.tk/",
    "supportUrl": "https://www.tictools.tk/",
    "termsOfServiceUrl": "https://www.tictools.tk/",
    "description": "PoC ACL for Google Sheets. This version uses a service account to access dataset.",
    "sources": ["GOOGLE_SHEETS"],
    "authType": ["NONE"],
    "feeType": ["FREE"]
  }
}
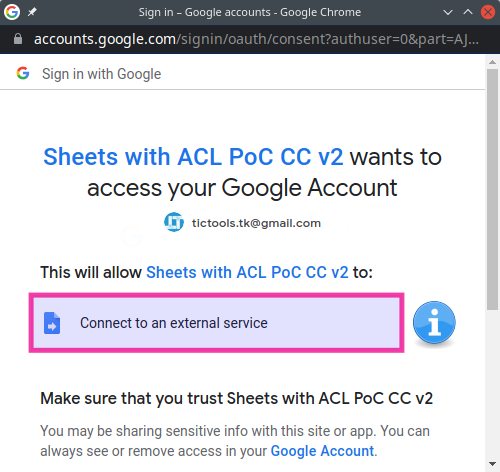
Users are getting a much less alarming message when authorizing the connector now that it only requests permission to connect to external services (script.external_request).
Connector.gs ⇒ getAuthType()
No changes here. Even though the connector will perform a non-interactive OAuth2 process, this is managed internally and does not require user intervention. Data Studio will remain clueless about it.
☝ Note: Even though this is not an advisable practice for public connectors, it can be adequate for limited or personal use.
Connector.gs ⇒ getConfig()
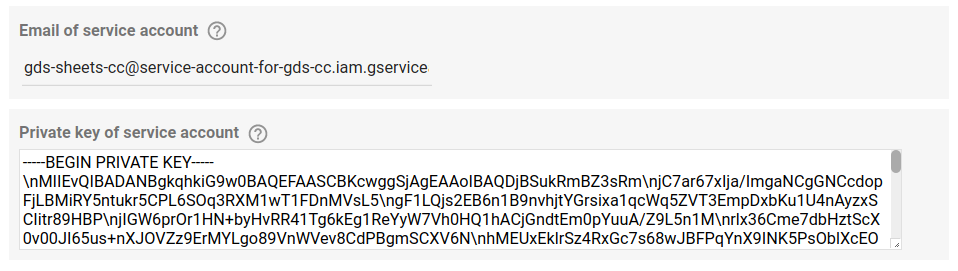
The connector needs two more parameters to be able to use the service account (we’ll obtain both of them later from the Google Cloud console).
- Email.
- Private key.
We simply have to update this function and add two more configuration parameters:
  // Service account >> email
  config.newTextInput()
    .setId('saEmail')
    .setName('Email of service account')
    .setHelpText('Service account needs read access to the spreadsheet.')
    .setPlaceholder('e.g.: user@project-cc.iam.gserviceaccount.com');

  // Service account >> Private key
  config.newTextArea()
    .setId('saPrivateKey')
    .setName('Private key of service account')
    .setHelpText('Paste private key to login as service account as downloaded from GCC > Service accounts > Keys (JSON format).')
    .setPlaceholder('e.g.: -----BEGIN PRIVATE KEY-----...');

As I told you earlier, the developer documentation for community connectors advises against using authentication methods other than those already built into the CC development framework.
We pursue a straightforward way for the user to input different service account credentials. Because of this, we are at this moment ignoring that recommendation for the sake of convenience, assuming that the private key will be visible while configuring the connection and that any user with edit permissions over the data source will be able to see the previously entered credentials.
☝ Note: The email and private key of the service account will be stored as internal configuration properties of the connector. We’ll be able to recall them by querying the already familiar request parameter. Please, in other situations be extremely careful to never store secret keys or authentication tokens in plain view inside the code of your script. You may use the Properties Service instead.
Connector.gs ⇒ getFields() / getData()
Both functions now call a helper readDataApiU() function rather than resorting to the Spreadsheet Service and its getValues() method to get data from the selected spreadsheet.
  // Read data from spreadsheet
  let interval, headers, records;
  try {
    interval = readDataApi(request.configParams.id,
                           request.configParams.range,
                           request.configParams.saEmail,
                           request.configParams.saPrivateKey);
  } catch(e) {
    cc.newUserError()
      .setDebugText(`Error at getData(): ${e}`)
      .setText('⚠️ Could not connect with spreadsheet.')
      .throwException();
  }
The Spreadsheet Service can no longer be relied on because it uses the OAuth token that is managed internally by the Apps Script framework (owned by the user under whose credentials the CC is running). That’s why readDataApi() will use the URL Fetch Service to interact with the Sheets API in a RESTful manner on behalf of the service account.
/**
 * Pull data from a range of cells in a given Google spreadsheet using Sheets API
 * and the specified service account
 * @param {string} id       ID of spreadsheet
 * @param {string} range    Range of cells, including sheet
 * @param {string} saEmail  Service account's email
 * @param {string} saKey    Service account's private key
 * @return {Array}          Range contents
 */
function readDataApi(id, range, saEmail, saKey) {

  const service = getOauthService(saEmail, saKey);
  // service.reset();
  if (service.hasAccess()) {
    const data = UrlFetchApp.fetch(`https://sheets.googleapis.com/v4/spreadsheets/${id}/values/${range}?majorDimension=ROWS`,
      {
          headers: {Authorization: 'Bearer ' + service.getAccessToken()},
          method: 'get',
          muteHttpExceptions: true
      });

    return JSON.parse(data.getContentText()).values;

  } else {
    console.info(service.getLastError());
  }
}
This function, in turn, invokes getOauthService(), which uses the OAuth2 library to manage the authorization flow into the service account.
/**
 * Oauth into a given service account with read-only access to spreadsheets
 * @param {string} saEmail  Email of service account
 * @param {string} saKey    Private key of service account
 */
function getOauthService(saEmail, saKey) {

  return OAuth2.createService('sheets')
    .setTokenUrl('https://accounts.google.com/o/oauth2/token')
    .setPrivateKey(saKey.replace(/\\n/g,'\n')) // transforms '\' + 'n' >> '\n'
    .setIssuer(saEmail)
    .setPropertyStore(PropertiesService.getScriptProperties())
    .setCache(CacheService.getScriptCache())
    .setScope('https://www.googleapis.com/auth/spreadsheets.readonly');
}
The \n substrings (composed of symbols \ and n.) found inside private keys, as obtained from the Google Cloud console, are replaced by proper single newline chararacters with saKey.replace(/\\n/g,'\n').
☝ Note: The code above sets the OAuth2 library to use the Properties Service to save the OAuth2 token inside the script store in a standard way. Keeping them on a per-user basis (user store) or even not using any persistent storage at all, might be a better fit in some situations. In fact, the way our CC scripts interact with the OAuth2 library makes this choice irrelevant, as tokens are never reused. This circumstance should be carefully pondered in each use-case, anyway.
The Sheets API is designed in a way that empty trailing rows (if majorDimension = COLUMNS) and columns (when majorDimension = ROWS) are omitted. This means that some rows could have fewer cells than the total number of columns that we have in the dataset. This can result in annoying "undefined" values when displaying data inside charts.
We can't deal with these absent values just using the missing data setting in the chart editor of Data Studio, as they are the result of the Google Sheets API returning non-perfectly rectangular arrays sometimes.
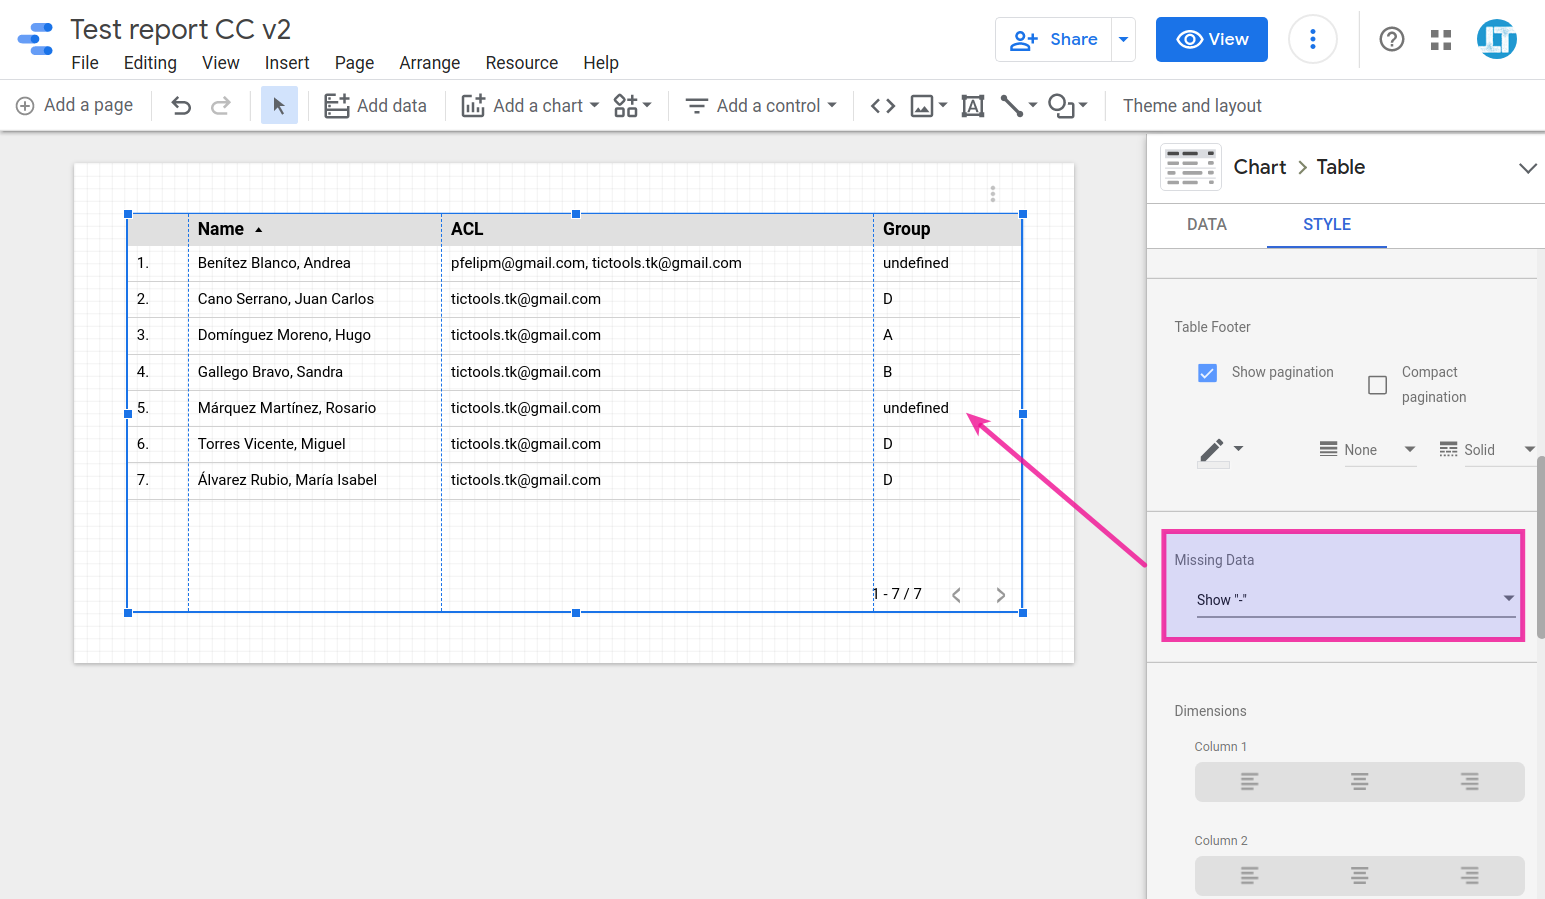
A possible workaround is comparing the size of each row with the header row and push as many blank elements as needed. This is accomplished in getData() immediately after calling the readDataApi() function:
  [headers, ...records] = interval;

  // Convert headers of dataset to lowercase and remove spaces to match with requested fields by ID
  headers = headers.map(h => h.toLowerCase().replace(/ /g, ''));

  // Add columns to rows with fewer cells than columns in the dataset
  records.forEach(r => {
    for (let i = 1; i <= headers.length - r.length; i++) r.push('');
  });
Testing the v2 connector
The steps to try this version of the connector are analogous to the ones provided in section 4.7. You’ll need this:
- Working connector 👉Google Sheets ACL by emails [PoC] v2.
- Source CC script 👉Sheets with ACL PoC CC v2.
- Sample spreadsheet 👉Sheets with ACL PoC v2 # service account.
This time the spreadsheet does not need to be shared with the target users of the report, only with the service account (major selling point of this v2!).

But where will you get this service account from?
You can use the credentials of this sample service account I’ve already setup to test with the working copy of the connector and sample spreadsheet above:
client_email:
gds-sheets-cc@service-account-for-gds-cc.iam.gserviceaccount.com
private_key:
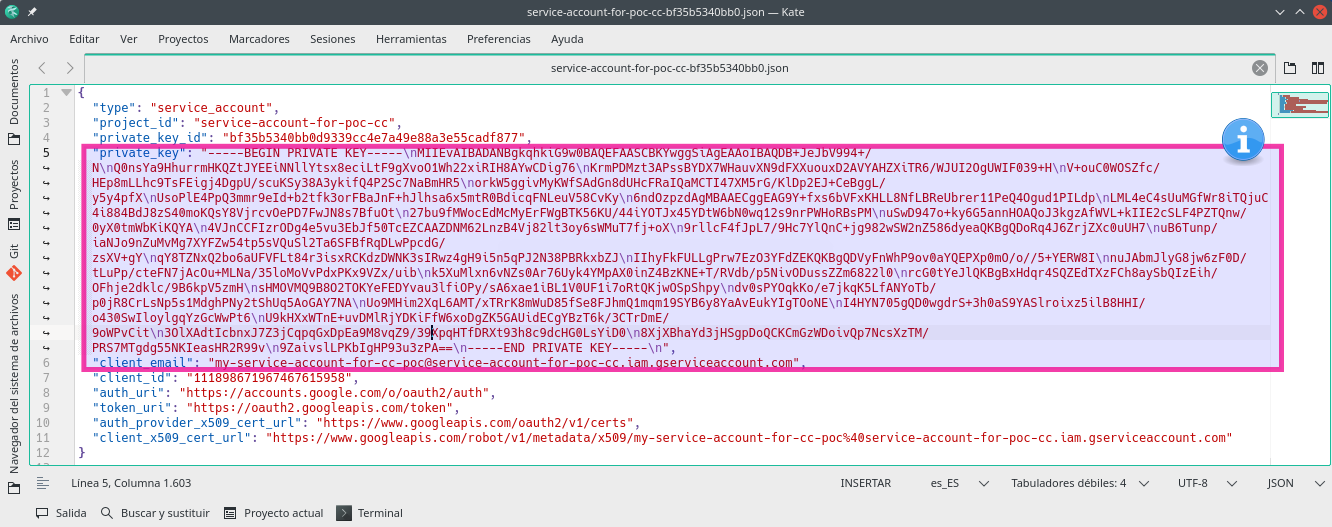
-----BEGIN PRIVATE KEY-----\nMIIEvQIBADANBgkqhkiG9w0BAQEFAASCBKcwggSjAgEAAoIBAQDjBSukRmBZ3sRm\njC7ar67xIja/ImgaNCgGNCcdopFjLBMiRY5ntukr5CPL6SOq3RXM1wT1FDnMVsL5\ngF1LQjs2EB6n1B9nvhjtYGrsixa1qcWq5ZVT3EmpDxbKu1U4nAyzxSCIitr89HBP\njIGW6prOr1HN+byHvRR41Tg6kEg1ReYyW7Vh0HQ1hACjGndtEm0pYuuA/Z9L5n1M\nrlx36Cme7dbHztScX0v00JI65us+nXJOVZz9ErMYLgo89VnWVev8CdPBgmSCXV6N\nhMEUxEklrSz4RxGc7s68wJBFPqYnX9INK5PsOblXcEOGmwmE3FK1yVki5IRKqW41\nhavevllPAgMBAAECggEAFnl0kJbHAx6iouRN3yh1UTnp4ZIubCmtrK+ND8oASqka\nW9I2/t2Ex+uV/6Hc/hVVCypeO0T9U9VjCABFPCYaZofCAStm0IZpQVbCPxil7uYX\nw4tm9R5hzHLJ9tgE383TFBj314ynkVNBqx5l1eLz4HJKzvFiUK3PUQcKwgF2pI9P\nK/fRbR0eLKw2xHmhXUNh+WOPe69fn5HSsjszYDXenmLlm2p20sSwHGezhrT6KyuB\nFkB1k0DNh9Vw6N08nqavWBur8cgzsRGXVx2CU7aE+HzlVGbl00+E6LESPfammpV3\nvATgp0Jgw6Vu5boVms0FkrH5mBmaLyrqDXZLt5TcgQKBgQD7qI36vgHNDVwnjoZK\nH/br0mvCx8QABzskka6c3Awnk33245eXZYEEGVy28/e8Wf4Mrlfn6jdXuQLBa4k8\nRQHuPmdAIg8KhtiUmN4+kfTW0LVpT+4HC0Tdry3CjsRuc3zLwmkNhDTmtbUpLyLM\nBKGILYGl05MA1ZKvl3JRr+uNCQKBgQDm780zV8prbTDdycB0XkgLGD8YVsjNFKHJ\nk5/h4ZIwmClTLH/Ao1ERNHnbVwNZ0STAyATRBVj1Y3iXe/Oh/cjdRoMqm9CSHqoF\nRZVoQ1RP9tPdfZEkDOA59ktZRcBt8ordMpZ2xpjdwf/Q++O/rPMfI+sK+zoQhuFZ\nl27Y2KAhlwKBgGeg6g5FreItTTRwyTW+4eQL+xnzPu+wCpetcdTf/BVT8/v1jlfm\nkXEJrJcd8XbbK/U22bYDSZTS96KEULfDxt6/Ta8oFz+Dda4DIQls+wB2Yy2hn2fB\nKTOMTnCeb5736XzSaoYJWetjCd2SrmaKxaWY75lEfXVLfSLXX1jp8zpZAoGASPEd\nQ0ZLbTsD4EnFO/w7jSWPaEShEAWgRGcYbOQupKKrCtZXU6VCCcklZB5LtKbWkP2c\nZ9jkjD1q7Y39GgFq3FlVPLQSYNTGpvufgVsi2k8ABEmQ+m4GtMgSbJQXf6LIMa20\n0LdRuVl5T6z/9p7N+9wAdWt8n5O6we2O2XcyvOkCgYEAuniiaWPQlIezIIz5ik+4\nGAYVpNMuP8XyP/ki8K3xdweelQ3oqc9PNKrrkDZWaN/71Vb0cw0kqDzXZaQMXaWx\nVUAXDVQDD5bNc5CDUWiyEvUzbrR0ajwC5XoDukC0/5ZO1b4iFrjbeDOlZj7/9jgC\nfQGsiG75ySHIsJtZRR2rpaE=\n-----END PRIVATE KEY-----\n
Or you can get one of your own:
1️⃣ Head to the Google Cloud Platform console at https://console.cloud.google.com.
2️⃣ Create a new project. Use any name you like.
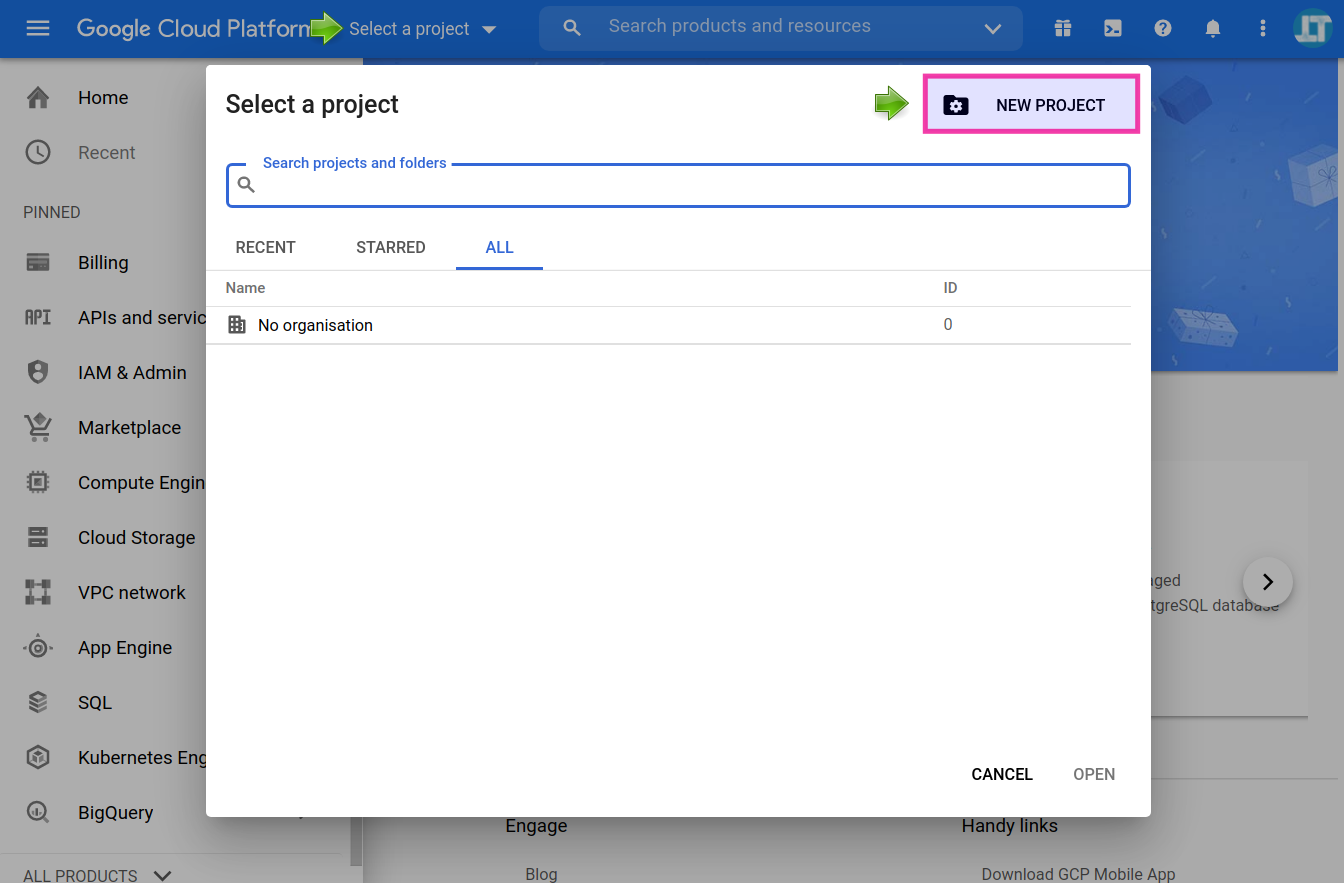

3️⃣ Select the project you have just created.
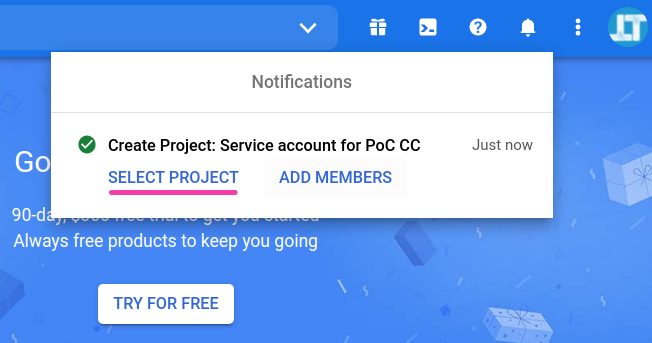
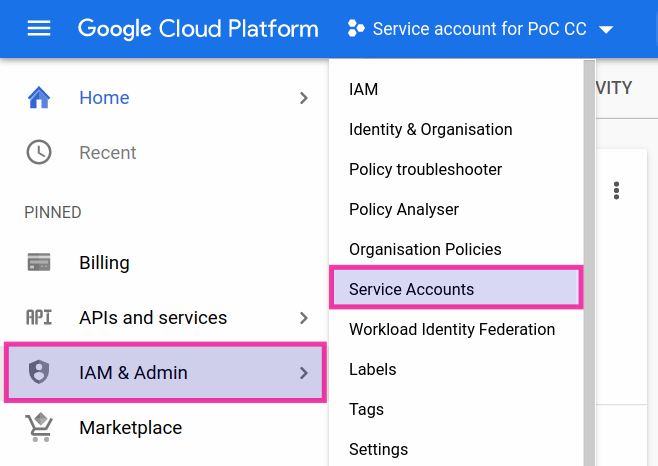
4️⃣ Go to IAM & Admin ⇒ Service accounts.
5️⃣ Create a new service account.
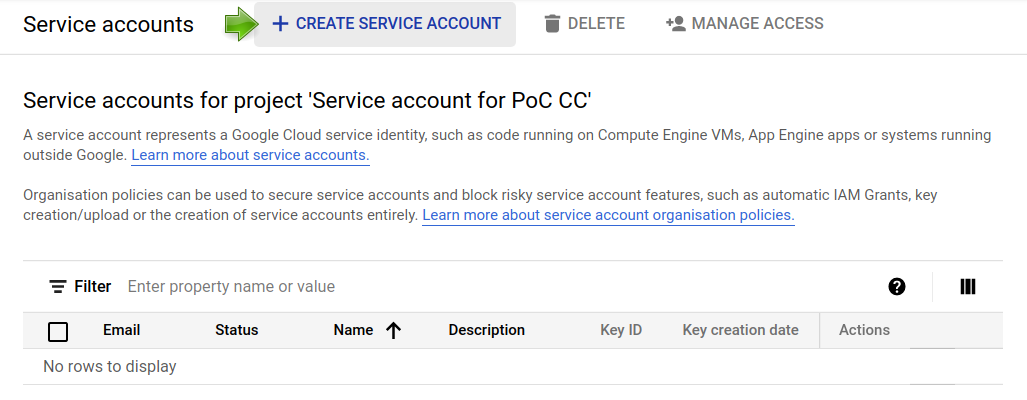
6️⃣ Use the name you prefer (will be used for the user part of the email) and hit the CREATE AND CONTINUE button.

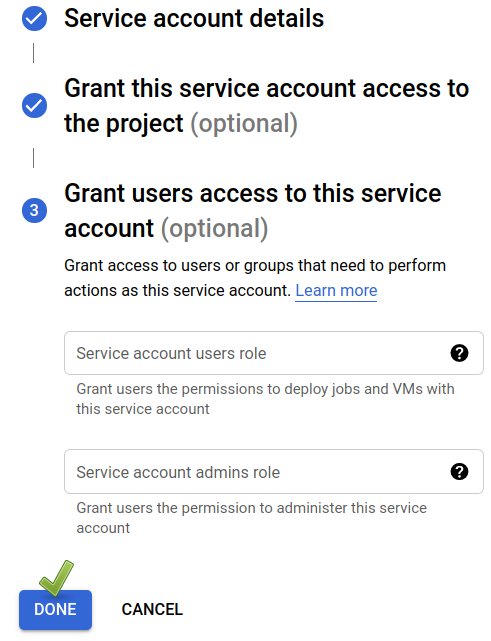
7️⃣ Don’t fill in the optional parts and click on DONE.
8️⃣ Click on the Actions button and then select Manage keys.

9️⃣ Create a new JSON key.
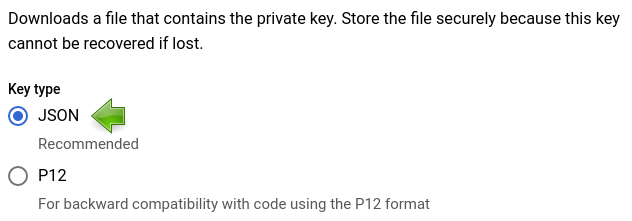
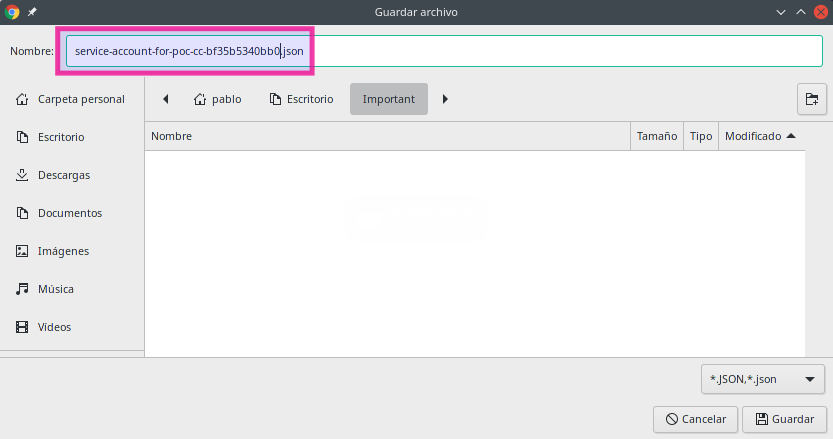
1️⃣0️⃣ Download the JSON file that has been spawned and store it in a safe place. You’ll only be able to do it once, if you lose your key you will need to generate a new one.
You will find inside the private key and client email, as well as some additional information we are not using right now. Just keep it in a safe place and copy and paste as needed inside the configuration params of the CC when setting up a connection.
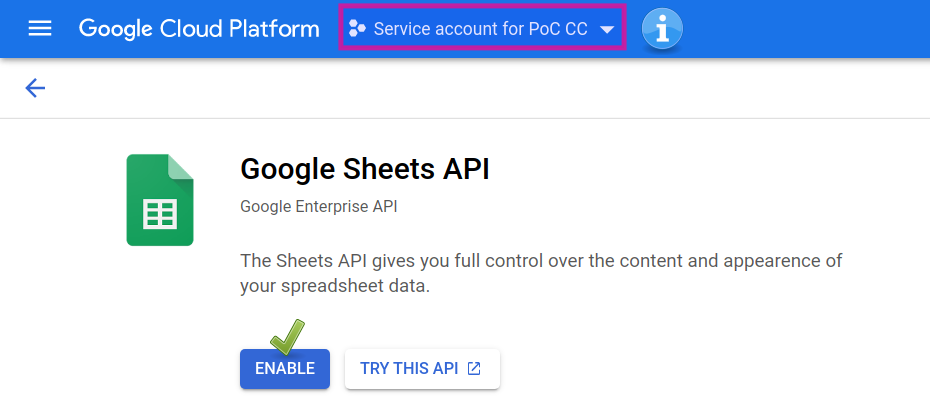
1️⃣1️⃣ The last step involves enabling the Google Sheets API for the GCP project where we have created our service account. Follow this link, select your project and click the ENABLE button.
One more thing. Well, it’s actually three:
- Share your spreadsheets with the service account. Use the obtained client email (such long names may not be a good idea, after all 😅).
- Never disclose the service account’s credentials. I am doing it here just for educational purposes (do what I say but not what I do).
- As previously, set the data credentials to viewer in the data source for the ACL email and do not enable the built-in filter by email feature.
CC Mk III: Why not a combined group / domain / * ACL?
In the last two sections, we’ve got acquainted with the inner workings of community connectors for Data Studio. We’ve learned that their Apps Script foundations allow for a lot of freedom when it comes to performing data manipulation processes behind the curtains, in other words, before data gets to the report itself.
Now we are ready to get a bit more creative.
Let’s devise a new iteration of our CC with an access control list that supports any comma-separated combination of:
- Email addresses.
- User groups.
- Full domains.
- A wildcard [ * ] that makes records public.
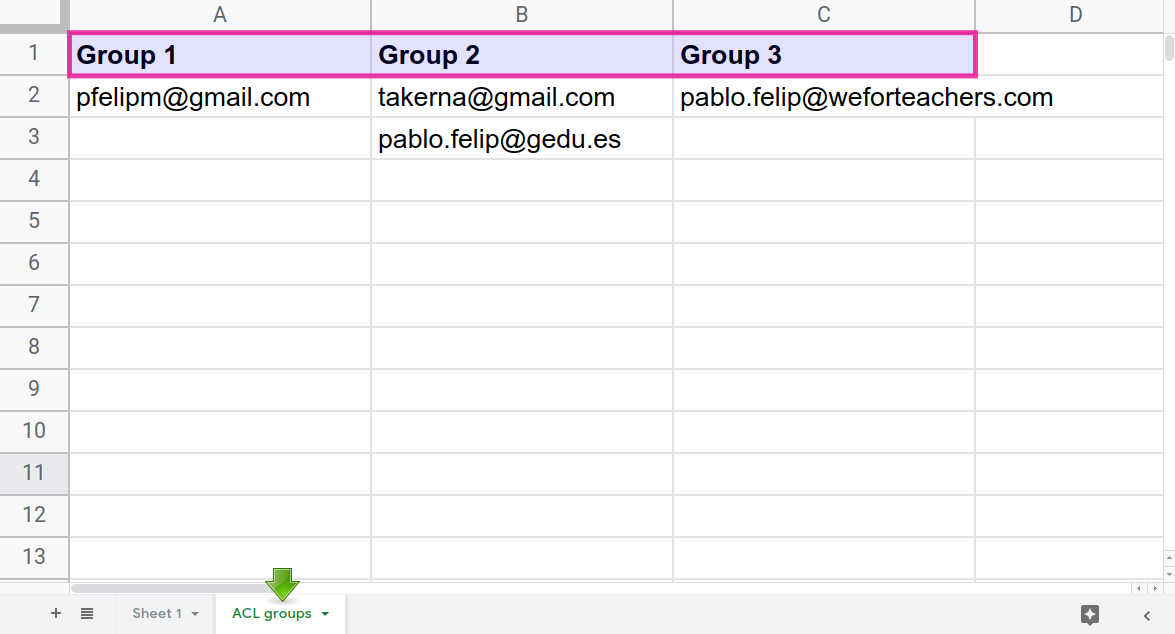
Take a look at this new 👉sample spreadsheet:
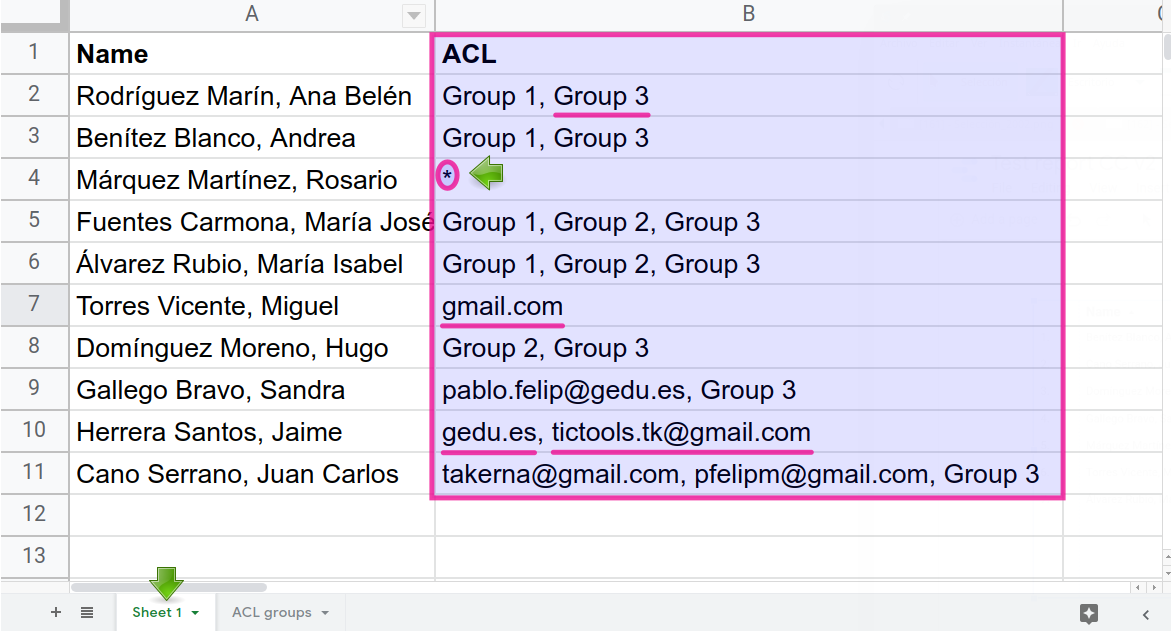
A secondary worksheet inside the same spreadsheet will map users and groups in different columns.
The code for this version is extremely similar to v2, we are just making the section that decides whether a given row has to be displayed or not, according to the viewer’s email address, a tad more complicated. All functional blocks remain the same.
Connector.gs ⇒ getConfig()
Another text input element is called for to get the data range of the ACL table:
  // Data range of ACL table
  config.newTextInput()
    .setId('aclTableRange')
    .setName('Data range of ACL table')
    .setHelpText('Input range of ACL table, INCLUDING sheet name, headers at row 1 >> name of groups / rest of rows >> user emails (sheet with no range selects all cells).')
    .setPlaceholder('e.g.: ACL groups!A1:C10');
Connector.gs ⇒ getData()
This is the updated code that enforces the ACL inside getData(). It employs a decision tree that takes care of the four different types of ACL items found in the designated security field of the spreadsheet.
/**
 * Pull data from spreadsheet
 */
function getData(request) {

  // Identify requested fields
  …

  [headersAclT, ...recordsAclT] = aclTable;

  // Convert headers of groups in ACT table to lowercase
  headersAclT = headersAclT.map(h => h.toLowerCase());

  // Add columns to rows with fewer elements than columns in the ACL table
  aclTable.shift().forEach(r => {
    for (let i = 1; i <= headers.length - r.length; i++) r.push('');
  });

  …

  // Get requested fields and prepare data response
  …

  // Checks viewer's email against ACL
  const aclCol = headers.indexOf(request.configParams.acl.toLowerCase().replace(/ /g, '')); // Remove spaces to match with headers
  const viewerEmail = Session.getEffectiveUser().getEmail();
  records.forEach(r => {
    const row = fieldIndexes.map(f => r[f]);
    const allowedUsers = r[aclCol].toLowerCase().split(",").map(aclItem => aclItem.trim());
    if (allowedUsers.some(aclItem => {
      let grantAccess = false;

      // Public access?
      if (aclItem == '*') {
        grantAccess = true;
      }

      // aclItem seems to be an email, check if there is an email match
      if (aclItem.includes('@')) {
        grantAccess = aclItem == viewerEmail;
      }

      // aclItem seems to be a domain, check against the viewer's domain
      else if (aclItem.match(/^[^@]+\..+/)) {
        grantAccess = aclItem == viewerEmail.substring(viewerEmail.lastIndexOf('@') + 1);
      }

      // aclItem has to be a group, check if email belongs to it
      else {
        const groupCol = headersAclT.indexOf(aclItem);
        if (groupCol != -1) {
          grantAccess = recordsAclT.some(row => row[groupCol].toLowerCase() == viewerEmail);
        }
      }
      return grantAccess;
    })) {data.addRow(row);}
  });

  return data.build();
}
It would be really easy to modify this part to implement other access control strategies, maybe using the Groups service or even the built-in share permissions in a file or folder stored in Google Drive. The sky's the limit!
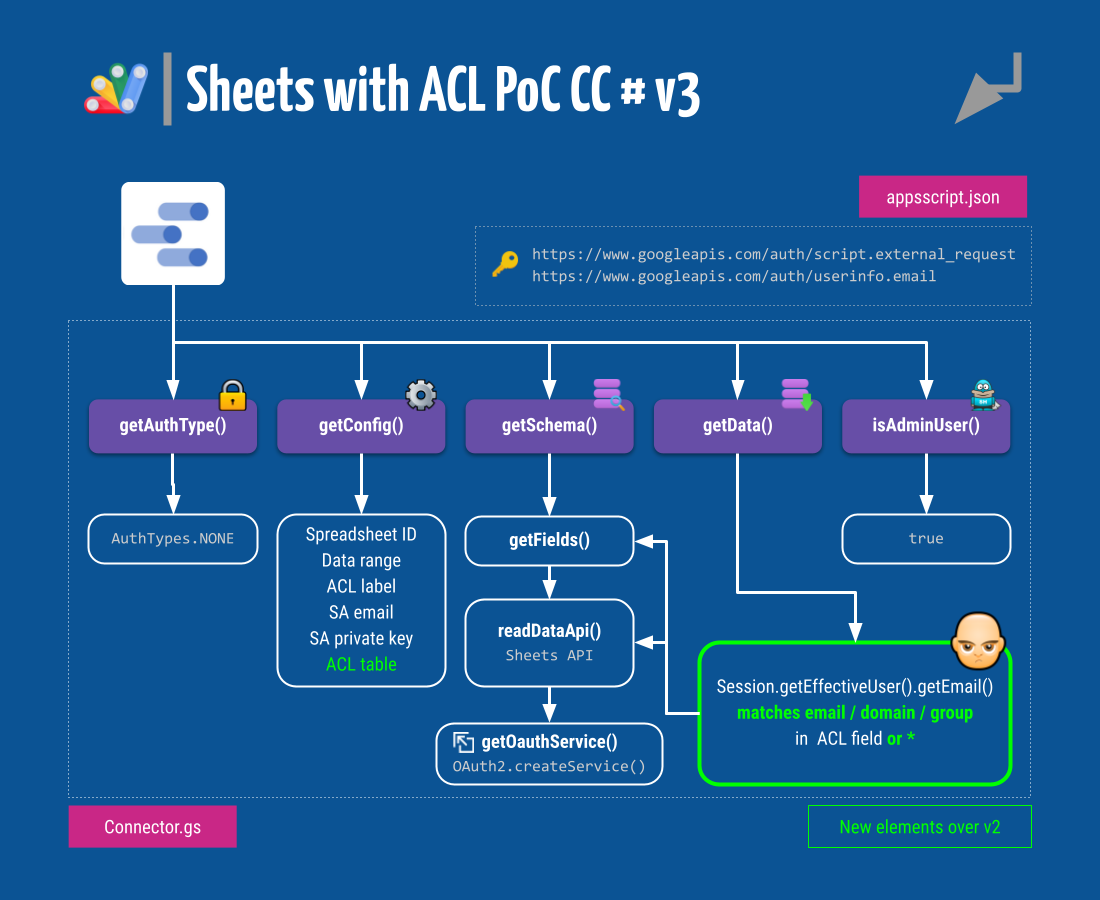
Testing the v3 connector
As usual, here you can find:
- A working connector 👉Google Sheets ACL by emails [PoC] v3.
- The source CC script 👉Sheets with ACL PoC CC v3.
- A spreadsheet with a group ACL table 👉Sheets with ACL PoC v3 # service account.
The indications in section 5.5 still apply. Please, feel free to do your own testing.
CC Mk IV: Other Auths and stepped configuration
The final (as far as this article is concerned) version of our connector will try to improve upon its previous siblings in two aspects:
- The service account credentials will be obtained using one of the available authentication methods that Data Studio provides, in compliance with the recommended practices.
- We’ll have a go at stepped configuration, a sort of multi-stage setup that can be used when setting up the connection with a dataset in a way that allows for dynamic drop-downs. For instance, we could populate a list selector with the names of the worksheets of a spreadsheet only after the user has entered its ID.
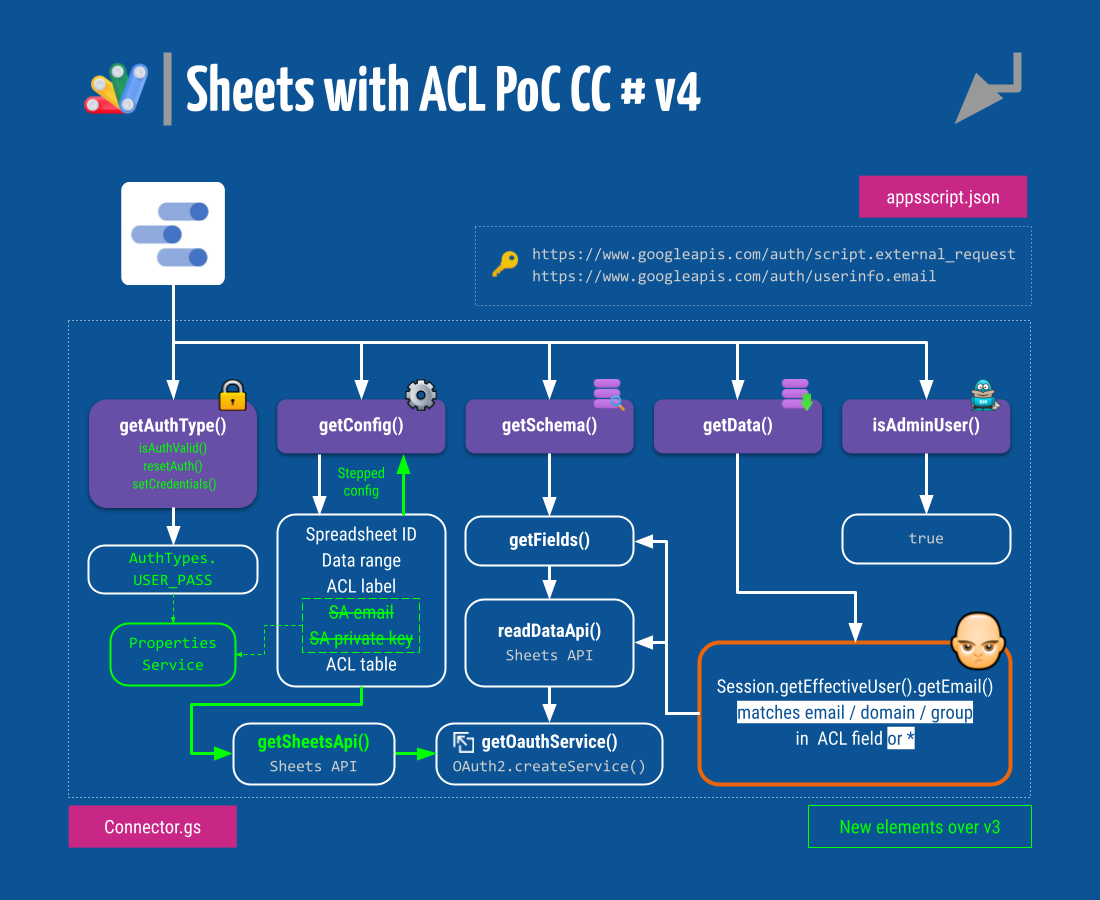
But let’s put the newly updated block diagram front and center:
Appsscript.json
No changes, save for the authType key:
/**
 * CC's auth type
 */
function getAuthType() {

  // Set auth type
  const AuthTypes = cc.AuthType;
  return cc
    .newAuthTypeResponse()
    .setAuthType(AuthTypes.USER_PASS)
    .build();
}
Some food for thought:
- We probably could have also used an authorization of type
USER_TOKEN, after all, we are just getting an email and secret to perform a login. In either way, I find both password prompts a little bit misleading when used to ask the user for the private key of a service account. - Even though this approach is way better than obtaining the credentials of the user account when setting up the connection as a configuration parameter from a security standpoint, there is an important catch: all data sources where a single instance (script) of the connector has been used will be sharing the same service account credentials, so I feel it is a little bit less practical. I hope Data Studio will support multiple authorization profiles soon.
Connector.gs ⇒ isAuthValid() / resetAuth() / setCredentials()
Besides the getAuthType(), we now require three additional mandatory functions that the Data Studio back-end also calls to trigger and manage authorization to access your data
The first one, isAuthValid() (reference), attempts an OAuth2 authorization flow using an existing set of credentials and returns true, if successful. Credentials are retrieved from the script’s properties store using the Apps Script Properties Service.
function isAuthValid() {

  // Check if we can login into service account, this is also called once before first authorization request
  const {saEmail, saPrivateKey} = getCredentialsFromProperties();

  if (saEmail && saPrivateKey) {
    const service = getOauthService(saEmail, saPrivateKey);
    return service.hasAccess();
  } else {
    return false;
  }
}
There is also an optional getCredentialsFromProperties() helper function to fetch credentials at different points in the code:
function getCredentialsFromProperties() {

  // Helper function, returns an object with the service account credentials

  return {
            saEmail: PropertiesService.getScriptProperties().getProperty('saEmail'),
            saPrivateKey: PropertiesService.getScriptProperties().getProperty('saPrivateKey')
          };
}
Next, resetAuth() (reference) simply clears a previously set of stored credentials.
function resetAuth() {

  // Forget credentials for service account access
  PropertiesService.getScriptProperties()
    .deleteProperty('saEmail')
    .deleteProperty('saPrivateKey');
}
Finally, setCredentials() (reference), is called after Data Studio gets the credentials from the user and stores them in a persistent manner. In heavy-use situations, you may want to use the Cache Service to avoid exhausting the Properties Service quota.
function setCredentials(request) {

  // If valid, store credentials for service account provided by the user inside script properties >> cache would be welcome!
  const saEmail = request.userPass.username;
  const saPrivateKey = request.userPass.password.replace(/\\n/g,"\n");
  const service = getOauthService(saEmail, saPrivateKey);

  if (service.hasAccess()) {
    PropertiesService.getScriptProperties()
      .setProperty('saEmail', saEmail)
      .setProperty('saPrivateKey', saPrivateKey);
    return {errorCode: 'NONE'}
  } else {
    return {errorCode: 'INVALID_CREDENTIALS'};
  }
}
Connector.gs ⇒ getConfig()
This part has undergone important changes as a result of both the new way of getting credentials (configuration parameters for the email and private key of the service account are no longer needed) and the implementation of a stepped configuration approach for the connection.
We are now getting a meaningful multi-stage set-up with some nice drop-down selectors that are populated based on previous answers.
This modus operandi allows for some on-the-fly error management, for instance, to check that the provided spreadsheet exists before proceeding to ask the user for the ACL column or table.
The current state of affairs regarding the stepped configuration capabilities of DataStudio are prone to making things rather tricky when complex configuration paths are needed, but it is a very welcome feature that requires some testing (at least it has been so for me 😅) before getting as right as it can be.
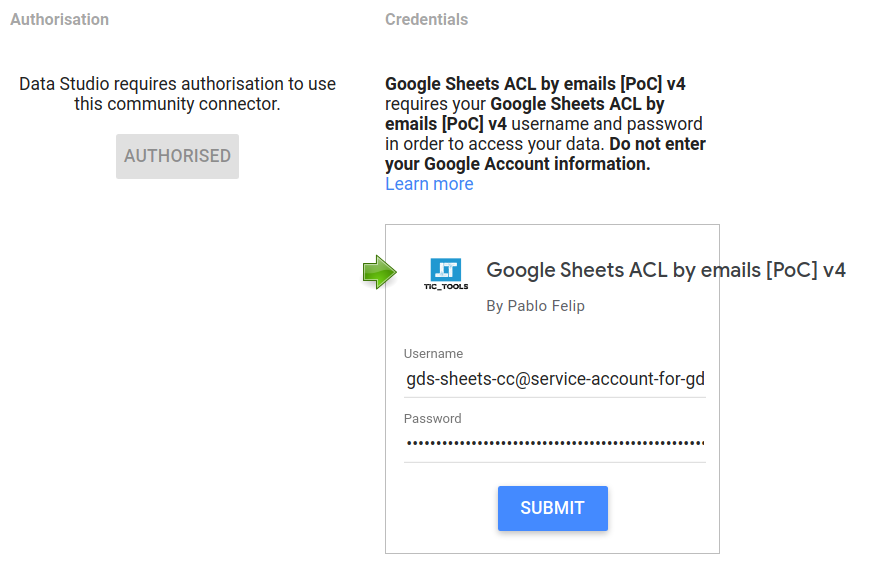
Please, take a look at the final configuration flow of the connection (after the authorization and credentials part) in this short video.
Let’s break down this code section.
The first block will appear unconditionally while setting up the connection. It will:
- Display a welcome message.
- Inform Data Studio that we are initiating a stepped config flow setting
setIsSteppedConfig(true).
Ask for the spreadsheet’s ID. The rest of the paramswill depend on this ID, that's why we de setIsDynamic(true) .
/**
* CC's setup
*/
function getConfig(request) {
// Initialization
const config = cc.getConfig();
const configParams = request.configParams;
config.setIsSteppedConfig(true);
let stage = 1;
// Instructions
config.newInfo()
.setId('settings')
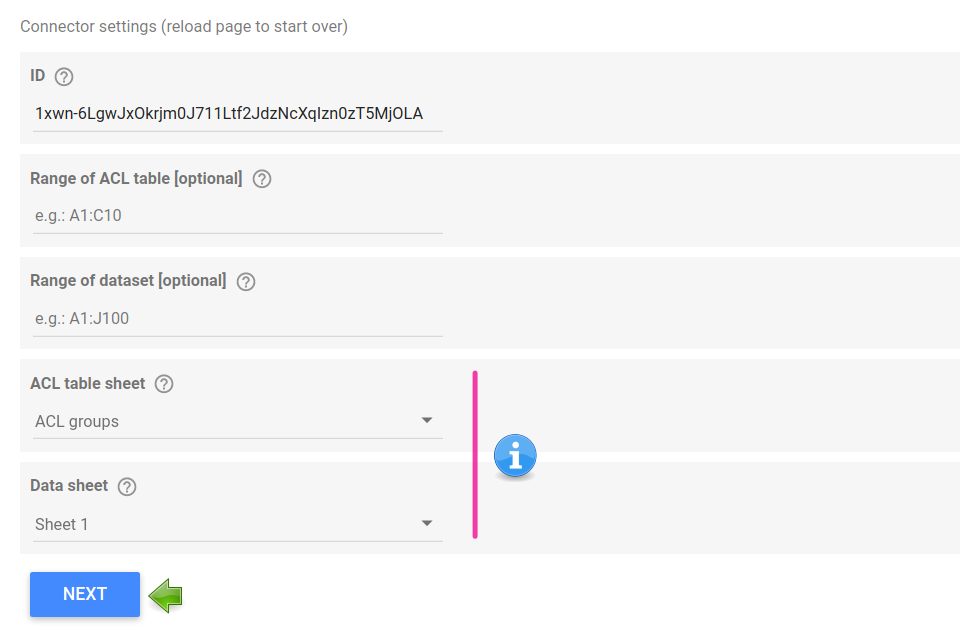
.setText('Connector settings (reload page to start over)');
// Spreadsheet's ID
config.newTextInput()
.setId('id')
.setName('ID')
.setHelpText('Google spreadsheet ID.')
.setPlaceholder('e.g.: 1kSrlo...')
.setIsDynamic(true);
Whenever the user edits the ID, all elements below will reset and a NEXT button will be displayed to proceed to the next step. Data Studio will call again the getConfig() function passing along the previously set configuration elements inside parameter request.configParams. We are testing the existence of this object prior to proceeding to the next stage. If this object is undefined, the connector will skip (and hide) whatever comes next.
If an ID has been established:
- We use the credentials of the service account to call the
getSheetsApi()function to enumerate the worksheets inside the target spreadsheet. - If it is not possible (new error check!), we throw an exception.
- If some sheets are indeed returned, we move on to ask for the datasets and ACL table ranges (both optional) and build two drop-down UI elements, with class
SelectSingle, for the user to choose both worksheets that contains the data and the ACL table. This not only results more natural and user-friendly but also reduces the chance of run-time errors as a consequence of user typos when entering this information in plain text input elements.
  if (configParams) {

    // We already have a request.configParam object and some ID, now in ### stage 2+ ###
    stage = 2;

    const {saEmail, saPrivateKey} = getCredentialsFromProperties();
    const sheetNames = getSheetsApi(configParams.id, saEmail, saPrivateKey);

    if (sheetNames.length == 0) {
      console.info('error')
      cc.newUserError()
        .setDebugText('Error at configuration stage 2.')
        .setText(`⚠️ No sheets found in spreadsheet with ID '${configParams.id}', please start over and check ID.`)
        .throwException();
    }

    // Data range of ACL table
    config.newTextInput()
      .setId('aclTableRange')
      .setName('Range of ACL table [optional]')
      .setHelpText('Input range of ACL table, EXCLUDING sheet name, headers at row 1 >> name of groups / rest of rows >> user emails (all cells selected if blank).')
      .setPlaceholder('e.g.: A1:C10');

    // Data range
    config.newTextInput()
      .setId('range')
      .setName('Range of dataset [optional]')
      .setHelpText('Input range to pull data from, EXCLUDING sheet name (all cells selected if blank).')
      .setPlaceholder('e.g.: A1:J100');

    // ACL sheet
    const aclSheetSelector = config.newSelectSingle()
      .setId('aclSheetName')
      .setName('ACL table sheet')
      .setHelpText('Choose the sheet that contains the ACL table, headers at row 1 >> name of groups / rest of rows >> user emails.');
    sheetNames.sort().forEach(sn => aclSheetSelector.addOption(config.newOptionBuilder().setLabel(sn).setValue(sn)));

    // Data sheet
    const dataSheetSelector = config.newSelectSingle()
      .setId('dataSheetName')
      .setName('Data sheet')
      .setHelpText('Choose the sheet that contains the dataset.')
      .setIsDynamic(true);
    sheetNames.forEach(sn => dataSheetSelector.addOption(config.newOptionBuilder().setLabel(sn).setValue(sn)));
We set again setIsDynamic(true) for the data sheet parameter selector because there already is one more dependent parameter left. This element is the header label of the ACL column in the worksheet where the actual dataset is and will only be displayed in case all previous params are known.
    if (configParams.dataSheetName && configParams.aclSheetName) {

      // We have everything but the ACL header, now in ### stage 3 ###
      stage = 3;

      // Get headers from dataset, append range, if exists (not blank), to sheet name
      const data = readDataApi(configParams.id,
                               !configParams.range ? configParams.dataSheetName : configParams.dataSheetName + '!' + configParams.range,
                               saEmail,
                               saPrivateKey);
      if (data.length == 0) {
        console.info('error')
        cc.newUserError()
          .setDebugText('Error at configuration stage 3.')
          .setText(`⚠️ Error retrieving headers of sheet '${configParams.dataSheetName}' in spreadsheet with ID '${configParams.id}', please start over and check ID and source sheet.`)
          .throwException();
      }

      // Header of ACL column
      const aclColumnSelector = config.newSelectSingle()
        .setId('acl')
        .setName('Label in header of ACL column')
        .setHelpText('Choose ACL column, must contain a comma-separated list of Google emails and/or security groups.');
      data.shift()
        .filter(h => h != '')
        .forEach(h => aclColumnSelector.addOption(config.newOptionBuilder().setLabel(h).setValue(h)));

      config.setIsSteppedConfig(false);
    }
  }
The header row of the data worksheet is fetched and, after another check, the connector builds a final drop-down to handily pick out the column that contains the ACL items.
This marks the end of the connection workflow, so finally, we assert setIsSteppedConfig(false).
A simple progress bar is displayed at the bottom of the configuration area.

  // Progress bar
  config.newInfo()
    .setId('progressbar')
    .setText(`[${stage}/3] ${'●'.repeat(stage * 3)}${'○'.repeat(9 - stage * 3)}`);

  return config.build();
}
Testing the v4 connector
Again, here you are:
- A working connector 👉Google Sheets ACL by emails [PoC] v4.
- The source CC script 👉Sheets with ACL PoC CC v4. You can also browse its codebase in this GitHub repository.
- The same spreadsheet with a group ACL table that we used in v3 👉Sheets with ACL PoC v3 # service account.
Refer to section 5.5 for thorough instructions.
Recap and next steps
Thanks for coming along this far. It has been quite a ride.
Let me recap what we have already learned and some of the possibilities that still lie ahead and should deserve further exploration.
The built-in filter by email in Google Data Studio is an extraordinary, code-free feature that can be leveraged to deliver the proper information to the right users. Coupled with smart data blends, it can deliver a form of group-based access control to individual rows of the dataset.
As of August 19th, Data Studio has been (almost) silently upgraded with a more advanced form of row-level security. Now we can combine sophisticated text-matching expressions with the DS_USER_EMAIL() function (reserved, as a parameter, to BigQuery data sources until now) and appropriate filtering at the report, page or chart level. But even harnessing their combined power, there are certain limits to the complexity of the security rules that can be applied and the correctness of the results.
That's the reason why we have introduced community connectors, pieces of code that anyone with some knowledge of Apps Script can develop. Data connectors are able to access Google services with ease, as well as any external REST APIs through the Apps Script URL Fetch Service. Connectors can fetch data but also, and this is the important part, perform all sorts of custom operations before information flows to the report charts. Dataset consolidation, data preparation, information enrichment… you name it!
We have also used service accounts and two different authentication methods to provide a more secure way to access Google Sheets datasets. That has allowed us to build four increasingly complex versions of a modular community connector capable of delivering different filtering strategies based on the email address of the report viewer.
These connectors are built around the fact that, currently, there is no way for them to obtain the viewer’s email address from the Data Studio back end. This absence is probably the result of a deliberate design decision aimed at hindering devious email-harvesting practices. For this reason, connectors need to run under the viewer's credentials. In this way, the underlying script can easily get the corresponding email addresses using standard Apps Script services. This circumstance makes things more involved as far as the proper management of credentials and service accounts is concerned.
Talking about those next steps, data connectors typically only read data. Nevertheless, we could take it up a notch and add logging capabilities, for example, in a spreadsheet or external DBMS, maybe for compliance reasons.
Besides that, several implementation aspects of the community connectors that we have built are suboptimal and deserve some careful attention, for sure:
- Better and more meaningful error control.
- Data/credentials caching.
- More thoughtful use of the Properties Service.
- Auto-detection of data types.
- More robust management of field IDs, including filtering out non-supported characters, duplicate fields, etc.
- Safer access to the sheets inside the spreadsheet using the immutable
sheetIDvalues, instead of their names.
But as someone once said, that's another story and shall be told another time...
Credits: Header image is based on a photo by Buffik on Pixabay.
Comentarios